sweet potato fries

Oven Baked Garlic Paprika Sweet Potato Fries – Paleo, Vegan

baked sp 8

These garlicky paprika sweet potato fries make a glorious side dish when you’re craving carbs, and are my go to snack when I’m craving junk food but want to eat something a little healthier.

baked sp 3

Sweet potatoes are a great source of vitamin A, magnesium, and potassium (which is great) but what really matters is that these sweet potato fries are really satisfying.

I love dipping them into creamy avocado mayo (sometimes with a bit of finely minced garlic mixed in) and they are also good with honey mustard.

baked sp4

Next time your craving junk food, give these sweet potato fries a try. If you’re anything like me, you find that you’ve eaten them all before you know it.

Oven Baked Garlic Paprika Sweet Potato Fries

Makes 2-3 servings

Ingredients

3 small sweet potatoes (the ones I used were 2 inches in diameter and 8 inches in length)

2 tbsp neutral flavored oil (I used avocado oil)

1 1/4 tsp granulated garlic

1/4 tsp + 1/8 tsp granulated onion

1/4 tsp paprika

1/4 tsp dried thyme (optional)

1/8 tsp black pepper

1/4 tsp sea salt


Instructions

1. Preheat the oven to 400 degrees F.

2. Give the sweet potatoes a good scrub and cut each sweet potato into 8 wedges.  Place the sweet potatoes into a large glass baking dish with the oil and toss gently.

2. Stir together the salt, pepper and other spices. Sprinkle the spice mixture over the sweet potatoes and give it all a good mix so that the fries are well coated.

baked sp 9

4. Arrange the sweet potatoes onto the baking dish so that they are in a single layer.

My baking dish was a little too small to fit all of the fries. So for this amount of sweet potatoes I used a 3 qt (9 in. x 13 in.) glass pyrex baking dish and a 9 in. pie plate.

5. Bake for 35 – 40 minutes until crispy and golden brown around the edges.

baked sp 5

Happy Eating!


How to Bake Sweet and Creamy Sweet Potato Fries – with No Added Sweeteners

sweet potato 2

This is one of my favorite recipes and I make it all the time. I love cooking sweet potatoes this way because they become soft and creamy in the middle and almost taste like custard, but the crispy ends taste like toasted marshmallow.

The sweet potatoes are cooked slowly so that it brings out their natural sweetness and this is a great recipe to make when you’re trying to avoid added sweeteners, but still want to have something that tastes like dessert.

Make a big batch, and keep any leftovers in the fridge. They actually get sweeter once refrigerated and are wonderful for snacking during the week. They are delicious on their own, but you can also sprinkle over some cinnamon and nutmeg right before serving and it makes this sweet potato dish even more dessert-like and wonderful.

Sweet and Creamy Sweet Potato Fries

Makes about 3 – 4 servings

Ingredients

2 – 3 sweet potatoes (cut into 1/2 inch fries)

1 tsp of avocado oil (or any neutral flavored oil)*

Notes – * I’ve used olive oil before too and that works great as well. You don’t taste the olive oil flavor very much at all when you cook the sweet potatoes this way, so really any oil that you use will be fine. Coconut oil is nice too, the sweet potatoes taste even sweeter when cooked with coconut oil.

Instructions

1. Preheat your oven to 375 F.

cut raw sweet potatoes

2. Take your sweet potatoes and place them onto a sheet pan or glass baking dish (I prefer using a glass dish for this, as the sweet potato fries do stick a little to the pan and you can use a spatula to scrape any crispy bits off of the glass without having to worry about scratching up a sheet pan).

sweet potato 6

3. Pour the tsp. of oil into a corner of the baking dish and slide each sweet potato fry into the oil and toss them with your hands until well coated.

Place the baking dish into the oven and bake for 55 – 60 minutes until the fries turn a little crispy and golden brown at the edges. In my oven this takes about 57 minutes.

sweet potatoes 5

4. Allow your fries to cool a little before serving.

sweet potato 3

I hope that you love these sweet potatoes fries as much as I do! I’m about to go make another big batch of them, and I can’t wait to eat them.


My Technique / Tips for Cutting Sweet Potatoes

cutting sweet potatoes

Sweet potatoes are one of my favorite vegetables, and they are super versatile. You can use them to make mini sweet potato pies, or sweet potato muffins (they taste like pumpkin bread), and they also taste great when sautéed with some onions, garlic and a drizzle of olive oil.

The one down side about sweet potatoes is that they can be very difficult to cut. They tend to roll around on the cutting board, and trying to cut them with a chef’s knife (even a very sharp one) can become a pretty risky situation fairly quickly.

Here’s the technique that I use to make cutting sweet potatoes a little easier.

You will need:

– a paring knife

– vegetable brush

– knife sharpener

– cutting board

– clean dish cloth or paper towel

Instructions

1. Give your sweet potatoes a good scrub with the vegetable brush and dry them off thoroughly with the dish cloth or paper towel. You want your sweet potatoes to be as dry as possible so that they don’t slip around on the cutting board. Set the sweet potatoes aside.

2. Sharpen your paring knife.

I have a little handheld knife sharpener (which isn’t the best, but gets the job done) and I run the paring knife through the carbide blades about 50 times and the ceramic rods about 30 times (if you have a better knife sharpener you probably won’t have to spend as much time sharpening your knife). Wash your knife with a little dish soap and carefully dry off the blade and the handle of the knife. You’ll also want to dry off your hands at this point so that you can get a good grip on the sweet potato while you’re cutting it.

You probably don’t need to sharpen your knife every time you cut a sweet potato, but it is a good idea too if you can. A sharp knife makes everything a little safer.

I also like using a paring knife over a chef’s knife for cutting sweet potatoes because it has a smaller blade, which means that there’s less force acting against your knife when you’re making your cuts.

3. If you want to peel your sweet potatoes, go ahead and do that now, but I usually keep the skin on the sweet potato just as a preference because it makes the sweet potatoes easier to grip when cutting.

Hold the left side of the sweet potato firmly with your left hand and then slice about 1/2 inch off from one end of the sweet potato, turn it 180 degrees, and then slice 1/2 inch off the other end.

From there you can cut up your sweet potato any way you like. I normally make sweet potato fries because they are easy to make, and make a great side for lunch or dinner.

To cut fries – hold the sweet potato firmly on the cutting board with your left hand, then place the blade of the paring knife perpendicular to the sweet potato so that the point of the blade goes straight into the middle of the sweet potato.

Once the blade is about an inch to an inch and a half into the sweet potato, (while still holding the sweet potato firmly against the cutting board with your left hand) with your right hand begin to push on the handle of the paring knife so that while you’re pushing the blade into the sweet potato, the blade also rotates all the way down and eventually becomes parallel to the cutting board, slicing through one half of the sweet potato.

Pull the knife out of the sweet potato and turn the sweet potato 180 degrees, and repeat so that the sweet potato is sliced in half and you have 2 halves of a sweet potato that you can lay flat on the cutting board.

4. Repeat this same motion (press the blade perpendicular into the sweet potato, rotate blade down and slice through), when making the rest of your cuts.

I like to cut my sweet potato fries 1/2 inch thick, and here’s how I cook them so that they get extra sweet without any added sweeteners.

To cut rounds – for if you want to use the sweet potato rounds as bases for veggie pizzas, press the blade about 1 inch into the sweet potato and press down while you rotate the sweet potato with your left hand until you end up with a little round of sweet potato.

cut raw sweet potatoes

I hope that these tips help make cutting sweet potatoes a little easier for you. If you also love eating sweet potatoes, let me know in the comments below how you like to cook them. It would be cool to see how other people like to cook them as well.

fudgy chocolate frosting

The Fudgiest Sweet Potato Chocolate Frosting – Dairy Free, Refined Sugar Free, Vegan

Fudgy Chocolate Frosting

This fudgy chocolate frosting works great over my Chewy Sweet Potato or Adzuki Bean Brownies, and it’s delicious enough that you can eat it by itself with a spoon. It tastes better than any store brought chocolate frosting, and it’s refined sugar free and dairy free.

It’s stable enough of a frosting that you can pipe designs with it and give cupcakes or brownies a little extra joy and decoration if desired.


The Fudgiest Sweet Potato Chocolate Frosting

Makes 1 cup (enough for 1 batch of brownies)

Ingredients

4 1/2 tbsp cocoa powder (25g)

1/4 cup oat flour (27g)*

1/2 tbsp ground chia seed (about 2.5g)

level 1/4 tsp sea salt


1/4 cup water

level 1/4 cup mashed roasted sweet potato

1/4 tsp vanilla extract

1/4 cup + 1 tsp maple syrup

5 tbsp melted coconut oil


Notes – * I grind oats into oat flour using a blender. Don’t grind the oats in a food processor because the flour won’t be fine enough.

Any extra oat flour I don’t use in the recipe goes into an airtight container and I use it for another recipe.

If you’re making this recipe for someone who has celiac disease, use certified gluten free oats, as the oats from the bulk bins can sometimes be processed on the same equipment as wheat.


Instructions

1. Add all the ingredients to a food processor and blend until smooth. Transfer to a bowl and gently heat over a double boiler and stir until glossy.

If eating with brownies, spread the frosting onto the brownies while the frosting is still warm and glossy. If you frost the brownies while the frosting is still warm, then the frosting will stay glossy when it cools and sets.

If you want to use this frosting to pipe flowers or designs, then the frosting needs to cool to room temperature before you transfer it into a piping bag. You can make this frosting in advance if needed and keep it in the fridge, and either heat it very gently and quickly over a double boiler, or let it sit a room temperature until softened before piping.


The Best Chewy Sweet Potato (or Adzuki Bean) Brownies – Gluten Free, Dairy Free, Refined Sugar Free, Vegan

sweet potato brownies

This is one of my best recipes.

These brownies are the brownies of dreams. They have a rich, deep chocolate flavor, but are not too dark or too sweet, and they taste like the best brownie you’ve ever had.

I came up with this recipe one day when I needed to use up some extra sweet potatoes that I had in the fridge. Somehow this recipe came together so quickly (and I worked perfectly the first time!), and taking the first bite of these brownies made my heart sing. I couldn’t believe how good they were, and they were vegan! And made from leftovers!

The cool thing about this recipe is that you can also make them with adzuki beans (if you have any leftover red bean soup).  They actually turn out slightly chewier when made with adzuki beans rather than sweet potatoes, but both kinds of brownies are fantastic.

With brownies, most people fall into two camps – chewy, or fudgy. These brownies are the perfect marriage between the two, because the actual brownies are wonderfully chewy, and the frosting is gloriously fudgy.

They don’t need the frosting, as they taste good enough without it, but a little frosting never hurt a good brownie.


The Best Chewy Sweet Potato (or Adzuki Bean) Brownies

Makes 9 brownies

Ingredients

1 tbsp ground chia seed (5g)

¼ cup + 1/8 cup hot water


1 cup of oat flour (90g)*

5 tbsp + 2 tsp cocoa powder (34g)

½ level tsp baking soda

½ level tsp + 1/8 tsp ground coffee (I used Starbucks Italian Roast Ground Coffee, which is also Fair Trade Certified, which makes it extra cool)

½ level tsp sea salt


2 tbsp apple cider vinegar

1 tsp of vanilla extract**

level ½ cup mashed roasted sweet potato (if using adzuki beans use ½ cup + 3 tbsp drained cooked beans instead of the sweet potato)

½ cup maple syrup

¼ cup + 1/8 cup melted coconut oil


Notes – for best results, please measure the dry ingredients by weight.

* I grind oats into oat flour using a blender. Don’t grind the oats in a food processor because the flour won’t be fine enough.

Any extra oat flour I don’t use in the recipe goes into an airtight container and I use it for another recipe.

If you’re making this recipe for someone who has celiac disease, use certified gluten free oats, as the oats from the bulk bins can sometimes be processed on the same equipment as wheat.

**If you run out of vanilla extract ( and it’s been the kind of day where you really need a brownie) have no fear, these brownies still taste amazing without it. So go forth, and bake with a light heart.

sweet potato brownies 2.jpg

Instructions

1. Stir together the ground chia seed and hot water. Let sit for 10 minutes until thickened.

2. Add the cocoa, oat flour, salt, coffee and baking soda into the food processor and give it a quick blend so that everything is well combined.

3. Add the rest of the ingredients to the food processor and blend until smooth.

4. Turn the oven to 350F and let the mixture sit in the food processor for 15 minutes. Then give it one final blend for about 30 seconds and then spoon the mixture into a glass 8×8 inch baking dish that you’ve oiled and floured with coconut oil (or a neutral oil like avocado oil) and a bit of oat flour.

Take a spatula and smooth the brownie batter out so that it’s sitting evenly in the baking dish.

5. Bake the brownies at 350F for 70-75 minutes until the brownies pull ¼ inch away from the pan on all sides.

Allow to cool completely (at least an hour for the best texture), frost with fudgy sweet potato chocolate frosting if desired, and then cut into 9 square pieces. Serve and enjoy!

I hope that you love these brownies as much as I do, and if you’re having a tough day, I hope that these brownies make it just a little bit better and brighter.  🙂

frozen lemons

What To Do With Leftover Lemons – How To Freeze Lemons

P1060487- edit 2

Lemons tend to be expensive. A single organic lemon can cost in the neighborhood of $1.30 – $1.70 depending on the store, so it’s usually a cheaper option to buy the 2 lb bag of organic lemons for about $5 instead.

This means that I usually end up with a bag of lemons when I only needed 1 or 2 of them.

If you’re ever in this pinch and trying to figure out what to do with the rest of your lemons before they go bad, then freezing them is a really good option.

I wash the lemons, then juice them and pour the lemon juice into an ice cube tray. Once frozen, pop the lemon juice cubes into a zip top bag and stash them in your freezer until you’re ready to use them. The lemon juice cubes melt quickly and are a great way to always have lemon juice always on hand. I used an ice cube tray from daiso, which just happens to make smaller ice cubes, but a normal ice cube tray will work just as well.

I add the lemon juice cubes to tea, or to chicken soup with brown rice and quinoa, or quinoa tabbouleh.

You can freeze the lemon rinds as well in a separate zip top bag, and grate them from frozen on a microplane to add lemon zest to your dishes.

When I have a cold, I’ll toss a few of the frozen lemon rinds into a pot and boil them with some water, ginger, turmeric, black pepper, a tablespoon of coconut oil, and honey for a soothing tea.

However you use your frozen lemons, I hope that this trick brings you many happy lemony dishes!

Nian Gao (Chinese New Year Cake with Red Bean Paste) – Dairy Free, Refined Sugar Free

P1080469-2

Nian Gao is a very traditional dish for Lunar New Year.

The word for “sticky” in Mandarin is a homonym for the Mandarin word for “year” so it’s considered good luck to eat nian gao, or “year cake” at Lunar New Year.

This recipe tastes identical to the version that my mom made when I was growing up, but is dairy and refined sugar free.

If you’ve never had nian gao before, think of it as basically a big baked mochi that’s slightly crisp on the outside and chewy in the middle with little pockets of sweet red bean filling.

Doesn’t that sound amazing?

This recipe is very simple to make. It’s basically pour everything into a bowl, stir and bake for a little more than an hour.

When I made a test batch I thought that it would be enough for 4-6 servings, but it’s so good that it was polished off very quickly. So, really, it will probably serve more like 2-3 people, so make extra if your family members are big eaters like mine are.

Nian Gao Recipe (Year Cake)

Adapted from this recipe

Makes 4-6 servings

Ingredients

1/4 level tsp + 1/8 level tsp baking soda

8 oz of sweet rice flour (I used the Koda Farms Mochiko Sweet Rice Flour)

1 egg + 1/2 an additional beaten egg (about 3 tbsp)*

5 tbsp melted coconut oil**

1/2 cup maple syrup

1 cup water

Red Bean Paste Filling

1/4 cup maple syrup

1 1/2 cups drained red beans ***

*You can replace the 1/2 egg with 1/2 tbsp ground flax seed and 3 tbsp hot water. Let the mixture stand for 10 minutes before using.

**There is the tiniest hint of coconut flavor from the coconut oil, but most people probably won’t notice. If you can’t stand coconut, you can used refined coconut oil instead. I like the Trader Joe’s one because it’s filtered to remove the coconut flavor instead of being bleached.

*** This recipe uses a lot of the red beans from the red bean soup, so if you’re planning on serving red bean soup for Lunar New Year, I would recommend making an extra batch of red bean soup just to use for the red bean filling in this Nian Gao recipe. You probably have some soup left over which you can send home with guests so it will all be eaten and people will go home happy.

Instructions

1. Preheat the oven to 350.

Grease your baking dish with either coconut oil, or a neutral flavored oil, and flour it with a few tbsp of sweet rice flour and set it to the side.

2. Stir together the 1/4 cup of maple syrup with the red beans. Use the back of a spoon to smush about 1/3 of the red beans against the side of the bowl. This took me about 20-30 seconds. You want some texture in the red bean paste when it’s baked, and some bits that are a little smooth.

3. In medium sized bowl, stir together the baking soda, sweet rice flour, melted coconut oil, egg (and the flax egg), 1/2 cup of maple syrup, and water. Stir until smooth.

4. I used a 8.5 x 11 inch oval casserole dish, but you can bake it in whatever size dish you have, just as long as the batter is an inch thick in the baking dish.

The nian gao batter plus the red bean filling is 4 1/3 cups in volume. If you want to see if your baking dish will work for this recipe, pour 4 1/3 cups of water into the baking dish and see if the layer of water is 1 inch deep. If it is, then that baking dish should work for this recipe.

Scoop 1 1/2 cups of the nian gao batter into the baking dish so that the batter covers the entire bottom of the dish. Spoon over the red bean filling into puddles all over the batter, this doesn’t need to be perfectly even, in fact it’s better if it isn’t as the nian gao will hold together better if there isn’t a smooth layer of red bean filling separating the top and bottom of the batter.

P1080449

Spoon over the rest of the remaining batter and use the back of your spoon to slightly swirl the batter and red bean filling.

P1080456

5. Bake at 350 for 1 hr and 15 minutes until golden brown on top and a toothpick comes out clean. It will be slightly crispy on top.

Allow the nian gao to cool to room temperature before cutting and serving.

If you don’t want to bother with the red bean filling, you can make the cake without it. I’ve only made it with the red bean filling, but if you make the nian gao without it, it will take less time to bake.

I would bake it at 350 and start checking to see if it’s done after 30 minutes. Other nian gao recipes that I’ve seen online without red bean filling seem to take about 45-60 minutes in the oven.

nian gao picture

Happy Lunar New Year!


Oat Flour and Brown Rice Tortilla Chips

Oat Flour and Brown Rice Tortilla Chips – Gluten Free, Dairy Free, Vegan – Tostadas

P1070082

When I first went gluten free I really missed having something crunchy to dip into hummus, or top with egg salad like a cracker.

When I came up with this recipe I found that it checked lots of carb-y, crunchy boxes.

You can eat these chips with guacamole or hummus. You can mix flax seeds and chia seeds into the dough to make multigrain crackers. For cheesy herby crackers, you can add some granulated garlic, parsley, oregano, and nutritional yeast into the dough and they bake up a treat.

Another thing that you can do with this dough is make tostadas. The tostadas bake up super crunchy and you can top them with anything that makes your heart happy.

I tried making tortilla chips and crackers in all kinds of ways before I came up  with this recipe, but it turns out that leftover brown rice was the key to making a great crunchy oat flour tortilla chip.

If you have leftover brown rice in the fridge, this is a perfect way to use it up. Making these chips / crackers are also so much cheaper than buying gluten-free crackers in the store, and I promise that they taste so much better. And if you can’t tolerate corn chips, this recipe is a great alternative. These chips also go great with my creamy lemon garlic black bean dip.

Brown Rice and Oat Flour Tortilla Chips (Baked)

Makes 10 chips (about 1 generous serving)

Ingredients

1/3 cup cooked short grain brown rice

1/3 cup oat flour

½ tsp olive oil

pinch of salt

1 -1 ½ tsp water


Instructions

1. Preheat the oven to 350 F.

2. Add all the ingredients into a bowl and mash the brown rice into the oat flour with the back of a fork. Squeeze the mixture together in your hands so that the rice incorporates into the oat flour and forms a nice dough. If the dough feels a little dry, add a little water to the dough. If the dough feels too sticky, add a little more oat flour.

3. Divide the dough into 10 equal sized pieces and roll each piece of dough into a ball .

Wet you hands lightly press each ball of dough into a 1/8 inch thick disk onto a silicone baking mat. The mixture won’t spread so the chips can be baked close together as long as they don’t touch.

4. Bake for 15 minutes, then take the chips out of the oven and use a spatula to flip over each chip. Bake for another 15 minutes until crisp.

Let them cool on the silicone baking mat for about 10-15 minutes. They will crisp up even more as they cool.

You can also use this same mixture to make about 3 tostadas about 4-5 inches in diameter (1/8 inch thick). Bake the tostadas for 15 minutes per side at 350 until crisp.

Vanilla Extract

Kitchen Tip – Easy Way To Get The Cap Off A Vanilla Extract Bottle

vanilla


If you’ve ever known the struggle of baking cookies and not being able to get the little cap off of the vanilla extract bottle, this one’s for you.

Here’s the secret –

Wrap a few thin rubber bands around the cap of the vanilla extract. The rubber bands make the smooth metal of the cap easier to grip. The bottle of extract should be a breeze to open after that.

I use the rubber bands that come wrapped around vegetables like kale, or green onions, or bunches of cilantro or parsley. It’s a thrifty solution, and makes baking with vanilla extract much much easier.

This idea for this came to me when I was testing the recipe for the maple vanilla sugar cookies. For a moment I was concerned that I was not going to be able to get the cap off of the bottle of extract, and I actually thought for a second “Do I really need vanilla in this recipe?”

The answer was “Yes. You do need vanilla in maple vanilla sugar cookies.” So I had to come up with a solution pretty quickly, and here we are!

I hope that this kitchen tip helps you to never again be held back from your baking dreams by another difficult to open vanilla extract cap!

Happy Baking!


blueberry muffins

The Best Gluten Free Blueberry Muffins Recipe – Made with Oat Flour – Gluten Free, Dairy Free, Refined Sugar Free

I love blueberries, and I also love blueberry muffins. It’s hard to find someone who doesn’t love them.

P1080289

Lots of us have fond memories of baking them with our families, and there is just something incredibly comforting and nostalgic about them.

A good blueberry muffin is one of the things that I most wanted to eat when I went gluten free, and I’m so glad that I finally came up with a recipe for them!

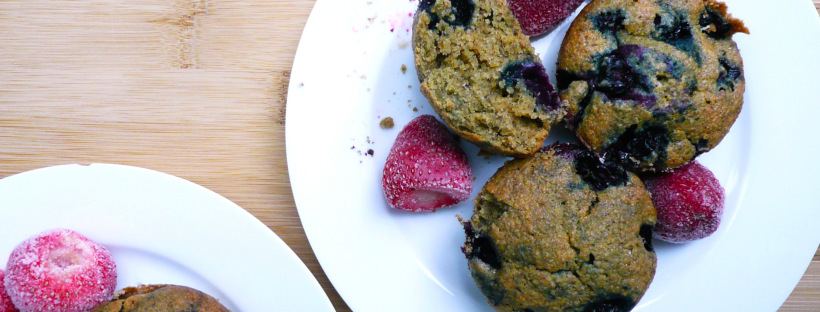
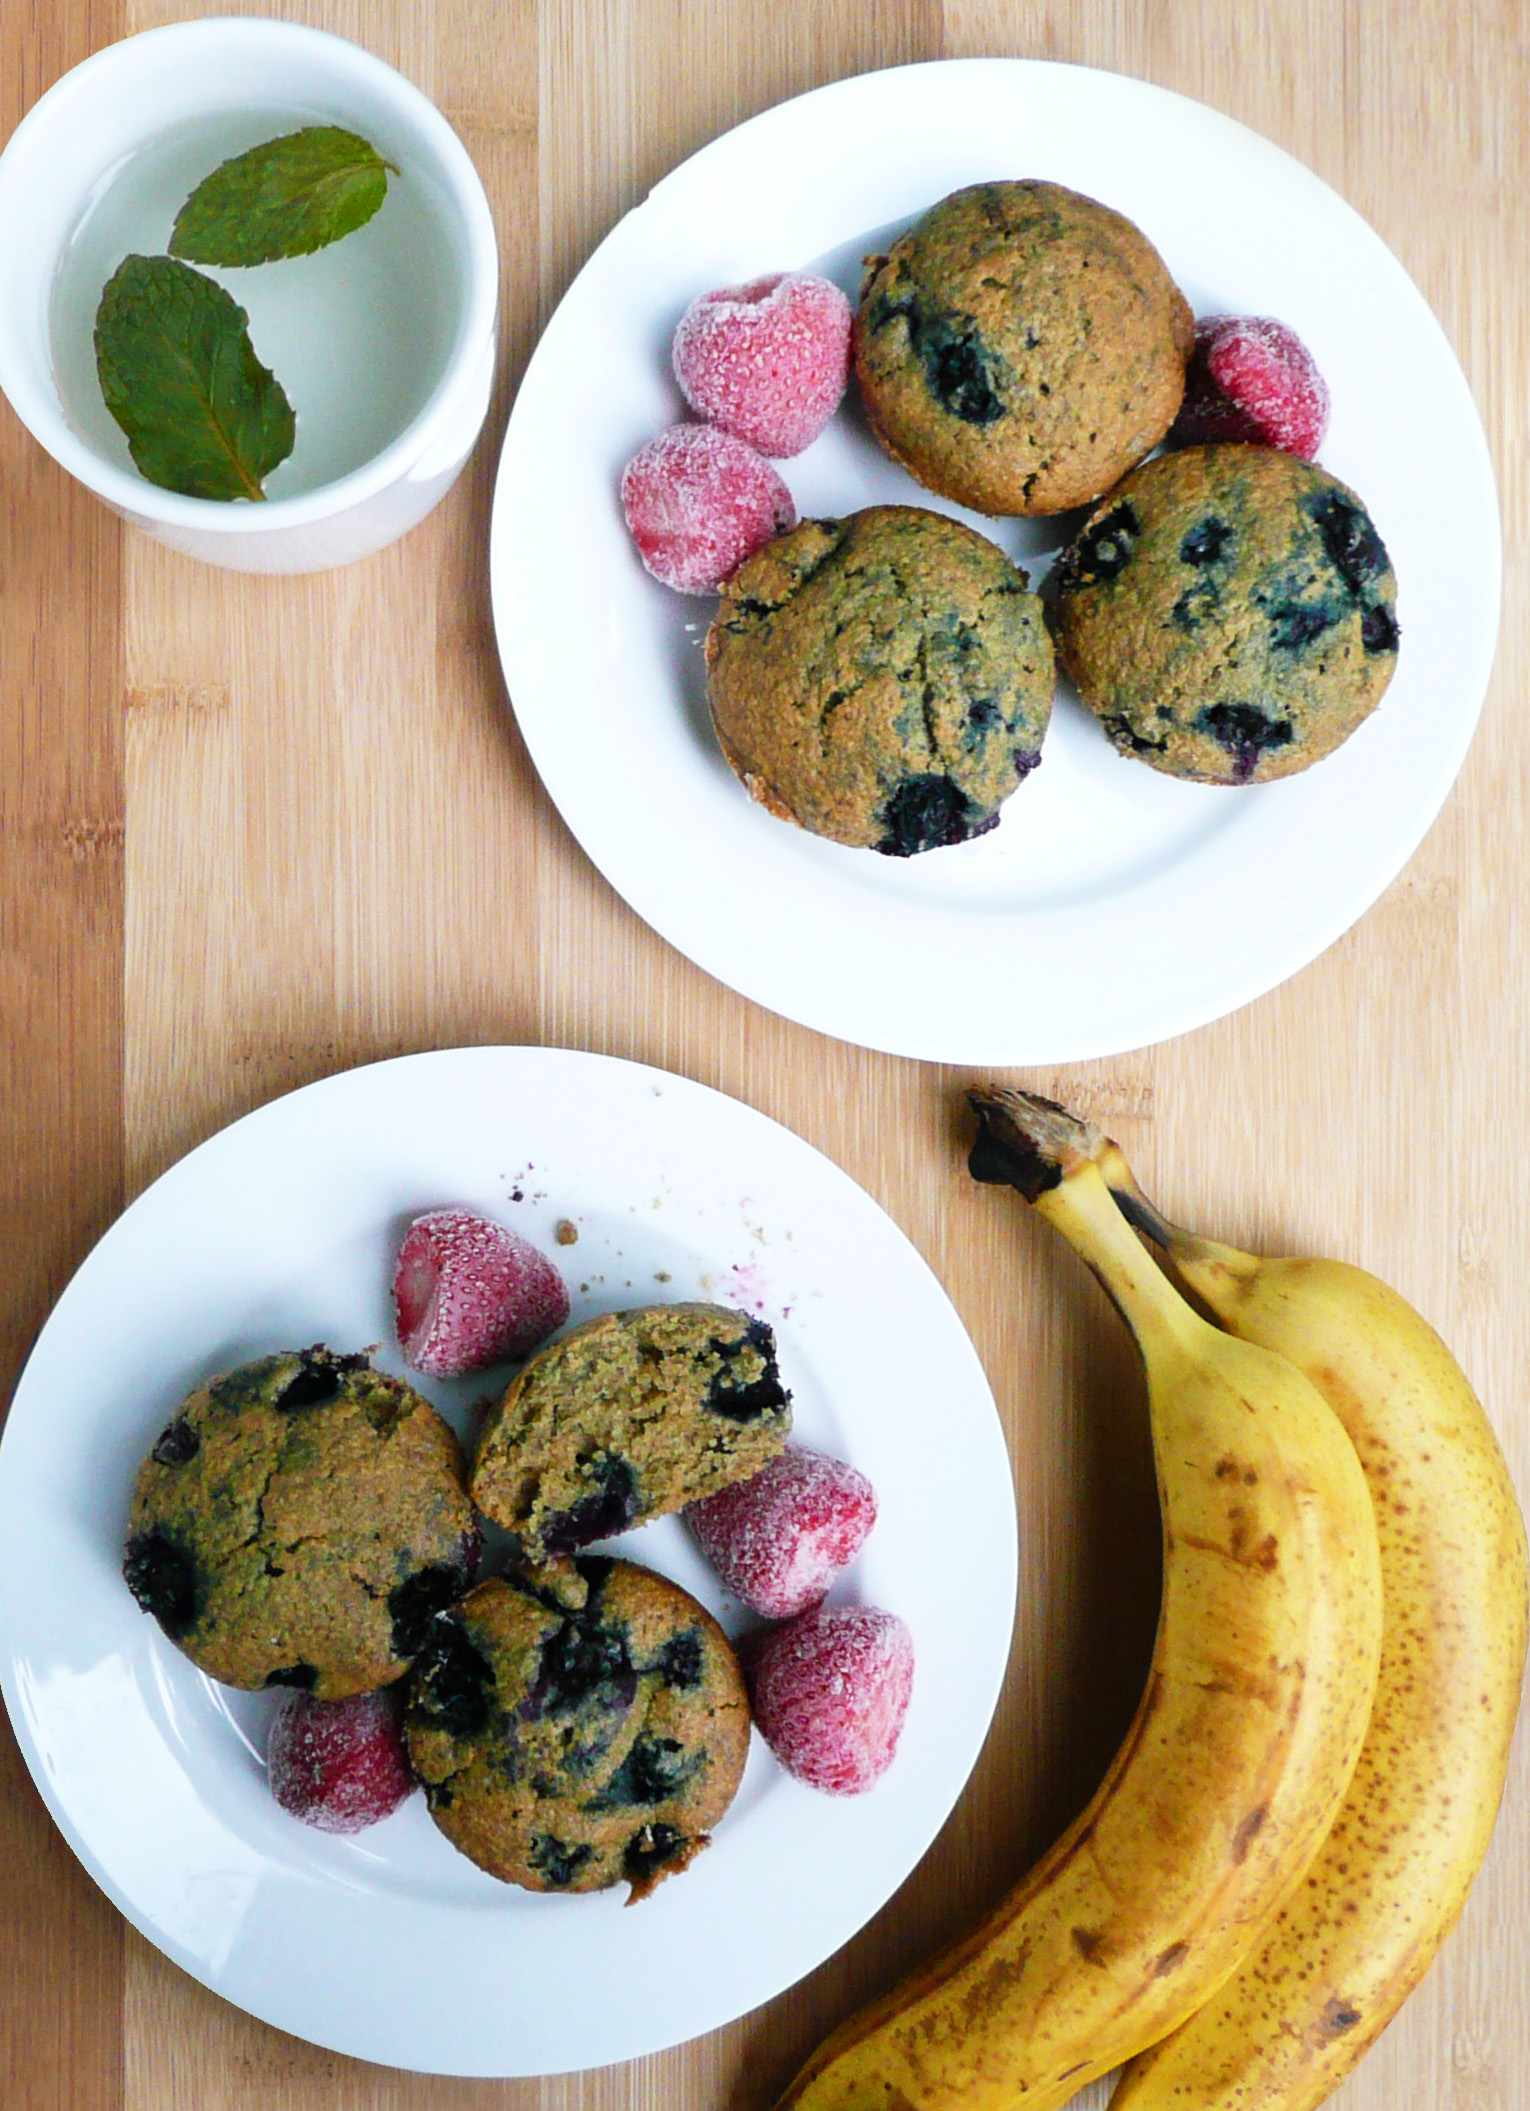
These delicious blueberry muffins are made with oat flour, and taste just like the muffins that you remember eating when you were a kid.

They are such a treat, and there’s nothing like biting into a freshly baked blueberry muffin on a cold morning with a hot cup of tea.

P1080248

Heaven.

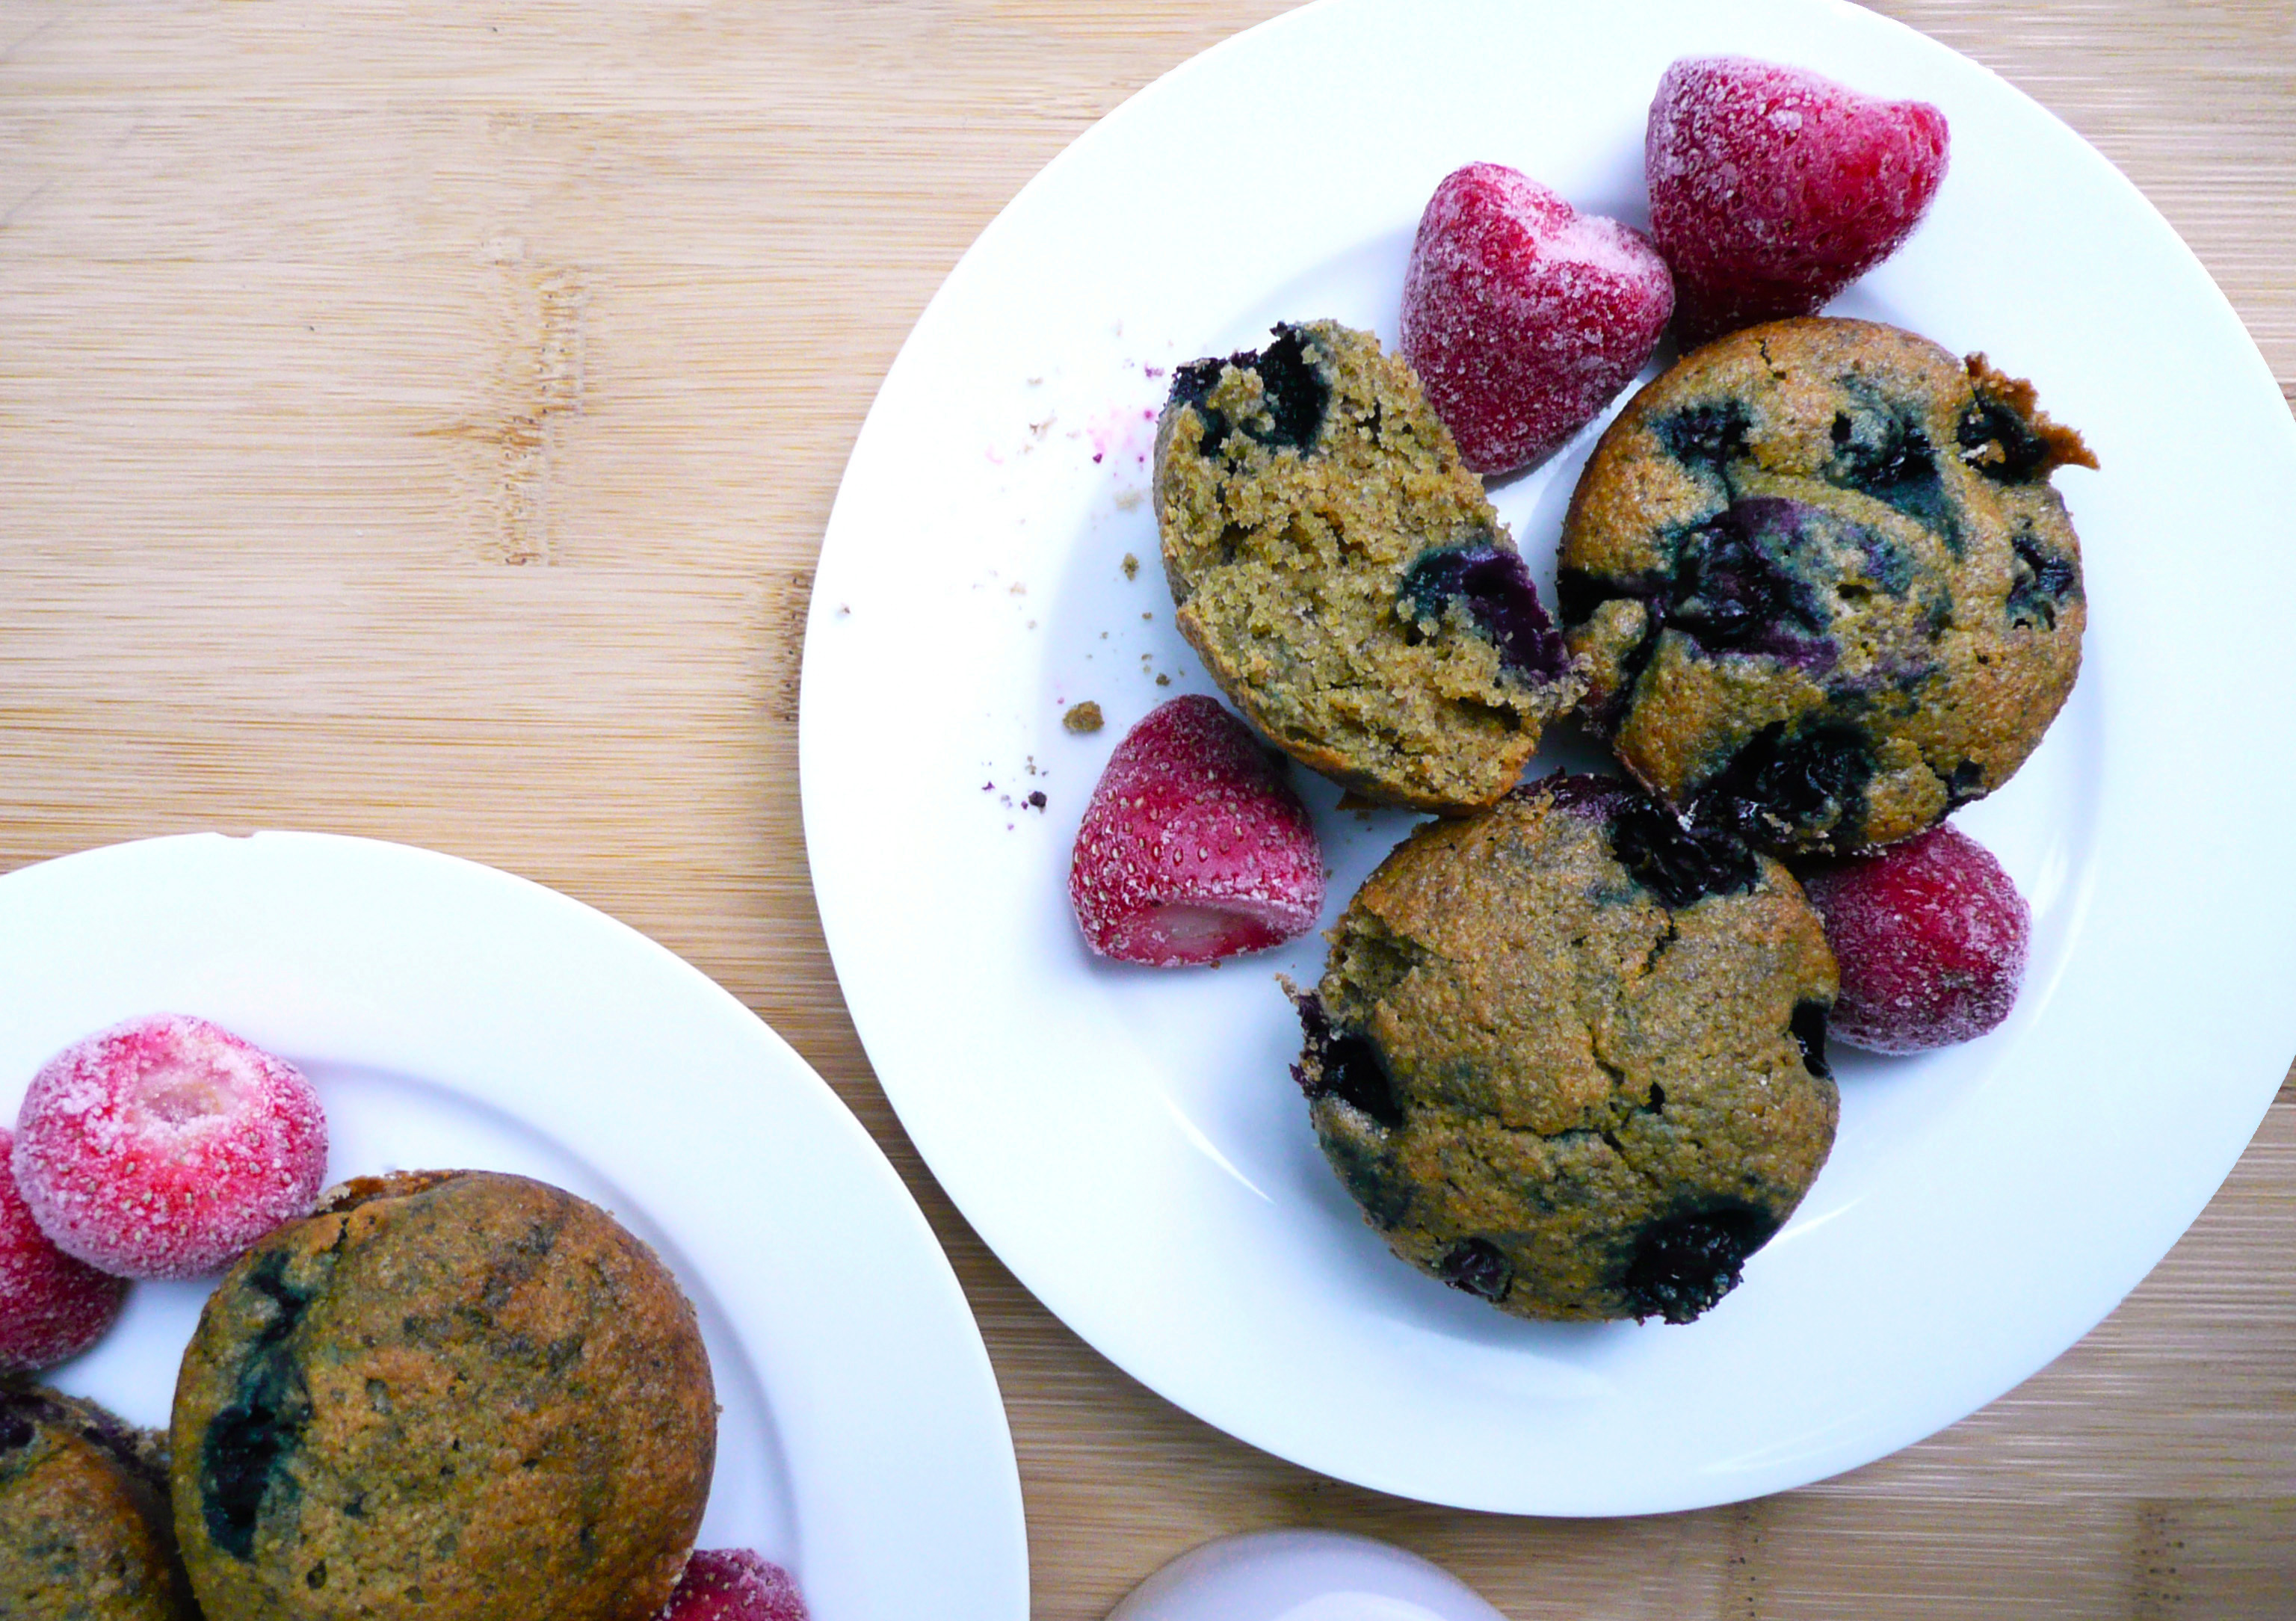
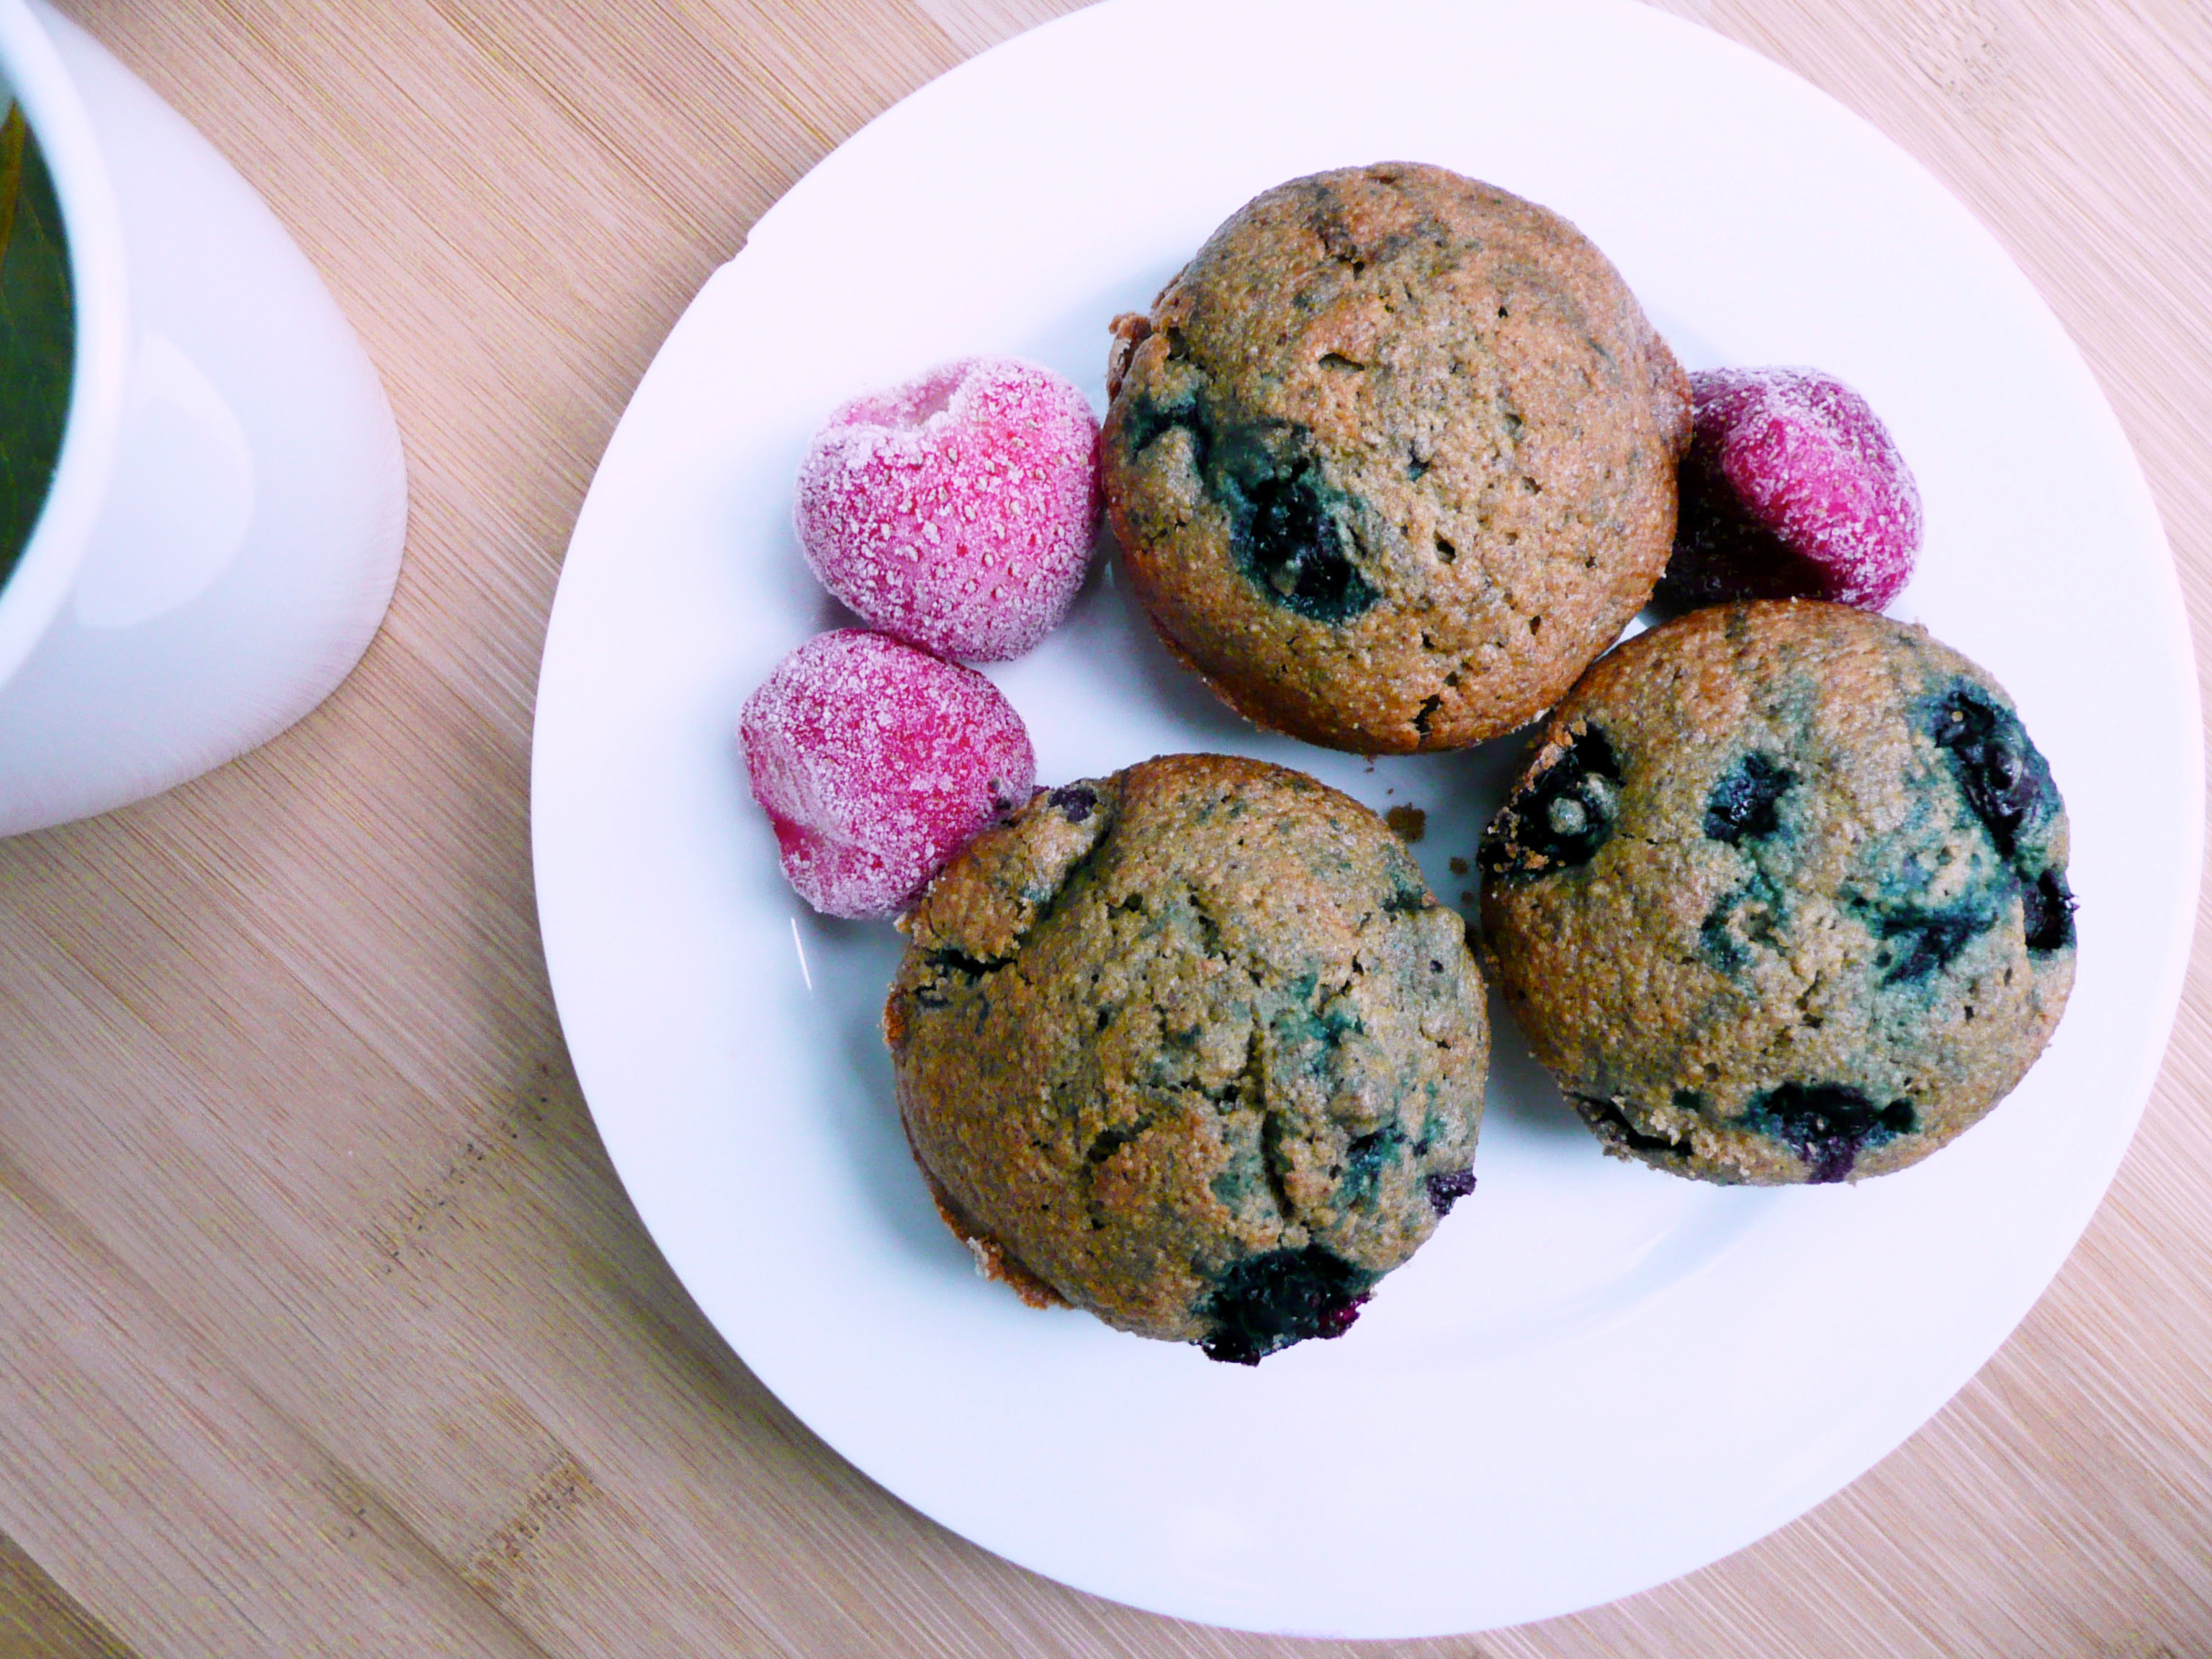
These blueberry muffins taste amazing, and are so good that you won’t believe that they are gluten free, refined sugar free, and dairy free.

They have a really great texture, just like a normal muffin, and aren’t gummy or funny textured at all.

P1080244

They use coconut oil instead of butter, but they don’t taste like coconut at all. They are perfectly sweet, and the bright flavor of the blueberries really shines through each delicious bite.

You won’t miss gluten / dairy muffins after you eat one of these, promise.

I hope that you give them a try!


The Best Gluten Free Blueberry Muffins

Makes 8 muffins


Ingredients

1 1/3 cup of oat flour (135g) *

½ level tsp of baking soda

1 ½ tbsp ground flax seed (6g)

tiny pinch of salt


¼ cup water

1/8 level tsp of psyllium husk powder**


1/3 cup + 1 tbsp maple syrup

2 tbsp of apple cider vinegar

1/3 cup melted coconut oil***

1 egg


1 cup of blueberries – I used frozen, but fresh will work too.


* For the best results, measure out the oat flour and ground flax seed by weight on a digital scale.

I grind rolled oats in a blender until I have a pretty fine flour. Don’t use a food processor for this as the flour won’t be fine enough. If I have any extra flour, I just put in into an airtight container to use for another recipe. I grind the flax seeds using the same method.

** If you don’t have the psyllium husk powder, you can just omit it. Just add the water in with the rest of the liquid ingredients. The muffins will still turn out well, just slightly more crumbly.

*** The coconut oil makes the muffins more solid at temperatures below 76 degrees, but you can heat them up in a toaster oven at a low temperature and they will become soft again. If you want the muffins to be soft all the time, you can probably substitute a neutral flavored oil that’s liquid at room temperature for the coconut oil.


Instructions

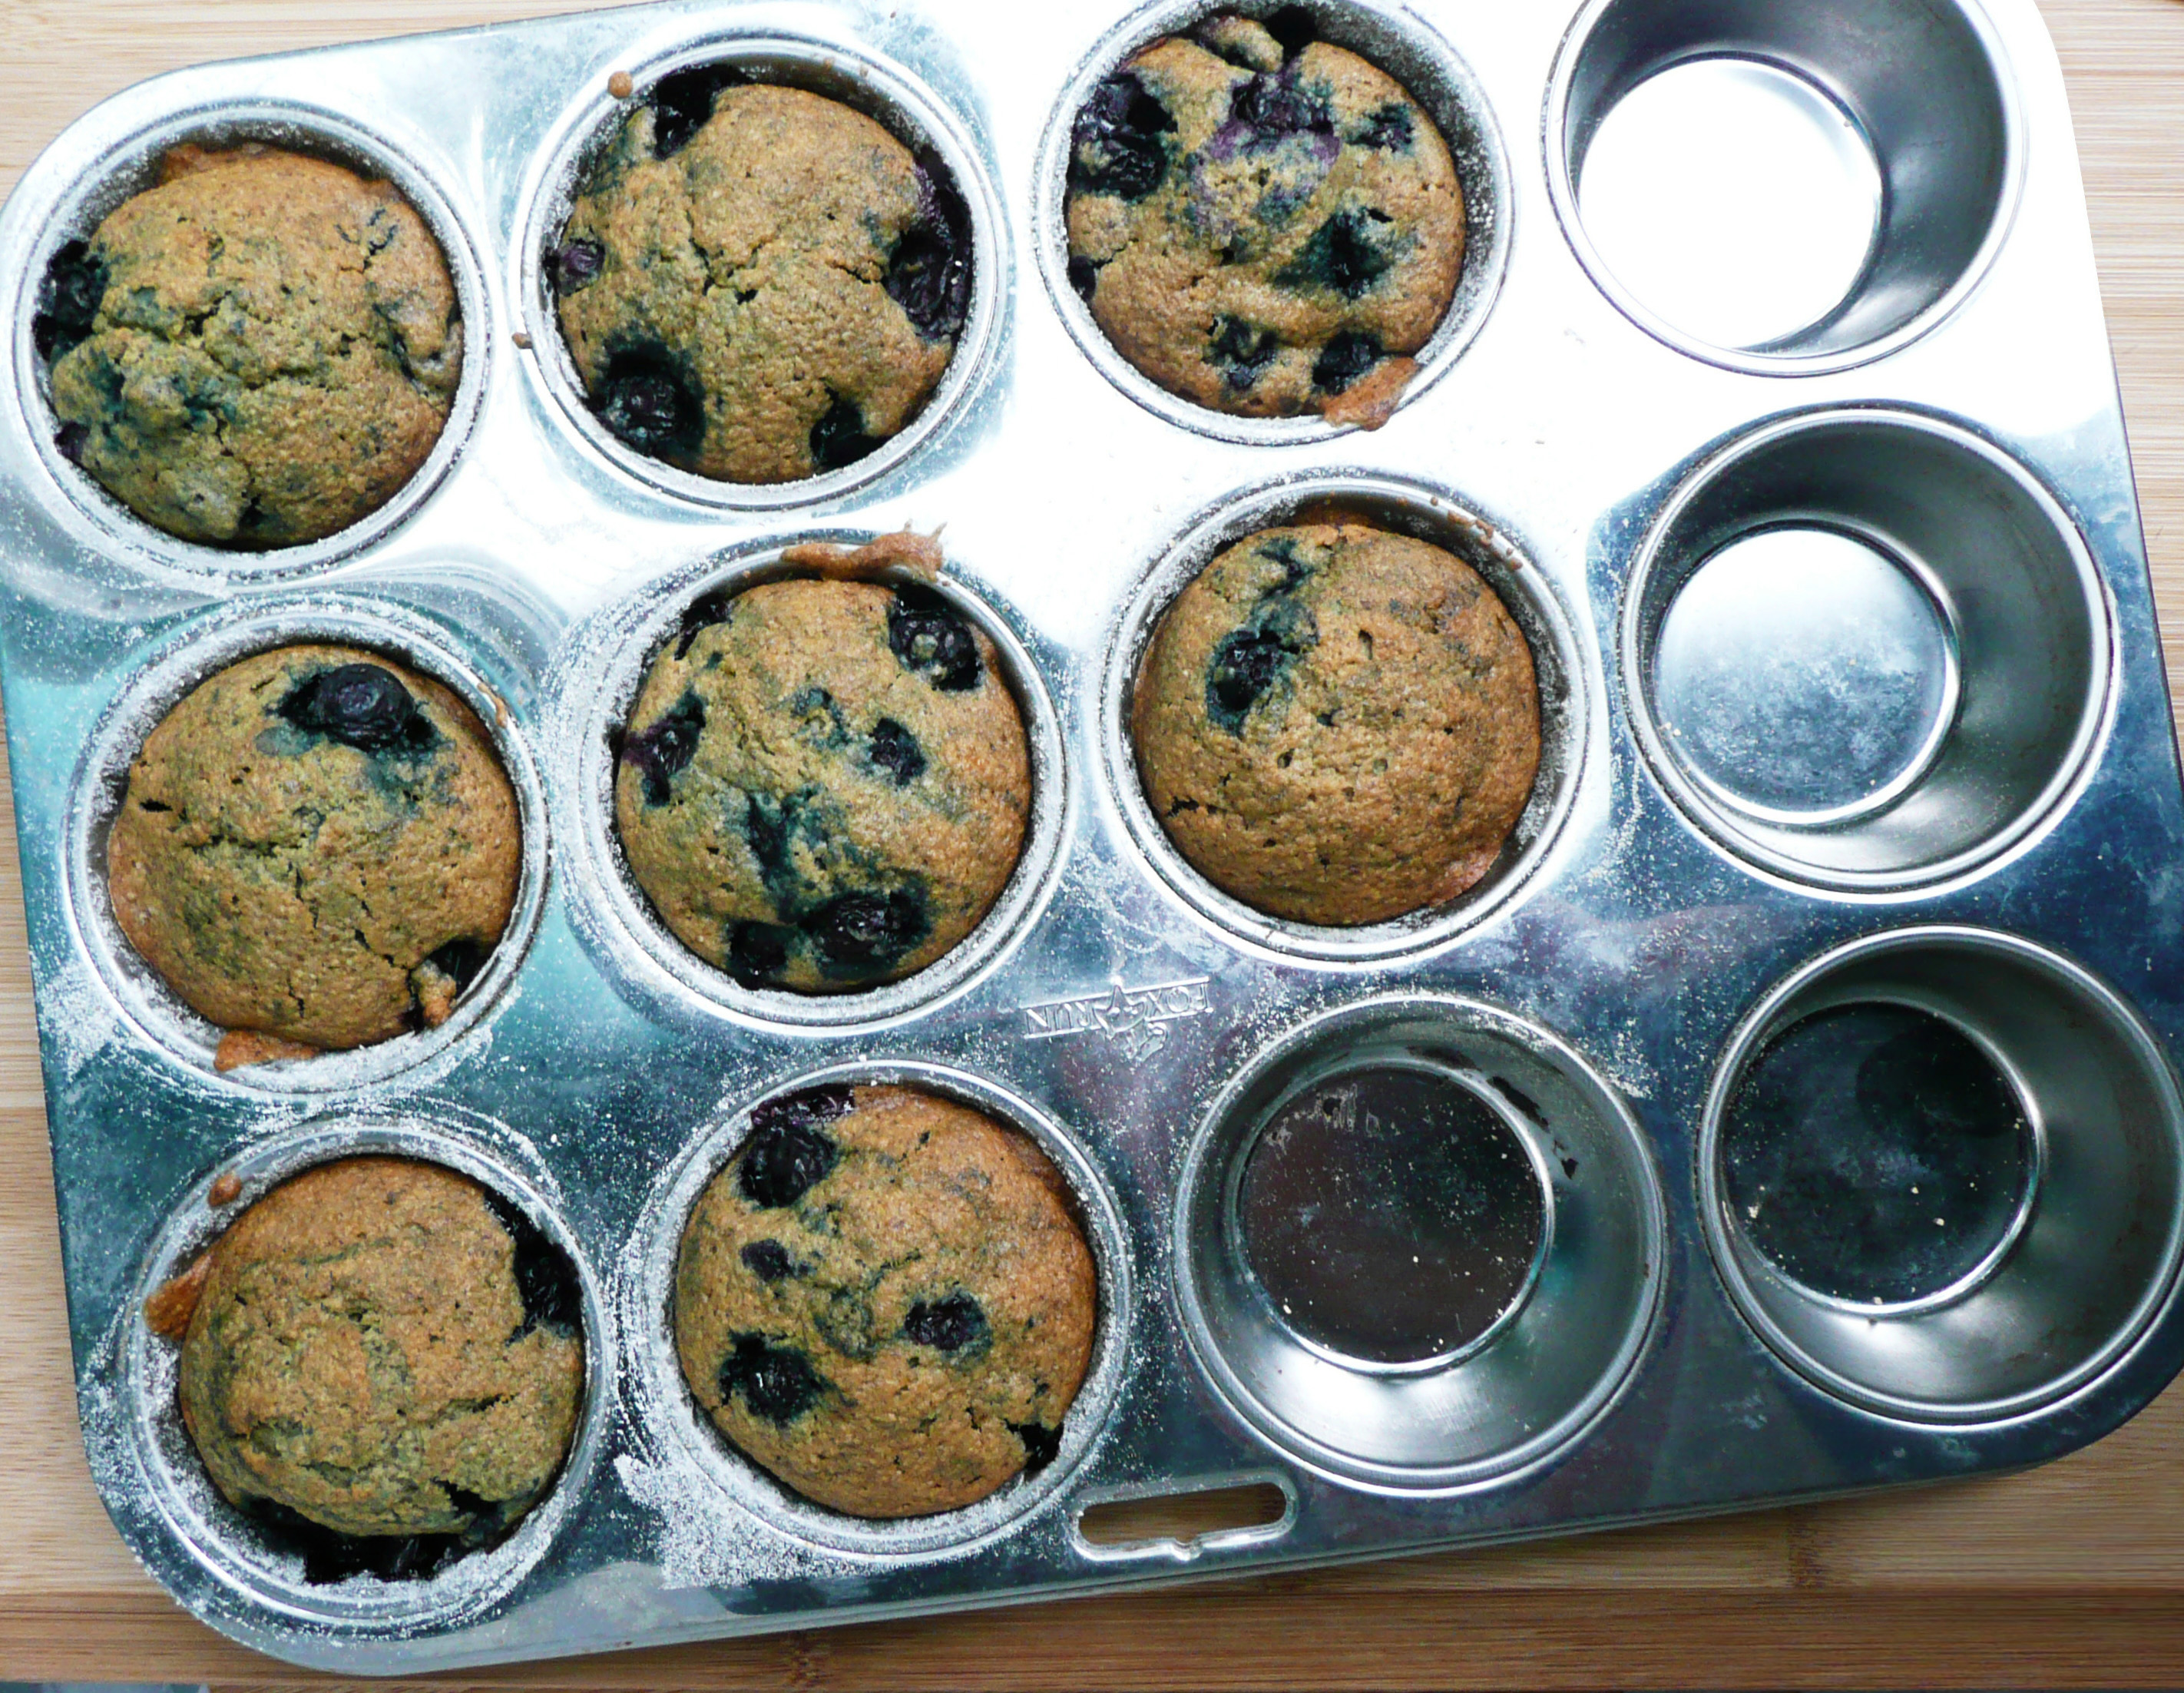
1. Grease and flour 8 of the wells in your muffin pan with some coconut oil and oat flour, or you can skip this step and just pop 8 muffin liners into the muffin pan.

2. Mix together the water and psyllium husk powder in a small bowl, and set aside the bowl aside for 5 minutes to allow the psyllium husk to gel.

3. In a large bowl sift together the oat flour, baking soda, salt, and ground flax seed.

4. In a separate medium sized bowl beat the egg, and add in the maple syrup, apple cider vinegar, and the psyllium husk mixture and stir until well combined.

5. Add the melted coconut oil to the flour mixture and give it a good stir. Add in rest of the liquid ingredients to the muffin batter and stir until well combined.

6. Set a timer for 15 minutes and let your muffin mixture rest.

7. Preheat your oven to 350.

8. When the timer goes off, put your blueberries into a sieve and using your snap mesh tea strainer (or you can use another sieve or even a tablespoon) to sift oat flour over your blueberries until they are well coated in the oat flour. Shake the berries in the sieve to get any excess oat flour off of them.

Coating the berries in the oat flour makes it so that the berries don’t sink to the bottom of the muffins while as they bake.

9. Fold the blueberries through your batter (try not to stir the mixture too much, as too much mixing will cause the frozen blueberries to turn the muffin batter purple), and divide the batter equally amongst the 8 muffin wells.

One note about this, because we’re using coconut oil and the berries are frozen, the batter will seize up on you because coconut oil turns solid under 76 degrees F (24 C). If the berries are fresh you shouldn’t have this problem, but it’s fine.

Just do the best you can to divide the batter up as equally as possible, and don’t worry if the mixture looks lumpy when you put the muffins into the oven. The muffins will smooth out in the oven and will bake up beautifully.

9. Pop the muffins into the oven, and bake for 25 minutes, turning the muffins 180 degrees after they’ve been in the oven for 13 minutes. You don’t have to do this, but it helps the muffins to bake more evenly.

Some of the muffins will look like they are baking more quickly than others. Don’t worry about this as they will all bake up evenly at the end.

11. After the 25 minutes, turn the oven temperature up to 375, and turn the muffin pan by 90 degrees. Allow the muffins to bake for another 10 minutes until they are golden brown.

If you test the muffins with a toothpick, it should come out pretty clean with just a few crumbs here and there.

Allow the muffins to cool in the pan for 30 minutes. Run a knife around the edge of each muffin and pop them out onto a plate and serve.


P1080263

Happy Eating!