Creamy Garlic + Rosemary Dip – Paleo, Vegan Friendly, Dairy Free

garlic rosemary dip 2

Sometimes eating vegetables can be a little less than exciting. Eating should be a pleasure. You want to have something that has a lot of flavor and be so delicious that you crave eating it the next day.

For me, this dip is the answer to getting myself to eat a big serving of vegetables, and to do so very happily.

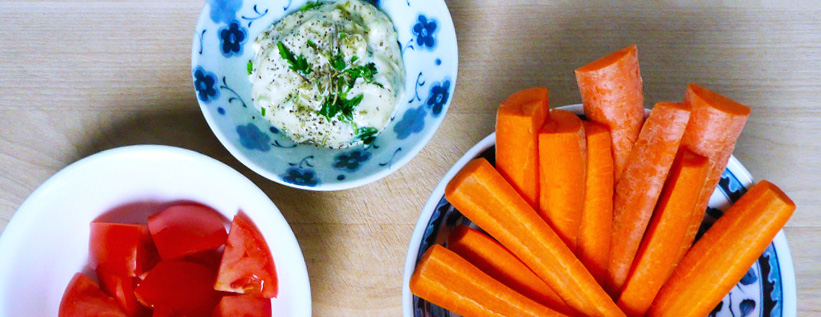
This creamy garlic rosemary dip takes just minutes to put together and makes snacking on everyday vegetables feel like a fun and tasty treat.

I used avocado oil mayo (but you can also use vegan mayo) and olive oil, so this recipe is packed with heart healthy oils and anti-inflammatory ingredients like parsley, garlic and rosemary.


Creamy Garlic + Rosemary Dip

Makes 1 serving


Ingredients

3 tbsp mayo or vegan mayo (I used avocado oil mayo)

1 tbsp olive oil

3 cloves thawed frozen garlic *

1/2 tsp finely chopped fresh parsley

1/4 tsp dried rosemary

1/8 tsp black pepper

Salt to taste (if needed)
Notes – * Thawed frozen garlic has a milder taste than fresh raw garlic and less of a bite to it. If you’re making this dip with fresh garlic, start out with adding 1 clove of garlic and then adding more to taste.

Instructions

1. Add the mayo and olive oil to a small bowl. Tilt the bowl to that the olive oil pools together and slowly stir it into the mayo until well incorporated. Add the rest of the ingredients and give it all a good stir.

Serve with any vegetables that you like. This dip is great with sweet potato fries, or I like eating it with 2 carrots (cut into carrot sticks) and a diced tomato for a quick snack.


garlic rosemary dip 3

Happy Snacking!

What To Do With Leftover Garlic

honey garlic 4

(fresh garlic + raw honey)

Finding giant bags of organic peeled garlic at the grocery store (or at Costco) usually seems like a huge win. It’s not very expensive (yay!) and will save you tons of time peeling garlic when you’re cooking.

Cut to a week later and you realize that even though you’ve been eating more garlic than normal (because you don’t have to peel it, throwing extra garlic into dishes is super easy) you’ve barely made a dent in your giant bag of garlic.

Peeled garlic also doesn’t have as long of a shelf life as unpeeled garlic either, so now  you’re thinking that it’s unlikely that you’ll be able to eat all of it before it goes bad.

But don’t worry! 
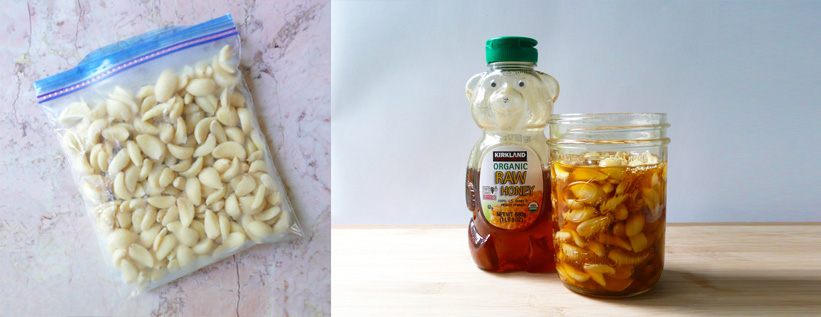
Here are two ways of storing extra garlic cloves so that you can use them up when you’re ready to.

1. Freeze The Extra Garlic Gloves

frozen garlic

This is super simple to do and you can use up all your garlic cloves in your own time.

Instructions

1. Pour the extra garlic cloves that you want to freeze into a bowl and set aside. Add a folded paper towel or two to the garlic cloves in the original package that they came in that you want to keep fresh in your fridge (the paper towel will absorb any excess moisture and the garlic will keep fresher for longer). Replace the paper towel every couple of days.

2. Give the excess garlic cloves a good rinse. Transfer them into ziploc freezer bags and squeeze out as much air as possible, and freeze them flat.

3. When you’re ready to use them, take out as many cloves as you need and run them under warm water for a few seconds to defrost. Chop and use as usual.

They will have a softer texture than fresh garlic cloves, and the flavor might be slightly milder, but you can always add another clove or two to your dish to balance that out.

2. Make Fermented Garlic Honey

I love watching the It’s Alive series on the Bon Appétit YouTube channel. It is hilarious. The editing and the host are fun and you learn a lot about fermentation. Here’s the episode about fermenting garlic in honey.


I’ve made garlic honey a few times now. I’ve made a few other fermented things before (red cabbage kimchi kraut and lacto-fermented garlic cloves) but the fermented garlic honey is by far the easiest thing to make if you’re looking to start preserving food using fermentation.

Garlic honey is delicious drizzled onto gluten-free bread, or homemade tortilla chips. I like to eat a few cloves of this when I have a cold. I’m not sure if it does anything to fight off a cold, but it’s a nice treat to have nonetheless.

I’m not a expert in this, so please watch the video above for more info, especially about adding the splash of apple cider and keeping the pH below 4.6 to be on the safe side.

Instructions

1. Rinse off your garlic cloves with filtered water (chlorine can prevent or slow fermentation). If you use straight tap water, that’s ok too. Just rinse them off with filtered water. Drain off as much water as possible and place them onto plates lined with paper towels to dry.

The next day replace the paper towels with dry ones, and leave the garlic cloves to dry another day until they are completely dry to the touch.

2. Pick out the cloves the look a little rough and trim off any blemishes or dark spots on the cloves. Put the cloves onto a cutting board and bash them with a knife or cut them in half. Add all the garlic into a clean dry wide mouth mason jar and cover them in raw honey (leaving about 2-3 inches of headroom in the jar).

I didn’t leave enough headroom in my jar, and the honey has leaked a little out of the top of the jar while it’s been fermenting (not a big deal, you can just wash it off).  Give everything a good stir so that the garlic and honey are well combined.

honey garlic 5

3. Put the lid on the mason jar and don’t screw the jar completely tight, leave it a little loose so that any gases produced during the fermentation can escape. Set the jar aside in an area without any direct sunlight where it wont be disturbed. I set my jar on a small plate so that it will catch any honey that might leak out from the top of the jar during fermentation, which makes it easy to rinse the honey off of the plate and the outside of the jar every few days.

Every day for the first few days, screw the lid on tightly and turn the jar upside down so that the honey can cover all the garlic cloves. Turn the jar right side up, loosen the lid, and place it back in it’s spot again.

After the first week, you can just do this every few days or so. After a month, you can just leave it alone with the lid a little loose and it should look after itself. Check the pH periodically to make sure that it stays below 4.6.

I’ve never had a jar of garlic honey go bad on me yet, but if you have any mold growing in the jar or if anything looks funny, when in doubt, throw it out.

honey garlic 1

This is what the garlic will look like after 6 months. The flavor of the garlic mellows out over time, and the cloves become sweet and chewy. The longer the garlic sits in the honey, the mellower the garlic flavor and the chewier they get. If you have a friend who loves garlic, a jar of this garlic honey makes a great gift.


Iced Apple Green Tea – Easy, Paleo, Refined Sugar Free

apple tea 4

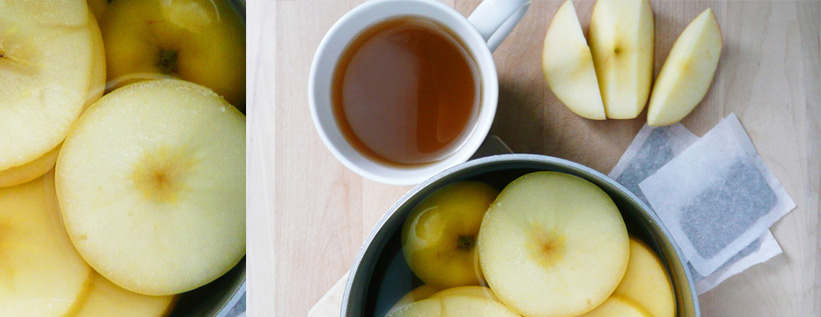
If you love Southern Style Sweet Tea and are looking for something that is refined sugar free, this is a great alternative. This Iced Apple Green Tea is just as refreshing, and the apple juice gives this green tea a lovely fruity sweetness, perfect for warm weather and sunshine.

I have a friend who is Japanese who has the most beautiful and extensive tea collection. She has an amazing cabinet filled with teas from all over the world.

During one of our visits we drank a Pink Lady Apple Green Tea, from The Republic of Tea brand. I loved that tea, and for years I would always try and look for it in any grocery store that carried that brand of tea. As it turns out, that particular tea was a limited edition and has since been discontinued, but that’s ok!

As long as you have some apples, apple juice, green tea, and a little honey, you can make a tea as delicious as that one was.

I enjoy drinking it iced (it’s good warm too), which is great for this time of year, as the weather is turning a bit warmer now (which is really exciting!).

apple tea 5

Iced Apple Green Tea

Makes about 4-6 servings


Ingredients

5 1/4 cups of water

5 green tea bags (I used the Organic 365 brand ones)

2 1/2 cups of apple juice **

2/3 of a fuji apple, cut into 1/4 inch slices

2 tbsp honey

Notes – ** I used the Martinelli’s brand of apple juice because it tastes wonderful, but please feel free to use your favorite brand of apple juice.


Instructions

1. Bring your water to a boil. Add in the tea bags and the sliced apples. Allow the tea bags to steep for 3 minutes, and then remove the tea bags. Add your apple juice and allow the apple slices to steep in the tea for 1 hr.

You don’t have to do this but I save the tea bags and put them in cold filtered water (3 cups) and allow them to steep overnight in the fridge with some lavender (1/2 tsp dried lavender). This cold brew lavender tea has a very light subtle flavor.

The flavor will get stronger the longer that you allow the tea to steep, and I sometimes will add that cold brew lavender tea to the apple tea as well, which tastes great too.

2. Remove the apples from the tea, and stir in your honey.  You can save these apples slices to blend into a smoothie later.

Allow the tea to cool, transfer to an airtight container and refrigerate until well chilled.

apple tea 1

I hope that you enjoy the tea!

Tea is just one of those great things that brings people together. Do you have any favorite memories around drinking tea?


How to Bake Sweet and Creamy Sweet Potato Fries – with No Added Sweeteners

sweet potato 2

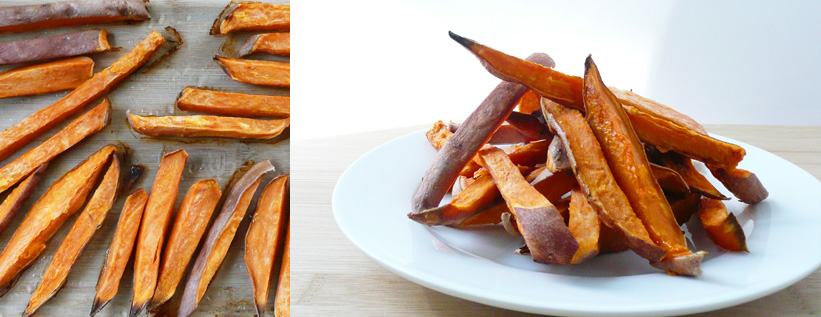
This is one of my favorite recipes and I make it all the time. I love cooking sweet potatoes this way because they become soft and creamy in the middle and almost taste like custard, but the crispy ends taste like toasted marshmallow.

The sweet potatoes are cooked slowly so that it brings out their natural sweetness and this is a great recipe to make when you’re trying to avoid added sweeteners, but still want to have something that tastes like dessert.

Make a big batch, and keep any leftovers in the fridge. They actually get sweeter once refrigerated and are wonderful for snacking during the week. They are delicious on their own, but you can also sprinkle over some cinnamon and nutmeg right before serving and it makes this sweet potato dish even more dessert-like and wonderful.

Sweet and Creamy Sweet Potato Fries

Makes about 3 – 4 servings

Ingredients

2 – 3 sweet potatoes (cut into 1/2 inch fries)

1 tsp of avocado oil (or any neutral flavored oil)*

Notes – * I’ve used olive oil before too and that works great as well. You don’t taste the olive oil flavor very much at all when you cook the sweet potatoes this way, so really any oil that you use will be fine. Coconut oil is nice too, the sweet potatoes taste even sweeter when cooked with coconut oil.

Instructions

1. Preheat your oven to 375 F.

cut raw sweet potatoes

2. Take your sweet potatoes and place them onto a sheet pan or glass baking dish (I prefer using a glass dish for this, as the sweet potato fries do stick a little to the pan and you can use a spatula to scrape any crispy bits off of the glass without having to worry about scratching up a sheet pan).

sweet potato 6

3. Pour the tsp. of oil into a corner of the baking dish and slide each sweet potato fry into the oil and toss them with your hands until well coated.

Place the baking dish into the oven and bake for 55 – 60 minutes until the fries turn a little crispy and golden brown at the edges. In my oven this takes about 57 minutes.

sweet potatoes 5

4. Allow your fries to cool a little before serving.

sweet potato 3

I hope that you love these sweet potatoes fries as much as I do! I’m about to go make another big batch of them, and I can’t wait to eat them.


My Technique / Tips for Cutting Sweet Potatoes

cutting sweet potatoes

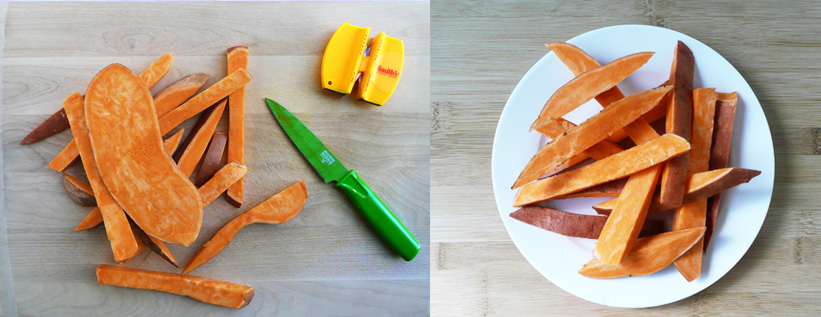
Sweet potatoes are one of my favorite vegetables, and they are super versatile. You can use them to make mini sweet potato pies, or sweet potato muffins (they taste like pumpkin bread), and they also taste great when sautéed with some onions, garlic and a drizzle of olive oil.

The one down side about sweet potatoes is that they can be very difficult to cut. They tend to roll around on the cutting board, and trying to cut them with a chef’s knife (even a very sharp one) can become a pretty risky situation fairly quickly.

Here’s the technique that I use to make cutting sweet potatoes a little easier.

You will need:

– a paring knife

– vegetable brush

– knife sharpener

– cutting board

– clean dish cloth or paper towel

Instructions

1. Give your sweet potatoes a good scrub with the vegetable brush and dry them off thoroughly with the dish cloth or paper towel. You want your sweet potatoes to be as dry as possible so that they don’t slip around on the cutting board. Set the sweet potatoes aside.

2. Sharpen your paring knife.

I have a little handheld knife sharpener (which isn’t the best, but gets the job done) and I run the paring knife through the carbide blades about 50 times and the ceramic rods about 30 times (if you have a better knife sharpener you probably won’t have to spend as much time sharpening your knife). Wash your knife with a little dish soap and carefully dry off the blade and the handle of the knife. You’ll also want to dry off your hands at this point so that you can get a good grip on the sweet potato while you’re cutting it.

You probably don’t need to sharpen your knife every time you cut a sweet potato, but it is a good idea too if you can. A sharp knife makes everything a little safer.

I also like using a paring knife over a chef’s knife for cutting sweet potatoes because it has a smaller blade, which means that there’s less force acting against your knife when you’re making your cuts.

3. If you want to peel your sweet potatoes, go ahead and do that now, but I usually keep the skin on the sweet potato just as a preference because it makes the sweet potatoes easier to grip when cutting.

Hold the left side of the sweet potato firmly with your left hand and then slice about 1/2 inch off from one end of the sweet potato, turn it 180 degrees, and then slice 1/2 inch off the other end.

From there you can cut up your sweet potato any way you like. I normally make sweet potato fries because they are easy to make, and make a great side for lunch or dinner.

To cut fries – hold the sweet potato firmly on the cutting board with your left hand, then place the blade of the paring knife perpendicular to the sweet potato so that the point of the blade goes straight into the middle of the sweet potato.

Once the blade is about an inch to an inch and a half into the sweet potato, (while still holding the sweet potato firmly against the cutting board with your left hand) with your right hand begin to push on the handle of the paring knife so that while you’re pushing the blade into the sweet potato, the blade also rotates all the way down and eventually becomes parallel to the cutting board, slicing through one half of the sweet potato.

Pull the knife out of the sweet potato and turn the sweet potato 180 degrees, and repeat so that the sweet potato is sliced in half and you have 2 halves of a sweet potato that you can lay flat on the cutting board.

4. Repeat this same motion (press the blade perpendicular into the sweet potato, rotate blade down and slice through), when making the rest of your cuts.

I like to cut my sweet potato fries 1/2 inch thick, and here’s how I cook them so that they get extra sweet without any added sweeteners.

To cut rounds – for if you want to use the sweet potato rounds as bases for veggie pizzas, press the blade about 1 inch into the sweet potato and press down while you rotate the sweet potato with your left hand until you end up with a little round of sweet potato.

cut raw sweet potatoes

I hope that these tips help make cutting sweet potatoes a little easier for you. If you also love eating sweet potatoes, let me know in the comments below how you like to cook them. It would be cool to see how other people like to cook them as well.

What To Do With Leftover Limes

P1080003-2

Limes are a great way to add zip and flavor to all kinds dishes from tacos, to pho, or sorbets, or pad thai. The the little burst of bright sourness that they give can instantly make a dish go from “good” to “Wow! This tastes AMAZING!”

Organic limes can be a little hard to find at my local grocery store. They also tend to be expensive if I don’t buy them in bulk. The cheapest place that I’ve seen them is at Trader Joe’s for about $2 for a bag for 4 -5 organic limes, so that’s where I tend to buy them from.

Limes are also not an ingredient that I tend to use very often, so before I figured out that there was a way to freeze them, I tended to buy a bag of limes when I really only needed one or two, and then forget that I had them at the back of the fridge until eventually I had to throw them out.

But no more! If you ever find yourself with leftover limes, here’s how to freeze them so that you have them on hand whenever you need them.

Instructions

1. Give your limes a good scrub with a vegetable brush. Juice them, and pour the juice into ice cube trays (any ice cube tray will do, this is just a circular one). Once the juice is frozen, transfer the lime juice cubes into a ziploc bag and keep in the freezer until ready to use.

You can set a few of the lime juice cubes in a little bowl on the counter to defrost, and then use the juice as needed.

2. Take the lime rinds and freeze them in a separate ziploc bag. You can zest the lime rinds from frozen when you need lime zest. The zest will defrost almost instantly once grated, and you can use it the same way that you would fresh lime zest.

If you find that the lime juice is a little bitter (some limes are bitter and some aren’t, I’m not entirely sure why) you can add a little maple syrup (if you’re vegan) or honey to your dish and it should balance out the bitterness.

I did this recently when I was making pico di gallo for a family get together and found the the limes that I had were a little bitter. So I added a little honey to the pico, and that smoothed out the bitterness and the bright flavor of the lime still came through. The pico came out great, and everyone happy ate their tacos and even went for seconds.

I hope that this helps you make the most of the times when you have fresh limes! If you use this tip, let me know what dishes you used your frozen limes for. It would be great to see all the different dishes that everyone was able to make with limes that they saved.


Mango Lemon Sorbet (No Churn) – Quick and Easy, Vegan, Paleo

mango 4

Sometimes the best kinds of foods are the ones that remind you of what you ate when you were growing up.

When I was a kid, we would often get takeout pasta and pizza from a local family owned Italian restaurant. The food was always good, but for me the highlight was getting to eat Italian ices anytime we ordered from that restaurant. This Mango Lemon Sorbet reminds me eating those Italian ices out of paper cups on hot summer days.

mango sorbet 2

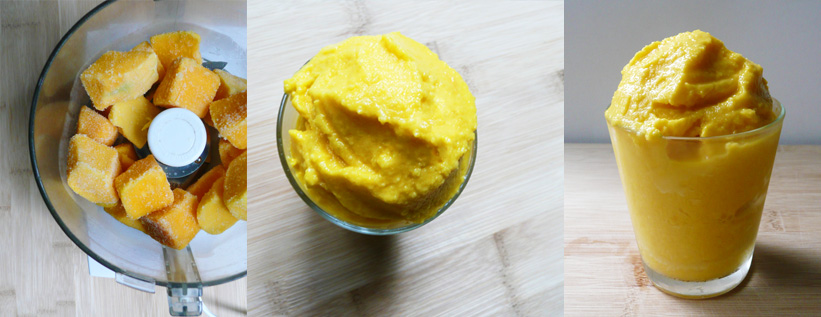
Mango Lemon Sorbet is incredibly simple to make, and you don’t even need an ice cream maker! The mango gives the sorbet a joyful tropical flavor, and the lemon zest gives it a brightness and zing. Each bite just tastes incredible.

This recipe would also work well if you have a number of ripe mangoes that you don’t quite know what to do with before they become overripe.

mango sorbet 3

You can cut them into 1 inch chunks, freeze them, and make this mango sorbet anytime you like! It’s a delicious and satisfying way to cut down on food waste.

Mango Lemon Sorbet

Makes 1 generous serving (about 3 scoops)

Ingredients

2 cups frozen mango (1 inch chunks)

2 tbsp maple syrup*

1/2 tsp lemon zest (lime zest also works well)**

4 tbsp avocado oil (or any neutral flavored oil)***

1/4 cup water

Notes –

* The store bought frozen mango that I used wasn’t very sweet, so if your frozen mango is naturally very sweet, you can probably add less maple syrup. Just add a little at a time until you’re happy with the sweetness of the sorbet.

You can also omit the maple syrup entirely, and replace the water with 1/4 cup of apple juice instead if you’re trying avoid added sweeteners. The sorbet won’t be quite as sweet as it would be with the maple syrup, but will still taste really good.

**I actually used the frozen lemon rinds from this post for the lemon zest I used in this recipe.

** There is a part of the brain that lights up in the presence of a fat and sugar, so adding that little bit of fat makes the sorbet taste better, and helps to increase the absorption of the vitamin A from the frozen mango.

Instructions

1. Lay your mango pieces onto a plate in a single layer, giving a little space between each piece of frozen mango if possible. Allow the mango to defrost for 15-20 minutes until you can pierce the cubes of mango with a fork with little resistance.

2. Transfer the mango to a food processor and add in the water, avocado oil, lemon zest and maple syrup to taste.

Blend until smooth, stopping to occasionally scrape down the sides of the food processor with a spatula.

3. Serve immediately, or you can make a big batch of this and freeze it it for later in an airtight container. Allow to defrost for a bit before scooping and serving.

mango sorbet 5

So good… and so simple to make! I’ll definitely be making this more often come summertime.

Happy Eating!

What To Do With Leftover Baby Greens

frozen greens 1

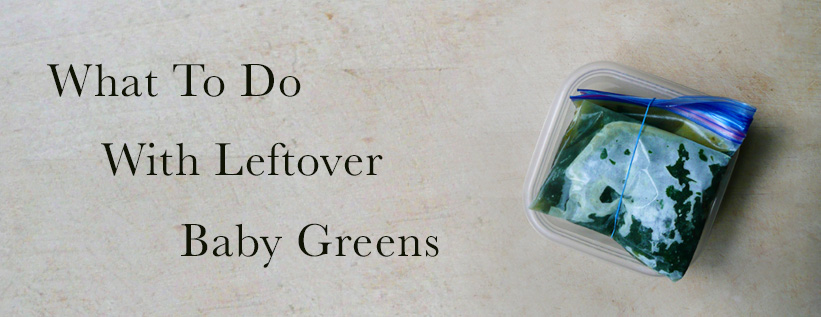
Sometimes when you go grocery shopping, you see a gigantic bag of organic baby greens for $5 and think “Hey! That’s a great deal!”

Once you get home though, you realize that there is no way that you’re going to be able to eat that entire bag of baby greens before they go bad. I had the same thought with a big bag of baby kale. But have no fear! There’s a super easy way to get the most out of your purchase.

And it’s ok to do this after your greens have started to look a little worse for wear. You may have to compost a few more leaves of baby greens, but you should still be able to save most of your baby green bounty.

Instructions

1. Take two large bowls. Pick out the greens that have started to get slimy (you don’t want those) and place them in one bowl, and the still good greens in the other.

Compost the old greens, and then give the fresh greens a few good rinses in cool water. Pour the baby greens with the rinse water into a large strainer and drain off the excess water (it’s ok if there’s still a bit of water on them, you don’t want them to be perfectly dry).

2. Place your greens in a large pot with a few tablespoons of a neutral flavored oil (I like avocado oil). The oil makes it easier for your body to absorb the nutrients in the greens.

If the greens are really dry, add about 1/2 – 1 cup water to the pot with the greens. Cook over medium to medium high heat (depending on how fast you want the greens to cook down) stirring occasionally until the greens have all wilted down.

3. Wait for the greens to cool to room temperature. Spoon the greens into a freezer ziploc bag (you may need more than one bag depending on how many greens you have) and flatten the bag so that the greens are evenly distributed inside of the freezer bag.

Fold the bag into thirds the way that you would fold a letter before putting it into an envelope (please see top photo for reference). You should be left with a long rectangle, then do your best to fold this long rectangle into thirds and wrap a rubber band around the whole thing, place it into a shallow dish of some sort (just to catch any drips on the off chance that there are any leaks) and pop it into the freezer and freeze until solid.

frozen greens 2

(They are kind of pretty aren’t they? The one on the left almost looks like vegetable stained glass, or baby kale stained glass.)

Once frozen, you should be left with these squares of baby greens. You can throw them directly into soups, or defrost them and add them to smoothies, or stir fry them with a bit of garlic and maybe a squeeze of lemon juice.

I also sometimes just throw a square of frozen baby greens into a bowl with some cooked leftover rice and sweet potatoes and put it into the rice cooker to steam for about 10-15 minutes, and ta-da! Add a little Thai Peanut Sauce Dressing that’s a simple and delicious dinner.

However you use your frozen baby greens, I hope that this trick helps you to make the most of them.

enoki mushrooms

Sautéed Enoki Mushrooms with Garlic – Quick and Easy, Vegan, Paleo

enoki mushrooms 3

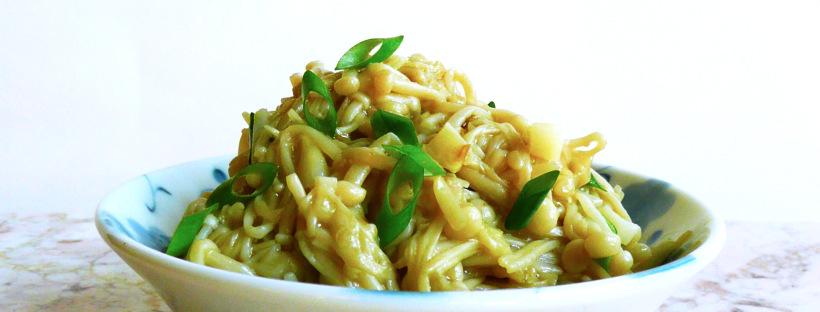
This is a super speedy and delicious vegetable dish for nights when you want to get dinner on the table as quick as possible. It’s paleo, and vegan and works with most dietary restrictions.
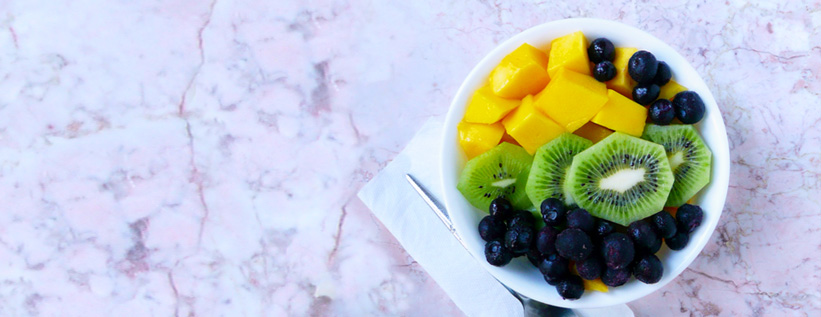
When I was growing up, we ate enoki mushrooms in Hot Pot at Lunar New Year, and for family celebrations. I loved scooping them out of the pot with a slotted spoon (along with lots of baby corn and tofu) and eating them with Taiwanese BBQ Sauce (the BBQ sauce with the cartoon bull on the side of the can is where it’s at, but it’s been a few years since I’ve had it).

The mushrooms come in 7 oz packages from the Asian grocery stores, and while I love button mushrooms too, eating the enoki mushrooms is sometimes a nice way to change up the different vegetables in my diet.

Giving the enoki mushrooms a quick sauté with a little garlic enhances the delicate flavor of the mushrooms. They have a great texture and are a great side dish to have on any table.

Sautéed Enoki Mushrooms with Garlic

Makes 2 small servings


Ingredients

2-3 cloves of garlic, finely chopped

1 package of enoki mushrooms (7.05 oz / 200 g)

1-1.5 tbsp olive oil

sprinkle of sea salt to taste


Note – I added the green onions in for the picture, but when I tasted it, I found that I actually preferred the mushrooms without the green onion. The enoki mushrooms have a subtle flavor, and that was overpowered slightly by sharpness of the green onions, but if you like green onions, go ahead and add them. It’s all about cooking the food that you enjoy eating.

Instructions

1. Wash the mushrooms under cool water. Cut the mushrooms about 1 inch above the roots. Give them another good rinse. Place them on a cutting board and cut them lengthwise in half.

enoki mushrooms 2

2. Add the mushrooms to a sauté pan with the garlic and olive oil. Cook over medium heat for 5 minutes, stirring constantly. Then turn the heat up to medium high and cook for another 3 minutes until lightly golden brown. 

Add a sprinkle of salt to taste and serve.

enoki mushrooms 1

Happy Eating!


Joyful Fruit Salad – Vegan, Paleo

fruit salad

There’s a really funny writer/actor/comedienne extraordinaire named Tiffany Haddish who has a dish called “Joyful Greens.” She says that they are “Joyful Greens” because she smiles when she picks the collard greens from her garden, she smiles when she washes them, and she smiles when she cooks them. All that joy, love and care that she puts into growing and preparing the greens make them extra delicious.

Taylor Swift also loves Tiffany’s Joyful Greens. Tiffany brought them with her to one of Taylor’s dinner parties and where they also dined on homemade barbecue chicken, potato salad, and cornbread (don’t we all wish that we could have been at that dinner party? It’s sounds amazing.)

Here’s a video of Tiffany teaching Oprah and Ellen how to make them.


While I didn’t grow these fruits myself, this is my joyful fruit salad. It’s joyful because you smile while you’re picking out the fruit (you smile at how wonderful and sweet that ripe mango smells), you smile when you see how bright and happy the different colors of the fruits are together, and you smile when you eat it (because it tastes so good…)

It’s super quick to put together, and I like packing it in a lunch because the colors look so cheerful together that I always look forward to eating it. This combination of fruits taste lovely together, and eating it feels like a real treat.


Fruit Salad 3


Joyful Fruit Salad

Makes 1 generous serving

Ingredients

1 ripe mango*

1 ripe kiwi**

1/3 cup blueberries (fresh or frozen)


Notes – *Ripe mangoes smell very sweet and fragrant. Mangoes that aren’t ripe won’t smell much like anything.

** Ripe kiwis are soft, but not squishy. If you have one that’s really firm, go ahead and leave alone for a couple days and it will ripen up.


Instructions

1. Cut the mango into 3/4 inch cubes (or cut it up however you like, this is just how I do it).

There are many ways to cut up a mango. I slice the cheeks off either side of the seed, then try and carefully slice off any remaining mango flesh that I can off of the seed. Then I cut the mango cheeks into 3/4 inch strips and use a paring knife to carefully separate the peel from the mango flesh (kind of like how you would peel an apple with a paring knife). I then cut the peel away from the slices of mango that I cut away from the seed into rough chunks and add them to a bowl with the rest of the cubed mango.

I’ve also seen people use a potato peeler to peel the mango and then slice the mango cheeks off either side of the seed, but I don’t do it that way because I find that the mango gets really slippery to hold while you’re trying to make your initial cuts.

All this is to say, cut up your mango in a way that works for you. The fruit salad will still be awesome.

2. Peel your kiwi and slice it into 1/4 inch slices.

How I peel a kiwi – Cut 1/4 inch off the top and bottom of your kiwi. Sit it flat on your cutting board and make 1/2 inch slices down the sides of the kiwi, cutting as close to the peel as you can until you’ve cut off all the kiwi peel.

You can also cut 1/4 inch off the top and bottom of a kiwi and slide spoon between the kiwi peel and the green flesh. Rotate your spoon under the peel until the peel has completely separated from the fruit.

3. Add your kiwi to the bowl of cubed mango along with the blueberries.

Enjoy!


fruit salad empty

What the bowl looks like once I packed the rest of it into a mason jar for tomorrow’s lunch. This is what was leftover, which looks very pretty on it’s own.

No worries, this didn’t go to waste. I ate it right after I took the picture, and I felt very happy and grateful.