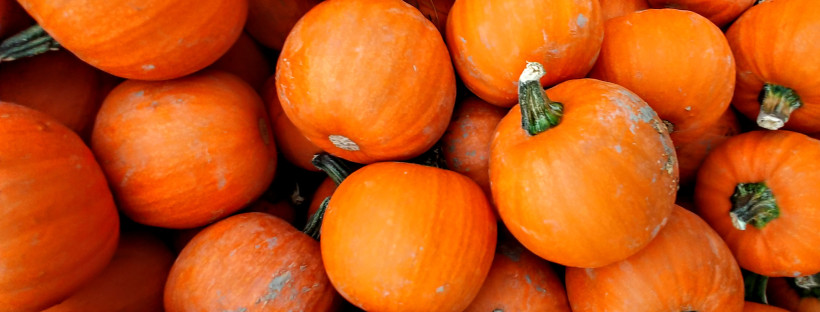
pumpkin banner

A Trip to the Farmers Market

20180930_153326~2

It’s Fall!

My favorite season of the year.

It’s time to wear cozy socks, cuddle up with a book by the fire and drink / eat pumpkin spice flavored things with joy!

I love seeing all the autumn leaves turn color and am very much looking forward to Halloween and Thanksgiving (of course my favorite holidays are always food related…).

Recently, I discovered a local farmers market nearby and I didn’t know what I was missing until I went there. My weekly trips there are something that I look forward to on the weekends.

I’ve almost always shopped at grocery stores before, and it is so neat to be able to see all the different kinds of food that are produced in my local area. There are shelves with local honey, dried herbs, lots of different vegetables (I saw a purple bell pepper for the first time here a few weeks ago), and locally produced beef and lamb as well.

I buy fresh eggs often here. They come in a beautiful array of colors, from white, to brown, to pastel blue. The fresh eggs also taste so good, and the hens that produce them are free ranged.

20180930_160635~2

These beautiful carrots were $1.99 / lb, which is more expensive than the $1.29 / lb at the local grocery store, but these were locally grown. I also usually buy kale and lettuce here as well, and they are usually about 50 cents more per bunch. For not very much more, it seems really exciting to be able to support local farmers in my area.

I love seeing all the different kinds of squash that they had at the farmers market. A lady came by with a cart piled high with all kinds of them which she mentioned that she was going to use for decoration.

20180930_153504~3

I can see why, all of them look interesting. These beauties are Cinderella Pumpkins. So cool! I’ve never seen these kinds of pumpkins before.

It was also super cute to see parents taking pictures of their toddlers holding little pumpkins. What a sweet memory.

20180930_153626

They also sell lovely herbs (both dried and live plants) there. Here are a variety of mints!

20180930_153235~2

Two squash that kind of look like spaceships…

20180930_153215~2

And more varieties of squash!

Do you have farmers markets where you are? What’s you’re favorite thing to buy there?

Elaine

Iced Watermelon Cubes

Iced Watermelon Cubes – A Healthy Ice Cream Alternative

watermelon cubes 2

If you’re living through a heat wave at the moment what you probably want most in the world is something sweet, cold, and refreshing to eat.

Here is the simplest of desserts to keep on hand for a hot day. These little cubes of frozen watermelon are delicious and perfect for popping into your mouth (straight from the freezer) to cool you down.

Refined sugar free, dairy free, paleo, and all that jazz… but what’s really important is that they taste so good!

Iced Watermelon Cubes

Makes lots and lots of servings

Ingredients

1 sweet seedless watermelon (pick the sweetest one you can find)

That’s it! 😀


Instructions

1. Cut the watermelon into 3/4 inch cubes (this is a perfect size as they can be eaten straight from the freezer and they thaw quickly too).

2. Freeze the cubes flat in ziptop bags.

To serve, scoop about 1 – 1.5 cups (or however much you want) of the frozen watermelon cubes into a bowl and eat with a spoon.

Ta-Da! I hope that these little cubes of watermelon joy make your summer days a little more awesome. 🙂

pear sorbet

2 Ingredient Pear Sorbet (No Churn) – Paleo, Vegan, Refined Sugar Free

pear sorbet 3

This pear sorbet is so simple to make and it tastes amazing! It’s flavor is light and sweet and makes the humble pear really shine.

When I first tasted it I couldn’t believe how good it was, and it was only 2 ingredients!

It’s smooth and creamy, and the perfect thing to make when you have ripe pears that you’re not quite sure what to do with. Even if they are a little bruised, that’s ok! They will still work great in this recipe.

2 Ingredient Pear Sorbet

Makes 2 servings (2 scoops each, or a generous serving for one)

Ingredients

2 ripe Bartlett pears (also known as William’s pears)

1/4 cup apple juice (I used the Martinelli’s brand apple juice as it’s naturally very sweet)


Instructions

1. Peel and core the pears. Cut them into 3/4 inch cubes (if they vary in size a little that’s ok) and freeze them in a single layer in a ziploc bag or an airtight container.

My two pears (after being peeled, cubed, and frozen) measured 2 2/3 cups.

2. When you’re ready to make your sorbet, take the frozen pears out of the fridge and let them thaw for 10-15 minutes.

pear sorbet 1

Break up any big clumps of pear cubes up with your hands and add the pears to a food processor along with the apple juice and process until smooth, stopping occasionally to scrape down the sides.

pear sorbet 2 copy

If you’re having a hard time getting the sorbet completely smooth, you may have to process half the mixture at a time. I have a smaller food processor and had to process the sorbet in two batches, but it came together beautifully.

pear sorbet 6

3. Spoon into bowls and serve immediately.

Happy Eating!

blueberry smoothie

Glorious Orange Berry Blitz-ish Smoothie (Mango, Pineapple, Blueberry) – Vegan, Paleo

blueberry smoothie 1

When I was a youngin,’ I once went to a summer camp. The camp was located on a college campus and close by was a Jamba Juice. So most days (during the few weeks we were there), I and some of the other students would go to Jamba Juice for smoothies and a scone for breakfast.

My favorite smoothie was the (now discontinued) Orange Berry Blitz. I loved how the orange juice gave the blueberries and pineapple smoothie a wonderful brightness.

It’s funny how food and flavors can sometimes take you back, and suddenly, there you are again, cocooned in a marvelous memory.

I smile now just thinking of how happy I was that summer, and and this berry smoothie is still the perfect thing to drink on a nice summer day.

blueberry smoothie 2

This is my version of that glorious smoothie. I added mango because I think that it gives the smoothie a little more of a tropical flavor (and an extra little bit of sweetness as well).

Feel free to play around with the ingredients. Sometimes I replace the apple juice with water, or add in a few handfuls of baby spinach (if I want to get my greens in for the day without having to give it too much thought).

Make the smoothie that you want to drink (though I will say that this smoothie is pretty awesome as written) and have fun!

Glorious Orange Berry Blitz-ish Smoothie

Makes 1 generous serving

Ingredients

3/4 cup ripe mango (cut into roughly 1 inch cubes, about 1 mango)

3/4 cup fresh pineapple chunks (cut into about 1.5 inch wedges, canned pineapple works too)

1 1/4 cup frozen blueberries

1/2 cup apple juice (I used the Martinelli’s brand)

2-3 tbsp orange juice


Instructions

1. Add all ingredients into a blender and blend until smooth. Serve immediately.


Blueberry smoothie 3

This is what the plate of fruit looked like after I added the fruit into the blender. I think that it’s quite beautiful in a wabi-sabi kind of way.

I hope that you have many happy summer days drinking smoothies with your loved ones.

Enjoy!

sweet potato fries

Oven Baked Garlic Paprika Sweet Potato Fries – Paleo, Vegan

baked sp 8

These garlicky paprika sweet potato fries make a glorious side dish when you’re craving carbs, and are my go to snack when I’m craving junk food but want to eat something a little healthier.

baked sp 3

Sweet potatoes are a great source of vitamin A, magnesium, and potassium (which is great) but what really matters is that these sweet potato fries are really satisfying.

I love dipping them into creamy avocado mayo (sometimes with a bit of finely minced garlic mixed in) and they are also good with honey mustard.

baked sp4

Next time your craving junk food, give these sweet potato fries a try. If you’re anything like me, you find that you’ve eaten them all before you know it.

Oven Baked Garlic Paprika Sweet Potato Fries

Makes 2-3 servings

Ingredients

3 small sweet potatoes (the ones I used were 2 inches in diameter and 8 inches in length)

2 tbsp neutral flavored oil (I used avocado oil)

1 1/4 tsp granulated garlic

1/4 tsp + 1/8 tsp granulated onion

1/4 tsp paprika

1/4 tsp dried thyme (optional)

1/8 tsp black pepper

1/4 tsp sea salt


Instructions

1. Preheat the oven to 400 degrees F.

2. Give the sweet potatoes a good scrub and cut each sweet potato into 8 wedges.  Place the sweet potatoes into a large glass baking dish with the oil and toss gently.

2. Stir together the salt, pepper and other spices. Sprinkle the spice mixture over the sweet potatoes and give it all a good mix so that the fries are well coated.

baked sp 9

4. Arrange the sweet potatoes onto the baking dish so that they are in a single layer.

My baking dish was a little too small to fit all of the fries. So for this amount of sweet potatoes I used a 3 qt (9 in. x 13 in.) glass pyrex baking dish and a 9 in. pie plate.

5. Bake for 35 – 40 minutes until crispy and golden brown around the edges.

baked sp 5

Happy Eating!


Watermelon Agua Fresca – Paleo, Vegan, Refined Sugar Free

watermelon ag 3

With summer fast approaching, the weather is getting warmer, and Memorial Day weekend is here!

This means that ’tis the season for backyard barbecues and hanging out with friends and family in the sunshine. This calls for drinks.

One of my favorites is my watermelon agua fresca. It’s cool and refreshing, and along with iced apple green tea is a refined sugar free alternative to sweet tea.

I love watermelon. It’s one of my favorite fruits and drinking this is almost like drinking a cross between lemonade/limeaid and watermelon juice.

Watermelon season in the US runs from May to September, so lots of delicious ripe watermelons are available in grocery stores right now, which is super exciting (yay!) and another thing that makes this watermelon agua fresca the perfect drink for summer.

Watermelon Agua Fresca

Makes 2 servings (4 cups total)

Ingredients

4 1/2 cups cubed seedless watermelon (1 – 1 1/2 inch cubes)*

1 1/4 cup + 1/8 cup water

3 tsp lime juice (I used lime juice that froze previously and defrosted)

Notes – * Use the sweetest watermelon you can find, that way you won’t have to use any added sweeteners. If you’re having a party, you can make a big batch of this ahead of time and it will keep great in the fridge overnight.

Instructions

1. Add all the ingredients into a blender and blend until smooth. Refrigerate until well chilled, making sure to give the agua fresca a good stir before serving. Pour over ice if desired (especially if it’s a particularly hot day) and serve.

How To Get A Pan Super Clean

Baking soda pan 1

Baking soda and vinegar can be your best friends in the kitchen. They help muffins to rise, can make a sink squeaky clean, or help you scrub out a pan without damaging the finish.

Here’s how I like to clean my pots and pans (if they need a little more help to get clean than the dishwasher can handle by itself).

(This is a pan that I used to sauté some baby spinach with garlic and olive oil.)

Start by sprinkling a generous amount of baking soda into your pan to absorb any leftover oil.

baking soda pan 2

Add a splash of plain white vinegar, and use a sponge to give the pan a good scrub.

baking soda pan 3

Rinse the pan out, then wash with soap and water as usual.

Ta da! A super clean pan, ready to make your next delicious dish.

Creamy Garlic + Rosemary Dip – Paleo, Vegan Friendly, Dairy Free

garlic rosemary dip 2

Sometimes eating vegetables can be a little less than exciting. Eating should be a pleasure. You want to have something that has a lot of flavor and be so delicious that you crave eating it the next day.

For me, this dip is the answer to getting myself to eat a big serving of vegetables, and to do so very happily.

This creamy garlic rosemary dip takes just minutes to put together and makes snacking on everyday vegetables feel like a fun and tasty treat.

I used avocado oil mayo (but you can also use vegan mayo) and olive oil, so this recipe is packed with heart healthy oils and anti-inflammatory ingredients like parsley, garlic and rosemary.


Creamy Garlic + Rosemary Dip

Makes 1 serving


Ingredients

3 tbsp mayo or vegan mayo (I used avocado oil mayo)

1 tbsp olive oil

3 cloves thawed frozen garlic *

1/2 tsp finely chopped fresh parsley

1/4 tsp dried rosemary

1/8 tsp black pepper

Salt to taste (if needed)
Notes – * Thawed frozen garlic has a milder taste than fresh raw garlic and less of a bite to it. If you’re making this dip with fresh garlic, start out with adding 1 clove of garlic and then adding more to taste.

Instructions

1. Add the mayo and olive oil to a small bowl. Tilt the bowl to that the olive oil pools together and slowly stir it into the mayo until well incorporated. Add the rest of the ingredients and give it all a good stir.

Serve with any vegetables that you like. This dip is great with sweet potato fries, or I like eating it with 2 carrots (cut into carrot sticks) and a diced tomato for a quick snack.


garlic rosemary dip 3

Happy Snacking!

How to Bake Sweet and Creamy Sweet Potato Fries – with No Added Sweeteners

sweet potato 2

This is one of my favorite recipes and I make it all the time. I love cooking sweet potatoes this way because they become soft and creamy in the middle and almost taste like custard, but the crispy ends taste like toasted marshmallow.

The sweet potatoes are cooked slowly so that it brings out their natural sweetness and this is a great recipe to make when you’re trying to avoid added sweeteners, but still want to have something that tastes like dessert.

Make a big batch, and keep any leftovers in the fridge. They actually get sweeter once refrigerated and are wonderful for snacking during the week. They are delicious on their own, but you can also sprinkle over some cinnamon and nutmeg right before serving and it makes this sweet potato dish even more dessert-like and wonderful.

Sweet and Creamy Sweet Potato Fries

Makes about 3 – 4 servings

Ingredients

2 – 3 sweet potatoes (cut into 1/2 inch fries)

1 tsp of avocado oil (or any neutral flavored oil)*

Notes – * I’ve used olive oil before too and that works great as well. You don’t taste the olive oil flavor very much at all when you cook the sweet potatoes this way, so really any oil that you use will be fine. Coconut oil is nice too, the sweet potatoes taste even sweeter when cooked with coconut oil.

Instructions

1. Preheat your oven to 375 F.

cut raw sweet potatoes

2. Take your sweet potatoes and place them onto a sheet pan or glass baking dish (I prefer using a glass dish for this, as the sweet potato fries do stick a little to the pan and you can use a spatula to scrape any crispy bits off of the glass without having to worry about scratching up a sheet pan).

sweet potato 6

3. Pour the tsp. of oil into a corner of the baking dish and slide each sweet potato fry into the oil and toss them with your hands until well coated.

Place the baking dish into the oven and bake for 55 – 60 minutes until the fries turn a little crispy and golden brown at the edges. In my oven this takes about 57 minutes.

sweet potatoes 5

4. Allow your fries to cool a little before serving.

sweet potato 3

I hope that you love these sweet potatoes fries as much as I do! I’m about to go make another big batch of them, and I can’t wait to eat them.


My Technique / Tips for Cutting Sweet Potatoes

cutting sweet potatoes

Sweet potatoes are one of my favorite vegetables, and they are super versatile. You can use them to make mini sweet potato pies, or sweet potato muffins (they taste like pumpkin bread), and they also taste great when sautéed with some onions, garlic and a drizzle of olive oil.

The one down side about sweet potatoes is that they can be very difficult to cut. They tend to roll around on the cutting board, and trying to cut them with a chef’s knife (even a very sharp one) can become a pretty risky situation fairly quickly.

Here’s the technique that I use to make cutting sweet potatoes a little easier.

You will need:

– a paring knife

– vegetable brush

– knife sharpener

– cutting board

– clean dish cloth or paper towel

Instructions

1. Give your sweet potatoes a good scrub with the vegetable brush and dry them off thoroughly with the dish cloth or paper towel. You want your sweet potatoes to be as dry as possible so that they don’t slip around on the cutting board. Set the sweet potatoes aside.

2. Sharpen your paring knife.

I have a little handheld knife sharpener (which isn’t the best, but gets the job done) and I run the paring knife through the carbide blades about 50 times and the ceramic rods about 30 times (if you have a better knife sharpener you probably won’t have to spend as much time sharpening your knife). Wash your knife with a little dish soap and carefully dry off the blade and the handle of the knife. You’ll also want to dry off your hands at this point so that you can get a good grip on the sweet potato while you’re cutting it.

You probably don’t need to sharpen your knife every time you cut a sweet potato, but it is a good idea too if you can. A sharp knife makes everything a little safer.

I also like using a paring knife over a chef’s knife for cutting sweet potatoes because it has a smaller blade, which means that there’s less force acting against your knife when you’re making your cuts.

3. If you want to peel your sweet potatoes, go ahead and do that now, but I usually keep the skin on the sweet potato just as a preference because it makes the sweet potatoes easier to grip when cutting.

Hold the left side of the sweet potato firmly with your left hand and then slice about 1/2 inch off from one end of the sweet potato, turn it 180 degrees, and then slice 1/2 inch off the other end.

From there you can cut up your sweet potato any way you like. I normally make sweet potato fries because they are easy to make, and make a great side for lunch or dinner.

To cut fries – hold the sweet potato firmly on the cutting board with your left hand, then place the blade of the paring knife perpendicular to the sweet potato so that the point of the blade goes straight into the middle of the sweet potato.

Once the blade is about an inch to an inch and a half into the sweet potato, (while still holding the sweet potato firmly against the cutting board with your left hand) with your right hand begin to push on the handle of the paring knife so that while you’re pushing the blade into the sweet potato, the blade also rotates all the way down and eventually becomes parallel to the cutting board, slicing through one half of the sweet potato.

Pull the knife out of the sweet potato and turn the sweet potato 180 degrees, and repeat so that the sweet potato is sliced in half and you have 2 halves of a sweet potato that you can lay flat on the cutting board.

4. Repeat this same motion (press the blade perpendicular into the sweet potato, rotate blade down and slice through), when making the rest of your cuts.

I like to cut my sweet potato fries 1/2 inch thick, and here’s how I cook them so that they get extra sweet without any added sweeteners.

To cut rounds – for if you want to use the sweet potato rounds as bases for veggie pizzas, press the blade about 1 inch into the sweet potato and press down while you rotate the sweet potato with your left hand until you end up with a little round of sweet potato.

cut raw sweet potatoes

I hope that these tips help make cutting sweet potatoes a little easier for you. If you also love eating sweet potatoes, let me know in the comments below how you like to cook them. It would be cool to see how other people like to cook them as well.