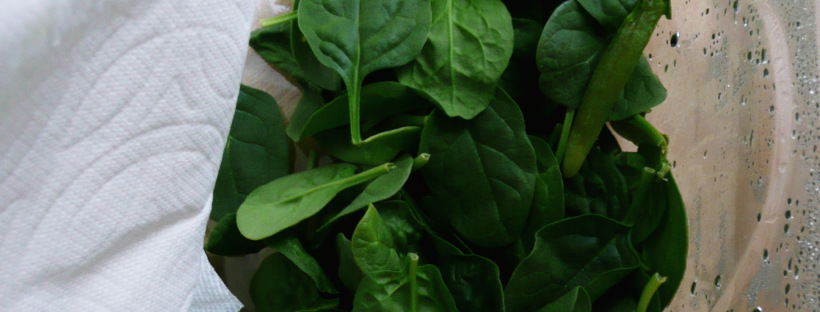
baby spinach

How to Keep Baby Spinach Fresh for Longer

baby spinach

These days, most baby greens come prepackaged and washed in those plastic clam shells at the supermarket. They are super convenient, but the greens seem to always spoil quickly. As it turns out there is a very easy fix for this.

When you open the package, take 2-3 paper towels, fold them in half, and lay them on top of your greens before you close the lid and put them into the fridge. The paper towels absorb the excess moisture that can cause your greens to wilt more quickly. Every few days, check to see of the paper towels are damp. If they are, just replace them with new paper towels, and compost the used ones.

These baby spinach leaves really have been in my fridge for 2 weeks (that’s why the box is so empty, I’ve eaten most of it). This trick works great!

Different greens will have different shelf lives, even if you use this trick. Spring mix doesn’t last as long as the baby spinach does, but this will still work for that as well. This works very well for romaine lettuce, as it’s a sturdier lettuce.

I think that I’m going to post a new recipe every Saturday from now on. Occasionally I may write additional posts other days of the week. I have a number of tips for how to keep food fresh, and how to freeze foods that can spoil quickly, and I’m really excited to share those with you as well.

Please feel free to comment below, and let me know if this trick works for your lettuce too! I think that this must have saved me a small fortune (in baby greens) by now, and it feels great when you can make the most of the ingredients that you have.


apple tarts

Apple Tarts – Dairy Free, Gluten Free, Vegan

P1060750-2

Happy Thanksgiving!

This is a bonus recipe, my gift to you for Thanksgiving! I hope that your family will enjoy them as much as my family does.

Apple tarts are full of fall flavors, and conjure up happy memories (or simply lovely daydreams) of wearing plaid (lots of plaid), and being bundled up in warm hats, scarves and mittens, and going to the local orchard for a fun day of apple pickin’ with friends and family.

These tarts are simple to make, they just require about 35 minutes of your time, and a bit of stirring. I made up a batch of apple filling last night, and it’s just sitting in the fridge as we speak. I’ll spoon it into the tart crusts and top them with some cashew whipped cream right before serving.

You can easily double the batch to make the filling for 12 tarts, and I’ll leave the measurements for 12 tarts at the bottom of post, just in case you need them. You may have to slightly adjust the cooking times for the bigger batch.

Apple Tarts

Makes 6

Ingredients

2 Fuji Apples – cut into 1/4 inch dice (about 2 1/2 cups)

1/2 cup maple syrup

1 1/2 cups water


1/4 level tsp ground cinnamon

3/4 tsp vanilla extract

2 tsp avocado oil (or any neutral flavored oil)


Instructions

1. In a medium saucepan (if doubling the recipe, us a large pot instead) cook the apples, water and maple syrup over medium high heat for 20 minutes, stirring frequently.

Wear an oven mitt and a shirt with long sleeves to stir the mixture, as the steam from the cooking apples can be hot.

2. Turn the heat to medium, and cook for another 10 minutes stirring constantly.

Don’t touch the mixture with your hands during the final 10 minutes, or until it cools, as we’re basically making a caramel with apples in it. You don’t want to burn yourself from the hot sugar mixture.

The pieces of diced apple will become golden brown, and there shouldn’t be any more pools of liquid in the pan. The mixture will become more difficult to stir, and lots of tiny tiny bubbles will form on the bottom of the pan while you stir.

The mixture is done cooking when you can turn your spoon to the side and most of the apple mixture on the spoon will stick to the spoon instead of falling back into the pot.

3. Take the pan off the heat, and carefully scrape the mixture into a bowl and allow to cool.


P1060779

I kinda love how the middle tart almost looks like an apple pie version of a golden snitch. An apple tart with the wings of golden (gluten free) pie crust!

4. Add the cinnamon, vanilla extract, and oil to the cooled apple mixture and stir to combine. Spoon about 2 tbsp of the apple mixture onto each tart shell, and top with a dollop of cashew whipped cream. Serve immediately.


For 12 tarts

4 Fuji Apples – cut into 1/4 inch dice (about 5 cups)

1 cup maple syrup

3 cups water

1/2 level tsp ground cinnamon

1 1/2 tsp vanilla extract

4 tsp avocado oil (or any neutral flavored oil)


Mashed Potatoes

Amazing Mashed Potatoes – The Best Vegan Mashed Potatoes Recipe – Dairy Free, Vegan

P1060620

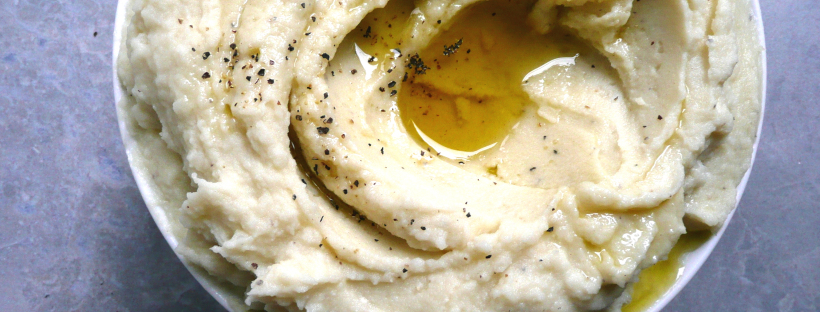
I first made these last year. I wanted super creamy, buttery rich mashed potatoes without any of the dairy. These definitely fit the bill. They were unbelievably good, and I hope that you love them as much as I do.

These mashed potatoes reheat better than normal mashed potatoes (hooray!) and can be made ahead of time and reheated just before serving.

Do be sure to let your guests know that the mashed potatoes have cashews in them though, just in case anyone has any nut allergies.

P1060626

By gently heating the olive oil it removes the pepperiness of the olive oil, and gives it a much more neutral flavor. This also removes some of the nutrients of cold pressed olive oil. To me, that’s ok for the holidays, but you could use any neutral oil in place of the olive oil and they mashed potatoes would probably still turn out well. If you do use a neutral flavored oil, then you can skip the step of heating the oil and add the oil directly to the cooked potatoes along with the cashew cream.

Amazing Mashed Potatoes
Serves 4-6

Ingredients

1/3 cup raw cashews, soaked overnight

½ cup + 3 tbsp. water

3 lb russet potatoes (I used 2.8 lb for reference)

2/3 cup + 1 tbsp. olive oil (or neutral flavored oil)

1 ¼ tsp. – 1 ¾ tsp. sea salt

¾ tsp. black pepper

Instructions

1. To make the cashew cream soak the cashews overnight, then drain them.  Blend the cashews and 1/2 cup + 3 tbsp of water until smooth. Set aside.

If you forget to soak the cashews, you can boil them for 50 minutes (it’s a long time I know, but they plump right up), adding water the pot occasionally if the water runs low. Drain them and allow them to cool to room temp before using.

2. I would heat the oil on the back burner of the stove, just so it’s less likely to be accidentally knocked over by a pet or a small child. Gently heat the olive oil in a dry medium saucepan (if there is any water in the pan, then the oil might splatter) over medium heat for 5-7 minutes, until it loses it’s peppery aroma and smells slightly fruity. Don’t touch the oil but waft it so that you can smell if the oil has lost its pepperiness.

Olive oil naturally smells peppery, but when it loses that smell, it loses that peppery bite in its flavor as well, which is what we’re looking for here. Once it smells fruity, take the pan off the heat and set it aside to cool to room temp.

3. Peel and cut the potatoes into 1 inch cubes. Add the potatoes to a large pot of cool water along with a drop of oil to prevent the pot from boiling over. Bring the potatoes to a boil over medium high heat and then turn the heat to medium and cook the potatoes for about 10-15 minutes until you get no resistance at all when you pierce the potatoes with a fork.

4. Drain the potatoes and put them into a large mixing bowl. The potatoes should take about 50 minutes to cook, and at this point, the olive oil should be cool.

If the pan of oil is still warm, spoon about 1 tsp of oil onto a plate and let it cool for a few minutes. Taste the cooled olive oil and see if it’s still peppery.

If it still has a peppery flavor, heat it for a few minutes longer over medium heat until it smells fruity. Drop a teaspoon of the oil onto a plate, allow it to cool and taste it again.

If the olive oil has lost it’s peppery flavor, allow the olive oil to cool to room temp before adding it to the potatoes. Don’t stir the hot oil into the potatoes, because you’ll be using a hand mixer to whip the mashed potatoes and you don’t want hot oil to splatter over anything or anyone while the potatoes are being whipped.

5. Roughly mash the potatoes with a fork, and stir the oil into the potatoes by hand until you no longer see any pools of olive oil. Stir in the cashew cream, 1 tsp of salt, and pepper. Then using a hand mixer, whip the potatoes until creamy and fluffy.

6. Taste the potatoes, and add salt ¼ tsp. at a time until you’re happy with the seasoning. I ended up adding 1 ¾ tsp. salt to my batch, but you may have to adjust your seasoning depending on if you have a slightly different weight of potatoes.

7. Serve warm, or stash in the fridge to reheat right before serving.

If you’re putting a dish straight from the fridge into the oven, put the fridge-cold dish into the cold oven (so that the ceramic dish does shatter from the temperature change between the cold fridge and the hot oven). Then preheat your oven with the dish inside so that it warms up with the oven and bake as usual.

You can reheat any mashed potatoes by covering the dish tightly with foil, and baking at 300 degrees for 45 minutes until warmed through.


Note- You can also add in some granulated garlic, and some nutritional yeast for “cheesy” mashed potatoes that are just delicious, or just have some extra nutritional yeast and granulated garlic on the table in case someone would like to add them to their own serving.

Frozen Celery

What To Do With Leftover Celery

P1060566

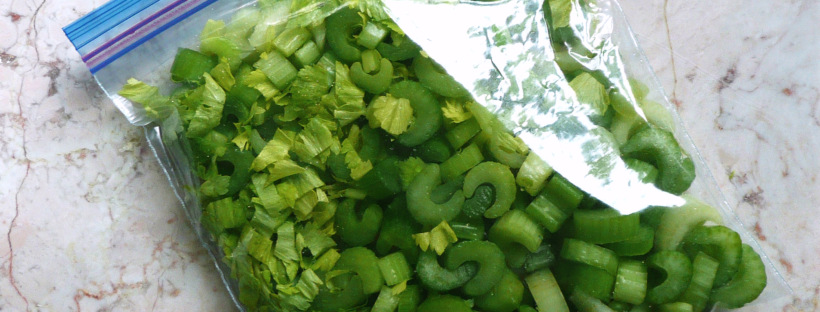
I don’t often cook with a lot of celery, and I always seem to have some leftover this time of year after making stuffing and gravy.

Instead of letting it languish in the back of your fridge (until you have to throw it away) you can freeze it and use it in future dishes. There are just two things you need to remember with frozen celery.

1. Don’t let it defrost before cooking with it or it will brown. Add it straight from the freezer to the pan. It’s still edible when it turns brown, just not so pretty. If you need to dice the frozen celery further before cooking, try and do it quickly so that the celery doesn’t have time to defrost before it hits the pan.

2. You can use frozen celery in any recipe that calls for cooking celery, it’s not so great in recipes that call for raw celery (like potato salad) because frozen celery will lacks the color and crunch of fresh celery.
I’ve even used frozen celery to make dairy and gluten free clam chowder and it came out great.

You can also add some frozen celery to a pot with some diced onion, sliced carrot, leftover chicken, broth and cooked brown rice or gluten free noodles for a quick and tasty chicken soup. Its also great in minestrone or other vegetable soups.

Directions

1. Wash and slice the celery into ½ inch thick slices. They look like beautiful little crescent moons this way, and the size makes it easy to add to recipes. I also love when little bits of chopped celery leaves peeking out of dishes because they make any dish a little prettier and cheerier.

2. Place the celery into a Ziploc bag and freeze flat.

When you want to use the celery, just break off as much celery as you need in the recipe and put the rest back into the freezer. Ta da! No more wasted celery!


gravy

Gorgeous Gravy – The Best Vegan And Gluten Free Gravy Recipe

P1060948-2

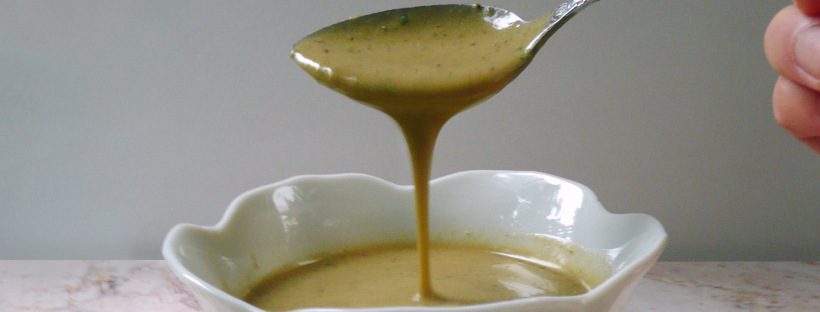
This is hands down the best gravy I’ve ever had. It’s totally vegan, and incredibly delicious.

It has all the flavors that you want in a gravy. The browned mushrooms give it a deep savory richness. The sage and the other spices give it that special Thanksgiving charm, and the oat flour gives the gravy a velvety, creamy, buttery texture with out any dairy.

I promise that you won’t miss the chicken stock or the butter.

It’s great served over mashed potatoes, turkey and stuffing, but delicious enough to be eaten on it’s own. You can double or triple the recipe and serve it with sautéed mushrooms as a creamy mushroom soup, or serve it over pasta for something like a creamy mushroom alfredo sauce.

I would add just a pinch more salt to this myself, but I like things more on the savory side. Some people like things less salty, and leaving that extra little bit of salt out gives your guests a little more wiggle room as far as the savory level of their gravy is concerned.

This recipe works well with lots of different dietary restrictions, but if you know that one of your guests has celiac disease, then be sure to use certified gluten free oats. Oats are naturally gluten free, but normal oats from bulk bins can sometimes be processed on the same equipment as normal flour, and can contain trace amounts of gluten.

You can make this gravy ahead of time, and just reheat it right before serving. One less (delicious) thing to worry about cooking on Thanksgiving is something to be thankful for indeed.

Gorgeous Gravy
Makes 2 cups

Prep time – 5 min
Cook Time – 30 min
Total Time – 1 hr 20 min

Ingredients

1 2/3 cup diced mushrooms (about 5 white or crimini mushrooms)

¾ cup diced onion (about ½ a medium onion)

1 tbsp. diced celery

7 tbsp. olive oil

¼ cup oat flour *

2 cups water


½ + 1/8 tsp. sea salt

¼ tsp. black pepper

¼ + 1/8 tsp. dried rubbed sage

¼ tsp. dried thyme

3 tsp. finely chopped fresh parsley.


Instructions

1. Sauté the mushrooms over medium high heat with 4 tbsp of olive oil for about 8 – 10 minutes until the mushrooms have become golden brown around the edges. Pour the mushrooms and olive oil into a bowl and set aside.

2. Allow the pan to cool off the heat for 10 minutes. The onions and celery will cook more evenly if they are allowed to start off cooking from a cool pan.

3. Add the onions and celery into the cooled pan along with another 3 tbsp of olive oil. Cook the onions and celery over medium high heat for 3-4 minutes. Then turn the heat down to medium and cook for another 3 minutes until the vegetables are softened.

4. Add the oat flour into the celery and onions and cook for 3 minutes, stirring the mixture as it cooks.

5. Add the 2 cups of water and the cooked mushrooms to the pan and turn the heat up to medium high. Cook uncovered for about 8 minutes until the mixture has thickened, stirring frequently. Don’t worry if the gravy looks a little lumpy right now, the blender will smooth that all out.

6. Take the pan off the heat, and let the gravy cool for 30 minutes.

Caution when blending hot liquids – remove the little clear plastic cap off the top of the blender lid (the lid’s center insert) and put a folded towel over the top, then blend.

If you don’t allow the blender to vent steam while blending hot liquids, pressure can build up and the blender contents can explode. Taking the center insert off the lid, and using the folded towel should prevent this from happening.

Add the gravy to the blender, and blend until smooth. Add in the the salt, pepper, sage, parsley and thyme and give the gravy a quick blitz to stir in the spices, but still allow some green from the fresh parsley to show through in the final gravy.

You can stash this in the fridge overnight and then reheat the gravy in a saucepan over medium heat right before serving.

Notes – * I grind oats into oat flour using a blender. Don’t grind the oats in a food processor because the flour won’t be fine enough.

Any extra oat flour I don’t use in the recipe goes into an airtight container and I use it for another recipe.

Cashew Whipped Cream

Cashew Whipped Cream – Dairy Free, Gluten Free, Vegan

P1060684-2.jpg

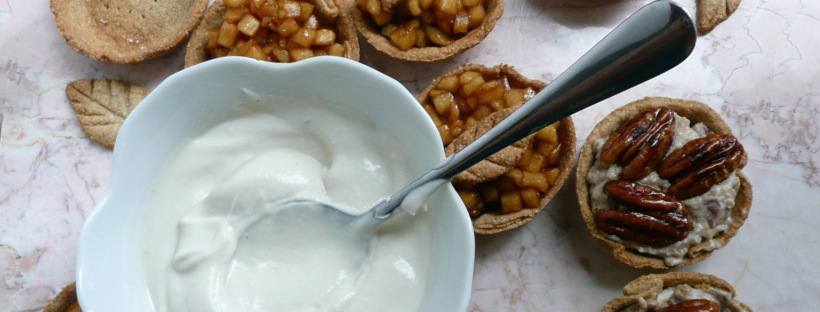
This cashew whipped cream is a great alternative to store bought whipped topping, and it’s super easy to make.

On it’s own, this cashew whipped cream isn’t super flavorful, but poured over a fresh summer peach it is absolutely spectacular, and it gives a wonderful creaminess when dolloped over mini pecan tarts, or pumpkin tarts at Thanksgiving.

Once it’s blended, you can add another tsp. of maple syrup, or a little more vanilla to taste, but the pie fillings will already be quite sweet, so try the cashew cream on a tart with some pie filing before adjusting the flavor of the cashew cream.

The oil may seem like a little bit of an odd addition, but it gives the cashew cream a little extra richness, and rounds out the flavor of the cashew whipped cream along with the sweetness of the maple syrup.

If you’re making a lot of tarts, you can easily double this recipe if need be. You can make this in advance and then keep it in an airtight container in the fridge until you’re ready to serve.

P1060787

Cashew Whipped Cream

Makes about ¾ cup.

Ingredients

½ tsp vanilla extract

1 tsp maple syrup

½ cup raw cashews (soaked overnight)

5 ½ tbsp. water

1 -1 ½ tsp avocado oil, or any neutral flavored oil (optional)


Instructions

1. Soak the cashews overnight, and drain. Add the cashews to a blender along with the rest of the ingredients and blend until smooth and creamy.

2. Spoon over fresh fruit or mini tarts. Serve.

Note – If you forget to soak the cashews, you can boil them for 50 minutes (it’s a long time I know, but they plump right up), adding water the pot occasionally if the water runs low. Drain them and allow them to cool to room temp before using

roasted sweet potatoes

Roasted Sweet Potatoes

P1060409

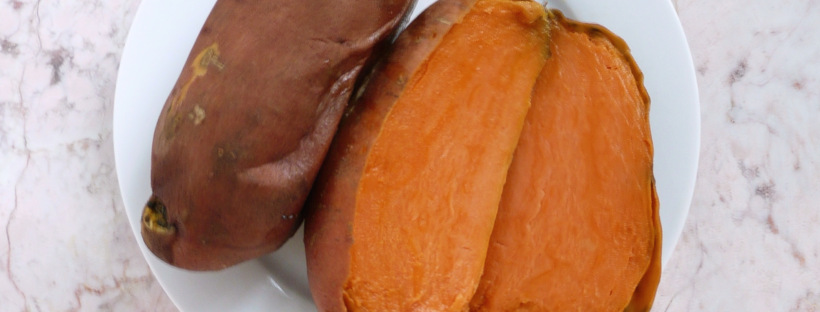
Roasted sweet potatoes are surprising versatile and super simple to make.

I roasted sweet potatoes a number of ways until I found Gwyneth Paltrow’s recipe for roasted sweet potatoes in her book It’s All Good.

This is a version of her recipe. I added the olive oil to crisp up the skin, and also put the sweet potatoes on a sheet pan (instead of roasting them directly on a baking rack) just for the sake of easy clean up.

I usually roast 4-5 of them at a time on a stainless steel baking sheet or a large glass pyrex dish, and they make a quick snack when I’m hungry but a little too tired to think to hard about what I want to eat. They usually get sweeter when they are refrigerated overnight. For a quick snack, I sprinkle them with a little cinnamon, and maybe a drizzle of little maple syrup if I’m craving something sweet

The cheapest place that I found organic sweet potatoes was at Costco (they don’t always have them) but you can get a 10 lb bag of them for around $11. Trader Joes almost always have them year round, and they are a little more expensive than Costco, but much cheaper than anywhere else.

You can puree them and use them to make my pumpkin tarts, mash them with some cinnamon and maple syrup, or add them to my vegan cheddar bay biscuits (recipe coming soon!).

Ingredients

4-5 sweet potatoes

½ – 1 tsp olive oil

Instructions

1. Preheat the oven to 425.

2. Give the sweet potatoes a good scrub. Pat them dry with a paper towel and prick them 4-5 times with a fork.

3. Rub the olive oil over the sweet potatoes, place them on a baking sheet or pyrex dish and roast for 1 hr.

4. If the sweet potatoes are thicker than 2 inches in diameter, cook them for an addition 15 -30 minutes until cooked through and you can pierce them with a paring knife with no resistance.

To clean up the caramelized/ blackened sweet potato goo, soak the pan or baking sheet overnight. Pour off the water and make paste from a little baking soda and dish soap. Use a scrubby sponge and baking soda paste to scrub off any of the remaining sweet potato goo.


Pecan Tarts

Pecan Tarts – Dairy Free, Gluten Free, Vegan

P1060884

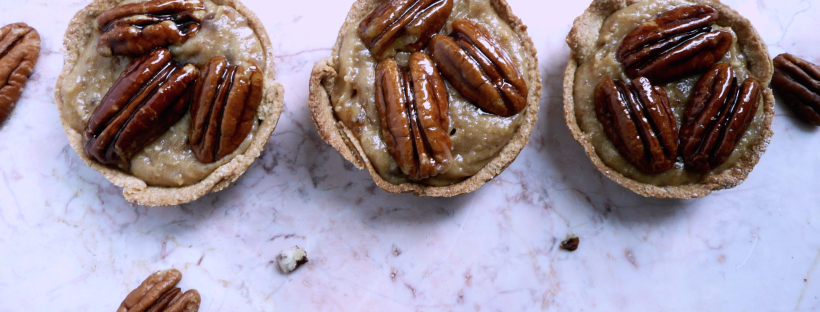
These pecan tarts are awesome! They really taste like pecan pie. The pinch of salt really makes these mini pecan pies sing. I hope that you love them as much as I do.

You can make the filling ahead of time, and just stir through the toasted pecans through right before serving. I’d make the candied pecans the day you want to serve them so that they stay crunchy.

This recipe makes 4 tarts, which is sort of a funny amount, so I’ll put the measurements for 12 tarts at the bottom of post just in case you want to make 12 instead. You may have to slightly adjust the cooking times for the bigger batch of toasted and candied pecans.

You can use this recipe to make the gluten free tart shells.

P1060874

Pecan Tarts

Makes 4 tarts

For the filling

¼ ts. vanilla extract

1/3 cup raw cashews

3 tbsp. maple syrup

6 diglet dates – about a scant 1/3 cup

1 tbsp. water

pinch salt

Instructions

1. Grind the cashews in a food processor until they look like breadcrumbs. Scrape down the sides of the processor occasionally, and add in the maple syrup and blend until the mixture looks like heavy cream, with little bits of cashews running through it.

2. Chop the dates into ¼ inch dice and add them to the cashew mixture. Blend for 3-4 minutes until relatively smooth, a few lumps of cashews or date here and there are ok.

This is what the mixture should look like when it’s done.

P1060849

3. Scrape the mixture out into a bowl and set aside.

Toasted Chopped Pecans

¼ cup whole pecans

Instructions

1. Chop the pecans into ¼ inch dice. Cook them in a dry pan over medium heat for 2-3 minutes, stirring constantly until toasted and fragrant.

2. Add the toasted pecans to the cashew mixture and stir until mixed through.

3. Allow the pan to cool, then carefully wipe out any tiny bits of leftover toasted pecans with a bit of folded paper towel, as they can burn when you use the same pan to cook the candied pecans.

Candied Pecans

12 whole pecans (3 pecans per tart) about ¼ cup

2 tbsp. maple syrup

Instructions

1. Toast the whole pecans until fragrant in a dry pan over medium heat for about 2 minutes, stirring frequently so they don’t scorch.

2. Add in the maple syrup and stir the pecans constantly for another 30 seconds, then take the pan off the heat. Continue stirring the pecans off the heat until the caramel coats the nuts.

3. Pour the candied pecans onto a silpat or a piece of parchment paper (on in pinch, a lightly oiled plate) and arrange them with two forks so they aren’t touching each other, and allow to cool.

Don’t touch the hot caramel or the candied nuts until they are cool. It’s super tempting to touch hot sugar, but you don’t want to burn yourself.

If you stir the nuts too long over the heat, the syrup can crystallize, and the coating on the pecans can go cloudy and rough textured. If this happens, it’s ok! It just means that the pecans will be extra crunchy, and they will still taste great.

4. Add about 1 ¾ tbsp. of filling to each tart shell. Top each tart with 3 candied pecans (4 candied pecans is two sweet, and 2 isn’t sweet enough) and serve.

Getting the leftover caramel off of utensils and saucepans is really easy. Just put the caramel covered utensils in the pot that you candied the pecans in, pour in some warm water and let the pan sit for an hour or two. The sugar will dissolve into the water, and you can just pour it out and put everything straight into the dishwasher.

For 12 tarts

For the filling

¾ ts. vanilla extract

1 cup raw cashews

½ cup + 1 tbsp. maple syrup

18 diglet dates – about a scant 1 cup

3 tbsp. water

3 pinches of salt

Toasted Chopped Pecans

 ¾ cup pecans

Candied Pecans

36 whole pecans (3 pecans per tart) about ¾ cup

6 tbsp. maple syrup


pumpkin tarts

Pumpkin Tarts – Gluten Free, Dairy Free, Vegan

P1060726
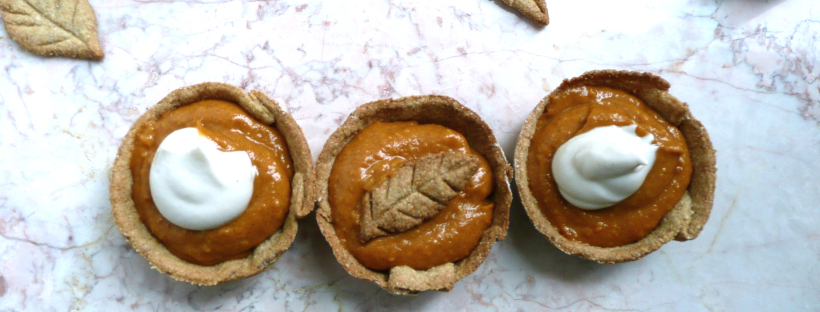
No Thanksgiving would complete without pumpkin pie!

When I was a kid, it was my job every year to make the classic pumpkin pie recipe from our well-loved Betty Crocker Cookbook. I made that same recipe all the way through high school and college, and missed it terribly when I found out that I couldn’t eat it anymore.

This is a quicker version, and is gluten, dairy and egg free. It’s rich, and perfectly spiced. You can top it with some cashew whipped cream for that classic pumpkin pie look and taste.

Also, another plus to this recipe is that you can secretly pretend that you’re at Hogwarts when you eat them.

You can make the filling ahead of time, and keep it in the fridge until you want to serve it.

The only to keep in mind is that you have to make the cashew whipped cream before you make this recipe because the few tablespoons of cashew cream give the pumpkin filling a lot of richness.

I’ll put the measurements for 12 tarts in case you’d like to double the recipe.


P1060805-2

Pumpkin Tarts
Makes 6 tarts

Ingredients

½ cup + 1 tbsp. + 1 tsp. pumpkin puree, or roasted sweet potato puree

3 tbsp. + 1 ½ tsp. maple syrup

2 tbsp. avocado oil or any neutral flavored oil


¾ level tsp cinnamon

¼ + 1/8 level tsp ground ginger

tiny pinch of cloves

pinch of salt

¼ tsp vanilla extract

1 tbsp. water

3 tbsp. cashew whipped cream


Instructions

1. Stir all the ingredients together. Top each tart shell with 2 tbsp. of the pumpkin pie filling, and a dollop of the cashew whipped cream. Serve.

For 12 tarts

Ingredients

1 cup + 2 tbsp. + 2 tsp. pumpkin puree, or roasted sweet potato puree

7 maple syrup

4 tbsp. avocado oil or any neutral flavored oil


1 ½ level tsp cinnamon

¾ level tsp ground ginger

pinch of cloves

2 pinches of salt


½ tsp vanilla extract

2 tbsp. water

6 tbsp. cashew whipped cream

mini pie crusts

Mini Pie Crusts – Dairy Free, Gluten Free, Vegan

P1060642

These tart shells are so cute and so full of possibilities! They can be filled with just about anything, and on their own they sort of taste like fortune cookies or waffle cones, but not quite as sweet. I snacked on a bunch of them while I was testing this recipe.

If you’re making mini-tarts for a party or celebration, I would the make a couple different pie fillings ahead of time, and then bake up a bunch of these tart shells the day I want to serve them. They have a crisper texture than normal pie shells, and I would fill them right before serving, as if the wet filling is in them too long then the bottoms of the tart shells can soften a bit and lose their crunch.

You can also set out bowls with a few different pie filling options like apple, pumpkin, pecan, or even a chocolate peppermint filling and people can top the tart shells with their filling of choice.

P1060723-2

I used a normal sized muffin tin (not a mini muffin tin). If you have to make them ahead of time, store them in an airtight container so that they retain most of their crunchiness.

Mini Pie Crusts

Makes 12 Tart shells.

Ingredients

6-8 tbsp. water

1 level tsp. psyllium husk powder*

1 tsp. vanilla extract

1 tbsp. + 1 tsp. olive oil

3 tbsp. maple syrup

1 cup of oat flour + 2 tbsp.**

Instructions

1. Preheat the oven to 375.

2. Grease and flour the muffin tin with olive oil and oat flour.

3. Stir together 6 tbsp of water with the psyllium husk powder. It will gel up quickly, and try to smush out as many lumps as you can. Let it sit for 5 minutes, and then stir in the vanilla, olive oil and maple syrup until well combined. Add in the oat flour and knead until a smooth dough forms.

If the dough is too sticky, let it sit for a minute. If the dough is still sticky, add a little oat flour and knead it through.

If the dough is too dry, add 1 tbsp. or water and knead it through. The dough should have the consistency of a soft sugar cookie dough and shouldn’t crack or break apart at all when you press on it.

4. Cut the top and sides off of a gallon size Ziploc back so that you have a large rectangle of plastic when you unfold it. Dip a paper towel in a little bit of olive oil and oil the inside of the plastic.

5. Divide the dough into 4 equal portions. Take one portion of the dough and roll it out between the two layers or oiled plastic until it’s just slightly thinner than 1/8 of an inch thick. Use a 3.5 inch wide round cookie cutter (I used the band off the top of wide mouth mason jar for this), to cut rounds out of the dough.

Peel the scrap dough away from the rounds. Peel the rounds away from the plastic and press them gently into the muffin pan. Repeat until you have 12 little tart shells ready to bake.

6. Prick the bottom of each tart shell with a fork 2-3 times, and bake the tart shells for 20-25 minutes until golden brown around the edges. Let them cool in the pan, then use a butter knife to pop them out of the muffin tin.

Fill with your favorite pie filling, add a dollop of cashew whipped cream if desired, and serve immediately.

Notes – *Psyllium husk powder gels like nothing else, and there’s no great substitute for it. I found mine in the bulk spice section of the local Fred Meyer, but Whole Foods, Trader Joes have been known to carry it as well. If it’s not in the natural foods, or bulk spice section, check the dietary supplement/ digestive health (where the Metamucil is) section of the store or pharmacy as it’s sometimes sold there as well.

** I grind oats into oat flour using a blender. Don’t grind the oats in a food processor because the flour won’t be fine enough.

Any extra oat flour I don’t use in the recipe goes into an airtight container and I use it for another recipe.