One Year Later…And Christmas!

20181123_135914

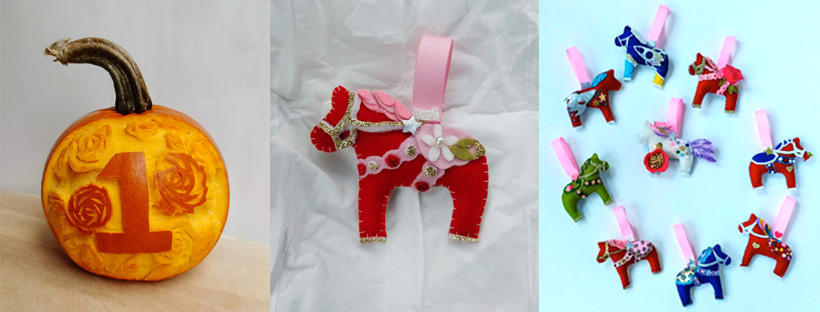
(The pumpkin that I carved to celebrate the blog’s 1st birthday!)

My first post on this blog was November 19, 2017. I’ve officially been blogging for over a year now!

It’s been a really fun year, but not the most comfortable one. I purposely pushed myself to try things that I was afraid to do this year, and writing this blog had a lot to do with that.

Before starting the blog, I had been writing recipes down for a year and a half, but I was afraid to share them. What if nobody read them? What if there were better recipes out there? What if I was terrible at food photography? What if the recipes weren’t as good as I thought they were?

Eventually I worked up the courage to just try anyways. Just try and do the things that I very much wanted to do (but was afraid to). So I posted the Thanksgiving recipes that I would have wanted when I first figured out that I had food sensitivities.

And you know what? Nothing terrible happened.

Then I took another leap of faith and wrote another recipe, and another after that. A year later I’ve written 50+ recipes! And I’m proud of every single one of them.

Green Goddess 3

(Parsley Green Goddess Dressing)

But I’ll let you in on a secret – halfway through every post I would think What’s the point?

During every single one of those posts I worried that my photography wasn’t good enough, and that my writing wasn’t good enough. I worried that the blueberry muffin recipe that I had tested 7+ times was never going to come out right (turns out the 10th try they came out perfect!)

p1080289-1

(Muffin Success! Finally…)

A year after starting this blog I’ve learned that the point is still that you try anyways. You do your best, and it’s probably going to work out ok.

Not everything is a smashing success, I only post the recipes that I’m proud of on the blog. The recipes that didn’t turn out so great I just worked on and polished until I knew that they were the very best that I could make them.

This year I designed leggings, backpacks, duffel bags, t-shirts, art prints, and even furniture for my society6 shop! I had no idea that was possible a year ago!

It’s so exciting when someone buys something that you made because they think that it’s cool, and the fact that I’ve been able to donate part of my earnings to a girls education charity (a cause that I really believe in) makes having my society6 shop as a creative outlet even more rewarding.

I also discovered the joys of shopping at the local farmers market! It’s so much fun to see all the amazing food that is produced locally and it just makes your heart happy to see all the colorful different kinds of vegetables, squash, and living herbs that you can’t find in a supermarket.

20180930_160635~2

I also tried intricately carving pumpkins this year!

If you want to do this I would highly recommending wearing a stainless steel mesh glove on your non-dominant while you’re carving. 

I carved the pumpkin on the left first, then after a few days I carved it a little more until it turned into the pumpkin on the right.

20181201_144824

Here’s a closer look at the final result. I’m pretty proud of it I have to say. I watched a few YouTube videos on Thai melon carving and that’s how I figured out how to carve the roses. Maybe I’ll try carving melons next year…

For Christmas I made this Dala Horse for my friend Katie. She’s part Swedish, and I wanted to make her something to say “Thank you for being an awesome friend this year!” This is the first Dala Horse that I’d ever made and loved the process of making it.

20181220_130112-2

I made it from some red merino wool craft felt that I had been unsure about what to do with. This one turned out so well that I was excited to make more of them.

So I made these two horses sharing a carrot…

clone tag: -4019565997308188355

Then I made a few more Dala Horses…

clone tag: 7517880155277458167
clone tag: 5206238601296770273

All in all I made 10 Dala Horses this year (personalized for various friends and family members). They took a lot of work (and were made from scraps of things that I had from other projects), but they came out so well!

I hope that 2018 treated you well, and that you are having a great holiday season!


Thanksgiving Chicken

clone tag: 1738347936203128812

I love Thanksgiving! It’s one of my favorite holidays of the year.

Friends, family, good food. What’s not to love?

One funny thing about Thanksgiving in my family is that I’m the only one that really loves turkey. Everyone else prefers chicken.

But that actually works out ok (even on Thanksgiving)! Most of the turkeys at the local supermarket are really big 20 lb birds, which is way too much turkey for our family to finish, so a 4-5 lb chicken is the perfect size for us. With all the side dishes and desserts (cornbread dressing, mashed potatoes, pumpkin tarts, apple tarts, and pecan tarts), everyone ends up very happy and full by the end of Thanksgiving dinner.

Also, those turkeys are expensive. Even if you buy a conventionally raised turkey, a 20 lb turkey is going to be about $50. This chicken was $8, and it was free-range and organic to boot.

How did I get a free-range organic chicken for $8? I just bought it on the sell by date and it was marked 50% off.

The grocery store also sold a little packet of mixed fresh herbs (thyme, sage, and rosemary) for $2.50, that plus an onion and some frozen celery (that I had stashed in the freezer from about a month ago) meant that this beautiful roast chicken added up to about $11-$12 for 4-6 servings. Much more affordable than $50.

And if you’re far from home this Thanksgiving, and you’re making dinner for two, you can make this chicken and have some great leftovers to pack for lunch.

Some great things about this recipe are that it still has all those rich flavors that we associate with a Thanksgiving turkey, AND you don’t even need to make a gravy! You can spoon the rich pan juices from this chicken over mashed potatoes and cornbread dressing to your heart’s content. It will be just as delicious as any gravy, (with less work) promise.

clone tag: 2934890611313498100

Sprigs of rosemary and thyme flavor the chicken from the inside out, and I tuck sage leaves under the skin for some color and extra flavor. The most delicious parts of that chicken are right under those leaves, so make sure to get some chicken with a sage leaf or two!

Thanksgiving Chicken

Makes 4-6 delicious servings

Ingredients

4 lb chicken


1/2 an onion (cut into 4 wedges)

2 sprigs of thyme

2 4 inch sprigs of rosemary

8 inch stalk of celery (cut into 1/2 inch slices)


2 1/2 tbsp olive oil

9-10 fresh sage leaves

sea salt

black pepper


1 cup of water


Instructions

1. Preheat the oven to 425 degrees F.

2. Wash your herbs, measure out the olive oil and water, and cut up your onion and celery and set all of this aside onto a separate plate along with some salt and pepper and a few toothpicks.

3. Whether or not your wash your chicken is completely up to you. There’s some controversy about if you should do it or not.

Personally, I do wash chicken before cooking it. I fill a big bowl of water in the sink and submerge the chicken, then pour out the water (this way the water doesn’t splash off the chicken). I do this a few times until the water runs clear. The chicken then goes into your roasting dish (I’m using a 12 inch oval CorningWare casserole dish) and the big bowl goes straight into the dishwasher.

Once the chicken goes into the oven, I sanitize the sink and any surfaces that the raw chicken may have touched.

clone tag: 4547346532438281968

4. Dry the chicken off with a paper towel. Put the onion wedges, thyme, rosemary, and celery inside the chicken and tie the legs together with some kitchen twine.

Gently separate the chicken skin from the chicken breast and tuck the sage leaves around under the skin. If the skin tears, don’t worry about it. The chicken will still be golden brown and amazing! Just use a few toothpicks to arrange the chicken skin back into place.

Rub the skin with olive oil, sprinkle over salt and pepper, and tuck in the wingtips using a few toothpicks to hold them in place while the chicken is roasting.

Pour the water into the bottom of the baking dish.

clone tag: 3141653108858848348


5. Roast the chicken for 50 min – 1 hr 15 minutes, or until the chicken is golden brown and a thermometer measures 165F in the thickest part of the thigh.


clone tag: -7849446987528649024

Look at that crispy skin! Yum.

Let the chicken rest 10-20 minutes before carving. Pull out the toothpicks and serve the chicken with the delicious pan juices.

clone tag: 708306459663070278

Ta-da! You just made a glorious roast chicken for Thanksgiving!

One more thing – this chicken still has a little magic left.

After dinner, pull the meat off the bones stash it in the fridge for later. Put the carcass with all the herbs and vegetables still inside of it into a slow cooker with a splash of apple cider vinegar and fill the pot with water (I cut off the kitchen twine before I put the bones into the slow cooker but I’m not sure if it’s really necessary). Turn the heat to low and cook for 24-48 hours.

Strain out the solids, and you will be left with an incredible and flavorful bone broth!

Add in some of your leftover chicken along with some vegetables and you will have a beautiful soup to warm you up on a cold day.

Wishing you and your family a very Happy Thanksgiving!

Elaine

mini pumpkins

Halloween – Quick & Easy (Last Minute No Carve) Pumpkin Decorating!

Halloween is one of my favorite holidays! It’s always so fun to see everyone’s costumes, and I have many happy childhood memories of eating lots and lots of candy.

Let me tell you, when you have dietary restrictions, the most difficult holiday isn’t Thanksgiving, it’s Halloween, because there’s always leftover candy and you have to give it away quick, or else you find that you’re eaten half the bag before you know it.

I don’t speak from experience of course…

But sometimes eating half a bag of left over Halloween candy once a year is SO worth feeling crummy afterwards.

Especially when you have white chocolate Kit Kats or white chocolate peanut butter cups… which are just extra awesome.

Another thing that makes Halloween super fun is decorations! While I love carving pumpkins at Halloween, it can be messy and time consuming and if you’ve left your Halloween decorating to the last minute, you can still make adorable decorations to put in the window to welcome all the trick or treaters!

clone tag: -2224802199802910510

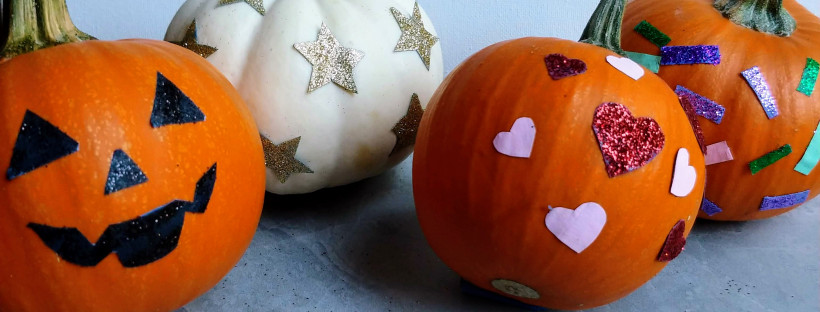
There are lots of tutorials for spray painting pumpkins, but I wanted to be able to cook with these after Halloween, so I used painters tape to make low tack stickers to put on these mini sugar pie pumpkins.

If you don’t have time to do this DIY, another option is just to buy some colorful stickers at the craft store and stick them onto the pumpkins instead. The store bought stickers might be harder to pull of the pumpkins, but I think that if you press the store bought stickers to your skin before putting them onto the pumpkins, the stickers might lose a little of their tackiness and be easier to pull of the pumpkins when you’re read to cook with them.

This DIY is best done a few days ahead of time if possible so that you can be sure the stickers are really dry before you start cutting them, but can also be done in about an hour or two before you want to start decorating the pumpkins if you use hairdryer to help the paint and Modge Podge layers dry quickly.

For your homemade stickers, you will need:

-painters tape

-acrylic paint

-ziptop bags

-Modge Podge (optional)

-glitter (optional)

-brushes

-scissors

-hairdryer (if you’re doing this DIY at the last minute)

Instructions

1. Lay your ziptop bag flat on the table and overlap pieces of painters tape by about 1/2 an inch over the bag. You want to have about 2 layers of tape on the plastic.

clone tag: -4494802101336254546

2. Paint a thin layer of acrylic paint of your choice over the painters tape. Allow to dry, or use a hairdryer to dry the paint quickly. Paint on more layers of color (using the hairdryer between layers) until you’re happy with the result.

Optional – Everything is more fun with glitter! If you want your stickers to be glittery, mix a little bit of Modge Podge with a generous amount of glitter and paint it over the top of your painted painters tape. Use a hairdryer to speed up the drying process.

What I first did is I painted the tape with acrylic paint and then sprinkled glitter on over the top while the paint was still wet, thinking that it would be tacky enough to keep the glitter on. That turned out not to be the case, and there was tons of glitter fallout (which you’ll see in the pictures, but a little glitter just makes things more festive! :D). I ended up having to vacuum up a lot of glitter, but it all came out ok in the end. I fixed the problem by spreading some Modge Podge over the top of each glittery sticker with my finger and blasted them with a hairdryer to get them to dry quickly and voila! No more glitter fallout.

clone tag: 8765980823518095111

So glittery! And super affordable!

clone tag: 7427284561683169572

Once the layers of paint and Modge Podge are dry, cut away the excess plastic from the sticker tape. Peel the plastic off the back of the sticker tape and then cut out whichever shapes you like and stick them onto your pumpkins.

Give each sticker a good press once you place them onto the pumpkins and decorate to your heart’s content!

clone tag: 6629403141417885135

This is the disco mini sugar pie pumpkin…

clone tag: -6387611760906468731

The Cinderella pumpkin (this variety of mini pumpkin is naturally white so I didn’t have to paint it). I love the glittery stars! This pumpkin looks so elegant!

clone tag: -6372366725628939485

The sweetheart pumpkin…

clone tag: -353266238720428542

And the Jack-o-lantern pumpkin enjoying the sunshine.

clone tag: -8858926983194438683

All the mini pumpkins in their 2018 class picture…

20181019_161833

And the Jack-o-lantern pumpkin being extra friendly and steppin’ forward to wish you a very Happy Halloween!

hardboiled eggs banner

How to “Hard boil” Eggs in a Rice Cooker (Super Easy)

egg2

Hardboiled eggs are one of those things that are great to have stashed away in the fridge. They are perfect high protein snacks (they even have a built in wrapper!) and make a great breakfast on the go as well.

The not so nice part of hard-boiled eggs? The sitting / waiting for a large pot of water to boil.

As it turns out, cooking them in a rice cooker is much easier and faster too!

I first got the idea to do this when I saw an awesome post on the Digging Food blog about how to steam fresh eggs. I had no idea that you could steam eggs before I read their post.

After a little experimentation, I figured out how to make perfect “Hard-boiled” eggs in a rice cooker.

Let me walk you through how to make them…

Step 1 –  Place your desired number of eggs in a heat safe bowl (ceramic or metal is fine).

I use a Tatung 10-Cup Multifunctional Cooker (the most useful piece of cooking equipment known to man). It’s a great rice cooker / steamer, and when I was in college (and living in small dorm room) I managed to make 60 tamales from scratch in one.

Step 2 – Add water. I pour about 1/2 cup of water in the bottom of the cooker before adding a rack that looks like this (you can buy it pretty inexpensively in a larger Asian grocery store like 99 Ranch).

wire rack.jpg

Step 3 – Put the bowl on the rack (this ensures that your food won’t scorch on the bottom of your bowl).

egg1

Step 4 – Cover the rice cooker with the lid and turn the rice cooker on, then set your timer.

My rice cooker takes about 5 minutes until I start to see steam come out the sides of the lid. Your rice cooker make take more or less time to heat up, and it may take a little trial and error before you figure out the right amount of time to cook the eggs to your liking.

For my rice cooker (from the time you turn the rice cooker on to when you turn it off):

Soft Boiled –  takes 13 minutes

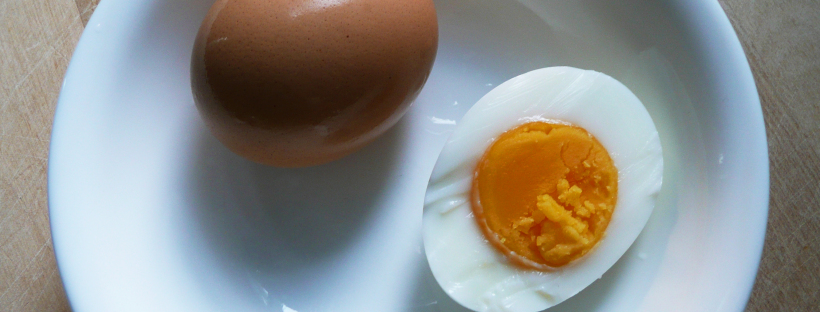
“7 Minute Egg”  (Like the one pictured) – takes 14 minutes

Hard-boiled – takes 20 minutes


Step 5 – Turn the rice cooker off.

Put on an oven mitt and transfer the eggs into an ice bath using tongs.

****Please be careful not to burn yourself **** The steam is pretty hot and you can use the lid of the pot to fan the steam away from you before you take the eggs out of the rice cooker.

egg3

Step 6 – Leave the eggs to rest in the ice bath for at least 30 minutes.

egg4

After this, the eggs should be pretty easy to peel. I like the keep them in the fridge unpeeled (I just like the ritual of peeling them right before I eat them) or you can peel the eggs and keep them in an airtight container in the fridge.

The most I’ve done at once is 4 eggs in one batch, and the cooking time doesn’t change if you cook 1-2 eggs or 4 at the same time.

Update – Jan 14, 2018 – I’ve found that it does make a difference what bowl you use to cook the eggs in. You want a sort of normal serving bowl and not something that’s super deep with high sides so that the steam can surround the eggs better. My preference these days is to cook 6 eggs at a time for 18 minutes (perfectly hard boiled , dunk them into ice water and then keep them in fridge for breakfast / snacking.

I hope that this helps make your breakfast / snacking / meal prep a little easier!

How do you like your eggs for breakfast?

– Elaine

Watermelon Agua Fresca – Paleo, Vegan, Refined Sugar Free

watermelon ag 3

With summer fast approaching, the weather is getting warmer, and Memorial Day weekend is here!

This means that ’tis the season for backyard barbecues and hanging out with friends and family in the sunshine. This calls for drinks.

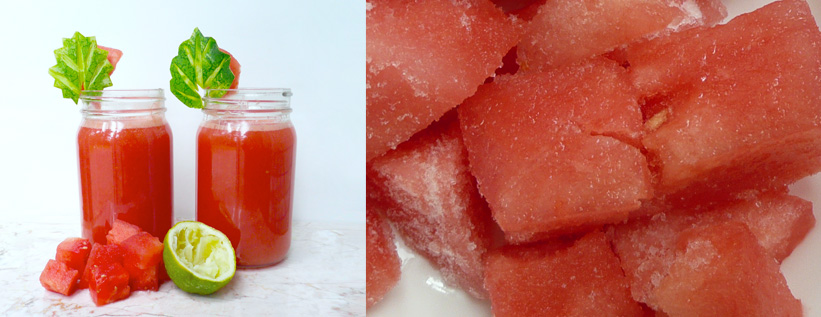
One of my favorites is my watermelon agua fresca. It’s cool and refreshing, and along with iced apple green tea is a refined sugar free alternative to sweet tea.

I love watermelon. It’s one of my favorite fruits and drinking this is almost like drinking a cross between lemonade/limeaid and watermelon juice.

Watermelon season in the US runs from May to September, so lots of delicious ripe watermelons are available in grocery stores right now, which is super exciting (yay!) and another thing that makes this watermelon agua fresca the perfect drink for summer.

Watermelon Agua Fresca

Makes 2 servings (4 cups total)

Ingredients

4 1/2 cups cubed seedless watermelon (1 – 1 1/2 inch cubes)*

1 1/4 cup + 1/8 cup water

3 tsp lime juice (I used lime juice that froze previously and defrosted)

Notes – * Use the sweetest watermelon you can find, that way you won’t have to use any added sweeteners. If you’re having a party, you can make a big batch of this ahead of time and it will keep great in the fridge overnight.

Instructions

1. Add all the ingredients into a blender and blend until smooth. Refrigerate until well chilled, making sure to give the agua fresca a good stir before serving. Pour over ice if desired (especially if it’s a particularly hot day) and serve.

The Etsy Shop is here!

one small blog

I’m so excited to share that the Hope and Butterflies Etsy Shop is now open!

Starting new adventures and not knowing where they will take you

When I started this blog, I had no idea where it was going to go. I knew that I loved to cook, and that I wanted to share my recipes because they were the kind of recipes that I wanted to have when I first went on a dairy / gluten / refined sugar free diet.

I had so many food sensitivities, and I missed eating the things that I loved.  It was really hard to be in more pain, or just feel ill because I ate something as normal as a blueberry muffin. My list of food sensitivities was so extensive that I couldn’t even eat most of the recipes on other gluten free websites.

So I started writing recipes, and eating gluten free versions of the foods that I loved again.

What I didn’t expect when I began this journey was that as my list of recipes grew, and as I cooked and ate my way through this rough patch, I felt more and more like myself again.

Not having recipes that worked for me meant that (for a while) the foods that I ate were boring and bland, and eating those foods brought me no joy.

I hadn’t realized how much brightness food had brought to my life before, and learning to eat the new versions of my favorite foods gave me that brightness back, and nourished not only my body, but also my spirit.

Baking and cooking have always felt very meditative to me. When I’m in the kitchen I can get lost in a recipe, and no matter what I’m going through, I always feel better (and like I’ve accomplished something) when I’ve created and eaten something delicious (especially if it’s a muffin or a brownie).

That’s what I wanted to share when I started this blog, to help other people with food sensitivities find a way to nourish their souls with the joy of creating something that they really enjoy eating.

What has also been exciting is to see how many people have visited the blog. Hope and Butterflies has had visitors from places like the UK, Australia, India, France, Ireland, Kenya, The Netherlands, Germany, and even our friendly neighbor to the north, Canada.

It feels amazing to think that this little cooking blog that I started 6 months ago would reach (and hopefully help) so many people in so many places all around our big world.

I’m also incredibly lucky to have so many good friends and family who have cheered me on during this time. So many people in my life have reached out to tell me that they enjoy reading the blog, or think it’s cool that I’m writing it, which has been amazing.

There have been many times when I think I’m out of ideas and am in doubt if I should keep trying to write recipes, and their encouragement has really cheered me on. I’m so glad that I kept writing, and I’m excited to see how the blog grows and evolves in the future.

The Prints

wonder wander comes + goes

The Hope and Butterflies Etsy Shop sells posters / prints that you can download and print at home.

Each shop listing includes 7 high resolution JPG files (300 dpi, RBG Color Format)

– 4″ x 6″
– 5″ x 7″
– 8″ x 10″
– 11″ x 14″
– 18″ x 24″
– 24″ x 36″
– Wallet Size (the size of a credit card)

Most importantly though, $1 from each sale will be donated to support girls education.

When I was designing, I wanted to create prints that would be encouraging, and most of all, kind. Many of the designs encourage self care, self acceptance, and cheer you on in difficult moments.

Life can be really hard sometimes, and you’re always doing the best that you can.

Sometimes it’s nice to have a reminder of that, which is why the prints all include a wallet size printing option as well.

Because sometimes you do need a pocket sized reminder that “You are AMAZING” when things aren’t quite going the way that you want them to. Take it from someone who knows, storms pass, you will grow from them, and things will get better.

And whoever you are, you matter too. Your dreams matter too.

I hope that in some small way, these prints will cheer you on when you start down the path towards your own dreams (even if you have no idea where it will take you).

Starting the blog was scary, but also exciting and so so rewarding. I wish you that same scary excitement (and fun surprises, and joy!) along your journey.

Girls Education

Right now, this little Etsy Shop and the Hope and Butterflies Blog are my dream.

I decided to donate part of the proceeds from each sale to support girls education, because not only is it simply the right thing to do, but also because I want to do what I can to help other young women and girls accomplish their own dreams.

I was lucky enough to be able to go to school and learn about the world around me.

Every young woman should have the right to do the same. This shop is my own little way of trying to help make that happen.

Thanks for reading. I’ll be posting more recipes soon.

And remember :


you are doing great blog

And you are wonderful, just as you are.

And Happy Mother’s Day to all the amazing moms out there!

banana bread muffins

Banana Bread Muffins – Gluten Free, Dairy Free, Refined Sugar Free, Comfort Baking

Banana Bread Muffins 1

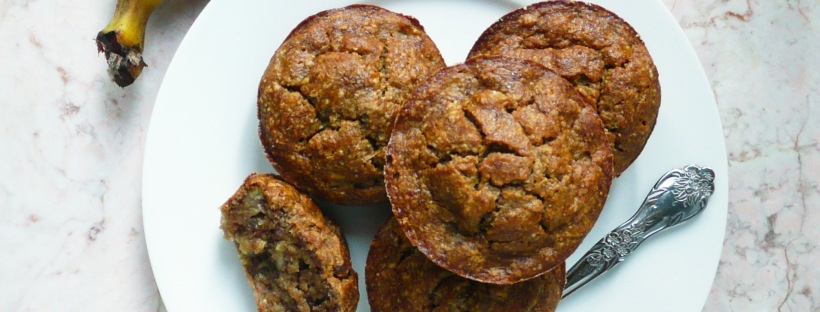
There is something magical about making muffins. You sift together a few ingredients, stir in a few more, and a little while later 12 mini cakes emerge from the oven ready to fill your heart with joy and comfort.

If there is a practice more conducive to self care than baking, I have yet to discover it.

If I’m ever having a bad day, I bake. It takes focus and when you’re measuring and stirring everything together, the things that troubled you before seem far away.

The scent of delicious muffins wafts through the air and makes any house and home seem more warm and friendly. It’s a scent that makes the world a little softer and everything feel a little more possible.

And once you bite into a freshly baked muffin the spell is complete, and life feels ok again.

banana bread muffins 2

I love blueberry muffins, but there’s something about banana bread muffins that seem extra nourishing to your soul.

When I first cut gluten out of my diet, I really missed banana bread. I missed it’s buttery sweetness, and cozy banana richness.

It took me a couple of tries to get this recipe right, but these muffins taste just like the banana bread that I used to love eating. They also have a touch of cinnamon and vanilla to give them an extra bit of warmth to their flavor.

I like to use the ripest bananas that I can find (overripe bananas work the best as they are sweeter) and baking these muffins is a great way to cut down on food waste and have breakfast ready to go for the next few days (even if you eat 3 – 4 muffins still warm from the oven like I normally do).

I like to make these muffins a day ahead and leave them out on a plate on the counter covered by a paper towel. They dry out a little overnight, and the texture gets even better the next day.


Banana Bread Muffins

Makes 12 muffins


Ingredients

1 3/4 cups mashed ripe bananas (about 4 – 4 1/2 bananas)


2 tbsp apple cider vinegar

1/3 cup melted coconut oil

2 eggs

1/4 cup maple syrup

1 1/2 tsp vanilla extract


2 cups oat flour

level 3/4 tsp baking soda

1 tsp ground cinnamon


Notes –

* I grind oats into oat flour using a blender. Don’t grind the oats in a food processor because the flour won’t be fine enough.

Any extra oat flour I don’t use in the recipe goes into an airtight container and I use it for another recipe.

If you’re making this recipe for someone who has celiac disease, please use certified gluten free oats, as the oats from the bulk bins can sometimes be processed on the same equipment as wheat.


Instructions

1. Preheat the oven to 350F.

Grease and flour muffin pan with melted coconut oil and oat flour.

2. In a large bowl, sift together the oat flour, baking soda, and ground cinnamon and set aside.

3. In a separate bowl stir together the mashed bananas, apple cider vinegar, melted coconut oil, eggs, maple syrup, and vanilla extract until well combined.

Pour the wet mixture into the dry and stir until well combined. Divide the batter evenly between the 12 muffin cups and bake at 350 F for 33 minutes (until golden). Turn the oven down to 300 F and bake for another 10 minutes until the cake tester comes out clean.

Let the muffins cool in the pan. To pop them out of the muffin tin, run a small knife around the edge of each muffin (a small butter knife works great for this) and they should come right out.

banana bread muffins 3

I wish you many happy breakfasts (and memories) with these wonderful muffins.


How To Get A Pan Super Clean

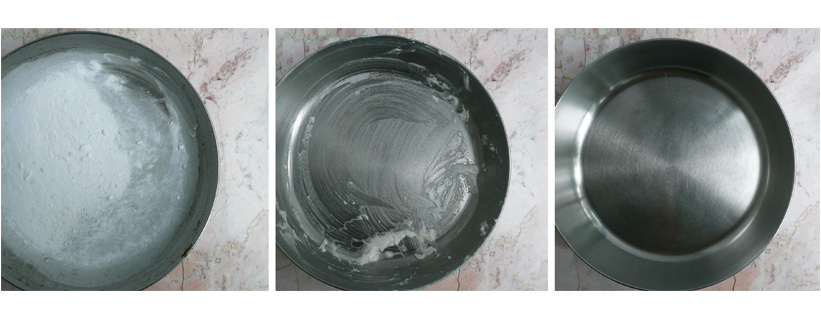
Baking soda pan 1

Baking soda and vinegar can be your best friends in the kitchen. They help muffins to rise, can make a sink squeaky clean, or help you scrub out a pan without damaging the finish.

Here’s how I like to clean my pots and pans (if they need a little more help to get clean than the dishwasher can handle by itself).

(This is a pan that I used to sauté some baby spinach with garlic and olive oil.)

Start by sprinkling a generous amount of baking soda into your pan to absorb any leftover oil.

baking soda pan 2

Add a splash of plain white vinegar, and use a sponge to give the pan a good scrub.

baking soda pan 3

Rinse the pan out, then wash with soap and water as usual.

Ta da! A super clean pan, ready to make your next delicious dish.

Classic Homemade Deviled Eggs – Paleo

easter egg 2

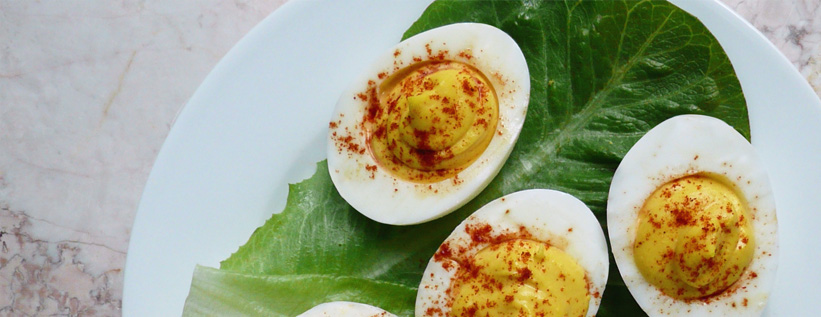
Like many people, I love a good deviled egg. There is something about these little bites of heaven that is both kind of fancy, but very comforting at the same time.

They take a little time and care, but they are everybody’s favorite thing to eat at a party.

You can top them with just about anything from chives to smoked salmon, but I like paprika on my deviled eggs because it gives a little color and flare, with just a hint of spice.

Deviled eggs are best when they are made ahead of time so that they get a chance to get nice and cold in the fridge. You can store them in an airtight container and snack them if you get hungry, or make a big batch of them and bring them to an Easter party this weekend.

easter egg 3

Classic Homemade Deviled Eggs

Makes 4 deviled eggs (but you can easily scale this recipe up)

Ingredients

2 eggs

2 tbsp of mayo (I used an avocado oil mayo, but feel free to use your favorite mayo)

1/2 tsp yellow mustard

3/4 tsp water

Sprinkle of paprika for garnish


Instructions

1. Place your eggs in a pot and cover with about 3/4 – 1 inch of room temperature water. Cover and bring the pot to a boil over medium high heat. Take the pan off the heat, and set aside (keeping the lid on the pot) and set a timer for 12 minutes.

2. After 12 minutes, take a slotted spoon and transfer the eggs to a big bowl of ice water and let them sit for 20 minutes. Peel and slice the eggs in half. If the eggs still feel warm at this point, transfer them to an airtight container and refrigerate until completely cool.

If the egg yolks are too warm when you mix them with the mayo, the filling for the deviled eggs will split, so you want the eggs to be nice and cold before you move on to the next step.

3. You can mash up the filling for the deviled eggs in a bowl with a fork, but the I find that the way to get the smoothest texture is to use a food processor. Add the cooked egg yolks, mayo, mustard and water to a food processor and blend until smooth (or mash together in a bowl with a fork, it will taste just as good).

If the food processor overmixes the filling and you see that the filling has separated, that’s ok. It’s an easy fix.

Add a few drops of water to a bowl with about about 1/4 – 1/2 tsp of the deviled egg filing. Mix together until smooth and it should become creamy and emulsified again. Keep whisking in little bit of the separated filling mixture into the emulsified filling (adding the occasional little bit of water if needed to get the mixture to become smooth again) until all the separated mixture has been whisked into the smooth mixture.

Don’t be afraid to adjust the taste of the filling to your liking. If you like a more spicy deviled egg, add a little more mustard (or use dijon mustard instead of yellow mustard if you want to live on the edge). If you like creamier and milder flavored deviled egg, add a little more mayo. It’s completely up to you, so make the deviled egg that you want to eat.

4. Spoon the filling into a ziploc bag and cut off a bit of one corner of the bag. Pipe the filling into the cooked egg whites and then sprinkle each deviled egg with a bit of paprika.

You can also skip piping the mixture and just spoon it into the cooked egg whites instead to give the deviled eggs a more friendly and comfortable kind of charm.

eggs easter

However you make them, I’m sure that they will taste AMAZING.

Happy Easter!

mint ice cream

Mint Chocolate Ice Cream – Dairy Free, Paleo, Vegan, Refined Sugar Free

mint ice cream

When I first realized that St. Patrick’s Day was coming up, I was at a bit of a loss as to what to make to celebrate.

So I googled “Traditional Irish Food” and pictures of things like shepherd’s pie, Irish stew, and colcannon popped up, along with literally a picture of a potato. That’s right, a plain ol’ uncooked potato.

After I finished laughing for a good solid minute (that lone potato really cracked me up), I decided to go check out what was in the fridge and see if I could come up with a recipe from the ingredients that I already had. After a quick glance at the bananas on the counter, I opened the fridge to find that I still had a big box of baby spinach. After a little tinkering, I came up with a recipe for this gorgeous ice cream.

mint ice cream 4

Ireland is the Emerald Isle after all, and this recipe borrows just a bit of that lush green color just in time for St. Patrick’s Day.

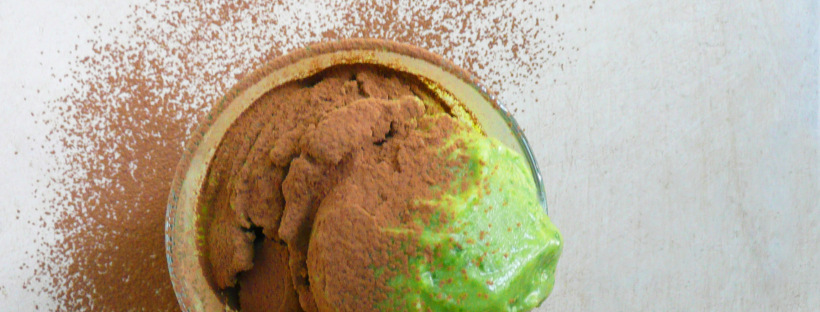
This amazing mint chocolate ice cream is rich and creamy, and you can’t taste the baby spinach at all, but it gives the ice cream it’s lovely bright green color without any food coloring. Little flecks of dark green dance across every beautiful spoonful, making every bite a little more festive, a little more special.

Sprinkle over a little cocoa powder before just serving and every delicious bite will taste just like a Thin Mint cookie, but in ice cream form (which is even better).

mint ice cream 2

That little bit of cocoa gives a little bit of bitterness which goes incredibly well with the brightness of the mint and allows the flavor of the ice cream to really sing.

This recipe is also a great way to use up extra baby spinach and overripe bananas. The avocado oil seems like a funny addition, but it adds a real creaminess and makes it taste more like traditional mint ice cream.

Mint Chocolate Ice Cream

Makes a generous serving for 1 (about 3 scoops)

Ingredients

2 bananas

1/2 cup packed baby spinach leaves

5 1/2 tsp – 6 1/4 tsp maple syrup

5 tsp avocado oil (or any neutral flavored oil)

1/8 cup water

1/8 tsp peppermint extract (or more to taste)

the tiniest sprinkle of sea salt imaginable (optional)

A little cocoa powder to sprinkle over the ice cream before serving

Instructions

1. Peel and slice the bananas into 1/2 inch slices. Put a piece of plastic wrap over a plate and arrange the banana slices in a single layer over the plastic wrapped plate. Cover with another layer of plastic wrap and freeze until solid.

2. Allow the bananas to defrost for 5-8 minutes until just thawed. Add the bananas, baby spinach, maple syrup, avocado oil, water, and peppermint extract to a food processor.

Blend until smooth. Taste and add in the tiniest sprinkle of sea salt if desired, and at this point you can add more mint flavoring if you like (add a drop at a time as this stuff is strong).

3. Once you’re happy with the flavor of the ice cream, scoop the ice cream into a dish and sprinkle with cocoa powder. Serve.

Notes – The bananas that I used were medium sized and they were ripe but were only lightly speckled brown, so if the bananas that you use are very brown and sweet, then you can probably decrease the amount of maple syrup.

The measurements that I ended up using in my own batch were 6 1/4 tsp maple syrup, and 1/8 tsp + 3 drops of peppermint extract (as I like a strong minty flavor in this ice cream).

You can also make the ice cream ahead of time and put it into something like a plastic snapware container and stash it in the freezer. This works especially well if you want to be able to scoop it into pretty scoops of ice cream for a nice presentation.

mint ice cream 5

So much minty chocolate goodness in one bite…

baby spinach heart copy

Happy St. Patrick’s Day!