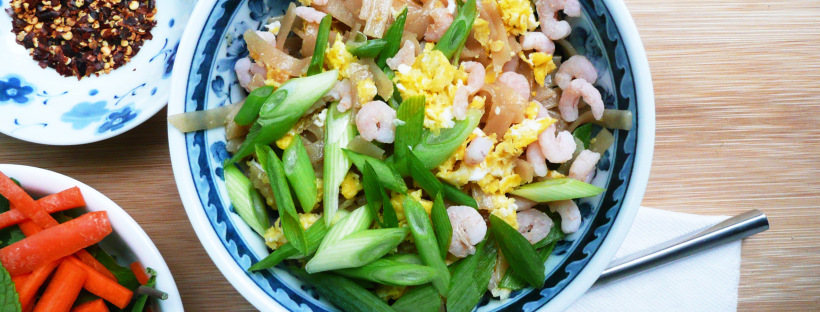
Shrimp Pad Thai

Weeknight Shrimp Pad Thai – Easy and Quick Recipe – Refined Sugar Free

P1080345

Pad Thai is the kind of dish that you love to eat, but are not quite sure how to make yourself.

At least that’s what I thought until I found a really easy recipe for pad thai on Goop.

What I really loved about the recipe from Night + Market on Goop was how simple the recipe was. I love pad thai, but most of the recipes that I found online had a lot of specialty ingredients that I would have to go a little out of the way to find.

I never attempted to make it myself before, but that recipe looked so easy, and with a few swaps, I knew that I could make a pad thai that would work with my dietary restrictions.

P1080307-2

This pad thai is made from ingredients that you can find at your local grocery store, and can be made in about half an hour. Perfect for a weeknight dinner.

Also great if you’re craving pad thai, but don’t live anywhere close to a Thai restaurant…

I used wild caught pink shrimp from Oregon (which I was able to find at my local supermarket in the display case at the seafood section, but I’ve also seen it sold at Costco as well). I only buy this kind of shrimp these days because it’s sustainably harvested, and also because it doesn’t contain any preservatives or ingredients that many other frozen shrimp are processed with.

The working conditions for people who catch, farm, and process shrimp around the world can also be very harsh and inhumane, so by purchasing domestically caught shrimp, I hope that I’m supporting more ethical working conditions for people who work in the shrimping industry.

You can find more information about Oregon Pink Shrimp here. This isn’t an affiliate link, just more info in case you’re curious about how the shrimp are caught.

P1080304

This type of shrimp is pretty inexpensive, at about $8 – $9 per lb, and it’s also just as tasty as the larger shrimp which makes it a good buy in my book. The amount of pink shrimp in this dish cost about $1, so while this pad thai feels very luxurious, it’s actually really budget friendly.

For more information on what to look for when buying shrimp, you can check out this article here.

About the fish sauce, I use the Red Boat brand fish sauce, because it’s only made from anchovies and salt (and therefore paleo, and refined sugar free). You can find it online, but I managed to find a bottle of the 500 ml (17 oz.) size for about $7 at my local Asian market, so it’s worth checking out your local Asian market if you have one nearby to see if they have it cheaper than online.

The noodles that I used were Fettuccini Style / Pad Thai noodles from Tinkyada which I found at my local grocery store. They weren’t organic, (but hey, it happens, you do the best you can). They were also on sale, which was definitely a plus, and the noodles worked great for this recipe.

brown rice noodles.jpg

There is a decent amount of maple syrup in this recipe, so if you’re watching your sugar intake, this may not be a meal that you eat every night, but it is certainly a really amazing and tasty dinner to have as a treat every once in a while.

If you’re planning on eating a few sides along with this (like a salad, fruit, etc.) this recipe makes enough for 2 smaller servings, but if you’re just eating it by itself, then it’s really just enough for one person, especially if you’re really hungry.

I hope that you give the recipe a try! It’s so good, and you’ll be super proud that you made a dish that you once thought that you could only enjoy in restaurants.


P1080350

Weeknight Shrimp Pad Thai

Adapted from this recipe.

Makes 2 servings, or 1 larger serving for a very hungry person.


Ingredients

4-5 oz of dried brown rice noodles *

4 tbsp of maple syrup

2 tbsp of fish sauce

2 tbsp of apple cider vinegar

1/3 cup of frozen pink shrimp

1-2 eggs (depending on how hungry you are)

2 green onions, thinly sliced


1 lime, cut into wedges for serving


* Note – If you hold the noodles between your thumb and forefinger, the circle that 4-5 oz. of noodles should make will be about the size of a quarter.

If you can get your hands on some bean sprouts, then definitely add those in too, as they add a nice crunch to the dish. I just couldn’t find any at my local grocery store, but the dish was still incredibly tasty.


Instructions

1. Make a skillet non-stick, and scramble your eggs. Tip the cooked eggs onto a plate and set aside.

2. Put the shrimp into a strainer and rinse under cool water. Place the shrimp into a medium size saucepan and cover them with about an inch of water. Bring the water to a boil and let the shrimp cook for a minute or two before draining. Set the shrimp aside.

The shrimp is already cooked, I just do this because it brings the shrimp up to temperature, but also kills off any potential pathogens that it may have picked up while it was sitting in the display case with raw fish.

3. Fill the medium saucepan with water and then cook your noodles. The directions for this package of noodles said to cook them for 10 -11 minutes, but I only cooked them for 6-7 minutes. You want to undercook your noodles a bit, as you’re going to finish cooking the noodles in the pad thai sauce. Drain the noodles and set aside.

4. Stir together the apple cider vinegar, fish sauce, and maple syrup. Add the sauce to the skillet along with the cooked noodles and cook over medium heat, stirring frequently until the noodles have absorbed all the sauce.

5. Add in the green onions, cooked eggs, and shrimp and stir them through the noodles, and continue to cook them for another 30 seconds or so until the eggs and shrimp are warmed through.

6. Spoon the noodles into a bowl (or two bowls) and serve with lime wedges, and a little bowl of red pepper flakes on the side.


P1080354

(I ate half of the pad thai before I realized that I had forgotten to photograph the lime wedges as well… Whoops. It was so good…)

spring rolls and peanut sauce

Vegan Thai Peanut Sauce and Veggie Packed Spring Rolls – Vegan, Gluten Free, Dairy Free, Refined Sugar Free, Peanut Satay Sauce

P1080067-2

When I was in high school, our “wild night out” on the weekends (more often during the summer) was going bowling, and then going to eat shrimp spring rolls at the Thai restaurant that my friend’s family owned.

The spring rolls were actually a Vietnamese dish, but I didn’t know that at the time. All I knew was that these spring rolls were amazing! They were one of the best things that I’d ever eaten, and we always ate them with the Thai peanut satay sauce.

When I moved away, the shrimp spring rolls and peanut sauce was the dish that I most associated with that time in my life.

I absolutely loved eating those spring rolls, and I could never find a restaurant that made them the same way. I wanted to make them myself, but the most difficult part of recreating that dish was trying to get the peanut sauce right.

I never did get the recipe for that peanut sauce. I managed to recreate the sauce a few years later through trial and error, but it did have a lot white sugar in it, so I wanted to create a version that was refined sugar free.

And this version is vegan to boot.

P1080074-2

It tastes very similar to that peanut sauce that I first had all those years ago, sweet and mildly spicy, rich with the flavors of ginger and chili, with just a hint of salt to round out the flavor. The extra salt replaces the savoriness of the fish sauce, and the sauce is so good that you won’t miss the fish sauce.

This peanut sauce is also easier to make than the traditional version (this one you don’t have to cook, just stir it all together), but still tastes incredibly similar.

You can make this peanut sauce in advance, and it will thicken and become creamier in the fridge as it chills.

I usually make extra sauce, as you can dip vegetables in it, or spread it over noodles, and I usually eat more than one serving of spring rolls at a time, so having extra sauce on hand is great.

Vegan Thai Peanut Sauce

Makes ¼ cup of peanut sauce (1 serving)

Ingredients

3 tbsp. + 1 tsp unsweetened natural peanut butter

1 level tsp of red curry paste (most supermarkets carry it these days, I used the Thai Kitchen Brand)

3 tbsp maple syrup

4 tbsp hot water

¼ tsp – ½ tsp sea salt (to taste)


¼ tsp. crushed dried mint* (optional)

1/8 tsp ground coriander seed* (optional)


*If you don’t have a few leaves of fresh mint and cilantro to put into your spring rolls, you can add these spices to the peanut sauce to give it a similar herby brightness.


Instructions

Ideally, your peanut butter would be room temperature, but if it’s cold from the fridge, that’s ok too. It will just take a little more mixing to get everything to combine.

Stir together the peanut butter, curry paste, maple syrup and optional spices until smooth. Add in the 4 tbsp of hot water, and still until well combined. Add salt to taste (I added ½ level tsp of sea salt).


P1080069-2

Veggie Packed Spring Rolls

For the spring rolls, I wanted to make a more colorful version, because it’s January, and spring rolls are a good way to eat lots of vegetables without having to think too hard about it. You can fill them with whatever you like really, that peanut sauce tastes amazing on pretty much everything.

I’d count on making about 4-5 spring rolls per person if you’re want to make them a main course, and 2-3 spring rolls per person if you want to make them as an appetizer.

You can cut them in half on an angle if you want to show off the colorful vegetables inside, or just leave them whole (which does make them a little easier to dip into the sauce, or you can spoon the sauce over the spring rolls instead).

I used Three Ladies Brand of rice paper wrapper in the 25 cm size (which is non-GMO and gluten free), but feel free to use your favorite brand of rice paper wrapper.

I would make the spring rolls right before you plan to eat them. They texture of rice paper wrapper changes after it’s been refrigerated, so it’s better to make them fresh. You can also pre-cut your vegetables in advance and assemble them right before serving to save time.


P1080070-2


Ingredients

(For each spring roll)

1 rice paper wrapper

¼ cup lightly packed baby spinach leaves

4-5 slices bell peppers

1-2 pieces of roasted sweet potato (cut into ½ inch thick strips)


2-3 mint leaves (if you have them)

3-4 cilantro leaves (if you have them)


To make the spring rolls, dip one rice paper wrapper into warm water for about 20-30 seconds. It should just begin to feel like silk between your fingertips. Spread the rice paper onto a plate, place the mint and cilantro leaves on first, followed by the baby spinach, then the bell peppers, and roasted sweet potato.

Wrap each roll like a burrito, so the sides get folded in first, then the fold the edge closest to you over the vegetables, and roll until the spring roll is closed, and then set the spring roll aside onto another plate, and start the next one.

Here’s a good visual lesson on how to do it.

https://www.youtube.com/watch?v=IfI1wMeDXhg


Before I moved away, I did have the foresight to buy some spring rolls from my friend’s restaurant, and take one home. Here’s what was in it:
1 1/2 teaspoons of bean sprouts

1 Sprig of Cilantro

2 one inch long pieces of mint leaves

3 pieces of Halved Shrimp (shrimp cut in half length ways)

3 teaspoons of rice noodles (possibly cooked in chicken broth, as they were light brown in color, I seem to remember my friend mentioning that they may have mixed the noodles with a bit of oyster sauce).

6 teaspoons of shredded romaine lettuce

1/2 teaspoons shredded carrots


My friend’s family has since sold the restaurant, and I make simpler version of these spring rolls now at home (which I will post on the blog another day), but I thought that I’d include the recipe just in case you were curious.

Happy Eating!

Instant Homemade Vegetable Stock

Instant Homemade Vegetable Stock Mix – Vegan, Soy-free, Gluten-Free

P1080022-2

Vegetable stock is easy to make, but can be a little bit of hassle, and takes up a lot of space in the freezer. Store bought veggie stock can be expensive, and it can have a lot of added ingredients that leave you wondering “What is organic caramel coloring?” and “Why does it need to be in vegetable stock?” I find myself asking the same questions when I read the back of soup bouillon labels as well.

If you too have these questions (and are wondering if there is an easier way to make vegetable stock with less additives) this might be the answer that you’ve been looking for.

This is a super simple and easy recipe to always have vegetable stock on hand. This recipe is soy free, thrifty and easy to customize.

We’re going to basically make a spice mix that contains a lot of flavors that you would normally find in vegetable stock. You can almost think of it as a tea. Admittedly, it takes 10 minutes to steep (so not quite “instant”) but it’s still pretty quick.

You can also make a large batch of this veggie stock mix and put it into a little jar to use as needed.

If you don’t like the little bits of dried spices in your soup, you can strain the broth through a coffee filter, or place the spices in some layers of cheese cloth, tie it up with some kitchen twine and place it into your soup pot (basically like a tea bag) to fish out later once the flavors of the broth have infused.

I hope that this recipe helps you make lots of wonderful soups in the future. I plan on making a noodle soup with this pretty soon. Perfect for the cold weather.


Makes a scant 2 tbsp of veggie stock mix = 4 cups of vegetable stock

Ingredients

1 tsp granulated onion

3/4 tsp + 1/8 tsp celery salt

1/4 tsp + 1/8 tsp of granulated garlic

1/4 tsp dried rubbed sage

1/4 tsp dried parsley

1/4 – 1/2 tsp sea salt

1/8 tsp black pepper


Instructions

Stir all the spices together. Add the mixture to 4 cups of boiling water and allow to steep for 5-10 minutes. You can strain the mixture at this point or leave the spices in the stock depending on your preference.

Use in your favorite soup recipes, or add some noodles, and some veggies for a quick and filling lunch or dinner.

Enjoy!

Maple Vanilla Icing

Maple Vanilla Icing – Refined Sugar Free, Dairy Free, Vegan

P1080184

No gingerbread cookies or sugar cookies would be complete without icing! This is a super easy and allergy friendly icing for gingerbread cookies, and sugar cookies. Perfect for decorating cookies around the holidays!

Maple Vanilla Icing

Makes about 1/4 cup

Ingredients

3 tbsp + 2 tsp maple syrup

3 tbsp sweet rice flour (I used the Koda Farms Mochiko Sweet Rice Flour)

3 tbsp + ½ tsp melted refined coconut oil (I used one from Trader Joes)

¼ tsp + 1/8 tsp vanilla extract

tiny tiny pinch of salt

Instructions

1. Stir together the maple syrup, sweet rice flour, and vanilla extract until smooth.

2. Add in the melted refined coconut oil and stir until well combined.

3. Allow the icing to sit for a minute or two until the coconut oil cools a little and it’s easier to spread or pipe onto cookies.

To get a glossy finish on the cookies, ice the cookies while the icing is still warm, and use the back of a teaspoon smooth the icing to the edges of the cookie. If the icing firms up too much to frost with, just put the icing over a double boiler to gently melt the coconut oil and it will smooth right out again.

You can also use this icing to pipe with. I just scooped the icing in to a ziploc bag, cut off a tiny bit of the corner of the bag and used it to pipe the frosting onto the cookies.

If you want to pipe with the frosting, add in about 1/4 – 1/2 tsp more of the sweet rice flour to the frosting (to get a firmer frosting) and pipe the icing while the icing is still a warm.

If the icing gets firm to pipe with, scoop it out of the bag, heat it in a double boiler again, allow to cool for a minute and then scoop the icing back in to the bag, and pipe the icing as usual.

If it does look a little rough in places, you can dip your finger in some warm water and smooth down the rough edges, or use a wet toothpick for ever more precision in cleaning up the edges of your icing.


Maple Vanilla Sugar Cookies

Maple Vanilla Sugar Cookies – Gluten Free, Refined Sugar Free, Dairy Free, Egg Free, Vegan

P1080165

These are great cookies, and super simple to make. They are sort of a cross between a traditional sugar cookie, and a fortune cookie. They have a wonderful crunchiness and the maple gives them a lovely sweetness.

Another good thing about these cookies is that they don’t contain any baking soda or baking powder, so the shape of the cookies don’t spread out or distort at all during baking.

The shape that you put the cookies into the oven is the same shape that they come out of the oven, perfect for holiday cookies.

You make them exactly the same way as the gingerbread cookies (hence the same instructions are repeated here) and the maple vanilla flavor really shines through in these cookies.

They aren’t too sweet, and I love them most when they are completely frosted with the maple vanilla icing. If you also love sweeter cookies, you can double the icing recipe. They frosting really gives the cookies a very polished look and makes them taste even more amazing.


Maple Vanilla Sugar Cookies

Makes 10 – 12 cookies


Ingredients


2 tbsp water

½ level tsp psyllium husk powder *


tiny pinch of sea salt

1 ¼ cup + 2 tbsp oat flour **


¼ cup + 1 tsp maple syrup

½ tsp + 1/8 tsp vanilla extract


2 tbsp + 2 tsp melted refined coconut oil ***


Notes – *Psyllium husk powder gels like nothing else, and there’s no great substitute for it. I found mine in the bulk spice section of the local Fred Meyer, but Whole Foods, Trader Joes have been known to carry it as well. If it’s not in the natural foods, or bulk spice section, check the dietary supplement/ digestive health (where the Metamucil is) section of the store or pharmacy as it’s sometimes sold there as well.

** I grind oats into oat flour using a blender. Don’t grind the oats in a food processor because the flour won’t be fine enough.

Any extra oat flour I don’t use in the recipe goes into an airtight container and I use it for another recipe.

If you’re making the cookies for someone who has celiac disease, use certified gluten free oats, as the oats from the bulk bins can sometimes be processed on the same equipment as wheat.

*** I used the refined coconut oil from Trader Joes, which is filtered and not bleached. It’s the fat of coconut oil, without the flavor which works great for these cookies. You can use regular coconut oil for this recipe, but it probably will give the cookies a mild coconut flavor. Because I used the refined coconut oil, these cookies didn’t taste of coconut at all.


Instructions

1. In a small bowl stir together the water and psyllium husk, try to stir out all the lumps. Set aside for a few minutes and let it gel.

2. In a medium size bowl, sift the oat flour, and salt together.

3. Add the maple syrup, and vanilla to the oat flour mixture, and stir until well combined. Add in the gelled psylium husk and stir until you no longer see any bits of the gel.

4. Add the melted refined coconut oil to the mixture and stir until well combined. It will look very sticky, but don’t worry. There’s no need to add any additional flour, the coconut oil will firm up in the fridge and the dough will sort itself out.

5. Let the dough sit in the bowl for 2-3 minutes and it should be firm enough to scoop onto some plastic wrap. Wrap it up and refrigerate for at least 3 hours.

sugar cookie


6. Preheat your oven to 325 F. Cut the top and sides off of a gallon size Ziploc bag and open it and lay it flat to form a long rectangle.

Dip a paper towel in a little bit of neutral flavored oil (like avocado oil or vegetable oil) and oil the inside of the plastic. Don’t use the coconut oil for this, it solidifies too quickly and the dough ends up sticking to it.

7. Take the dough out of the fridge and cut it in half. Wrap the half you’re not working with in plastic wrap and set to the side.

If the dough breaks when you try to roll it out, you can knead it with your hands for a little bit so that the coconut oil in the dough melts a little from the heat in your hands. It should soften up and become easier to work with after this.

If the dough is too sticky to work with, you can add about 1 tbsp of oat flour, and knead it into the dough to combine, or put it back into the fridge to firm up for a few minutes.

P1080174


Roll out your dough between the layers of oiled plastic to 1/4 of an inch thick, re-oiling the plastic each time your re-roll out the dough.

Cut out the shapes with the cookie cutters. Use something like the flat edge of the back of a butter knife (an offset spatula would be perfect for this) and run it under the cookies to get them to release from the plastic.

If there are any little bits of the dough stuck to the plastic after you peel your cookies off, make a little ball out of your scrap dough, and drag it over the plastic and it should clean it right off.

If your finding it difficult to remove the cookies from the plastic (especially for more complex shapes like snowflakes), cut the cookie shapes out using the cookie cutters, and remove the excess cookie dough from around your cookies. Then lay the cookies that are stuck on the plastic onto a plate and stick them in the freezer for 10-15 minutes. After that, the cookies should be firm enough to peel off the plastic and set them onto the baking sheet.

I usually use my finger to press the sides of the cookies smooth, just to clean up the edges.

Place the cookies onto a silpat or parchment lined baking sheet and bake at 325 for 34- 38 minutes (I baked them for 36 minutes) until just lightly golden brown about the edges and firm to the touch.

Allow the cookies to cool before icing.

P1080152 copy

Enjoy!

Happy Holidays!

Gingerbread Cookies

Gingerbread Cookies – Gluten Free, Dairy Free, Refined Sugar Free, Nut Free, Vegan

P1080121

It just doesn’t really feel like Christmas without gingerbread cookies.

These cookies are free from nuts, gluten, refined sugar, dairy, egg free and completely vegan.

They are also delicious.

They are actually the best gingerbread cookies I’ve ever had. Who knew you could make amazing gingerbread cookies that work with so many dietary restrictions?

These cookies are crunchy, and not too sweet. They have a lovely warm flavor to them, and are perfectly spiced (without being too spicy) so they are perfect for kids as well.

The black pepper is optional, but I do think that it gives the cookies a wonderful complex rich flavor.

Another good thing about these cookies is that they don’t contain any baking soda or baking powder, so the shape of the cookies don’t spread out or distort at all during baking.

The shape that you put the cookies into the oven is the same shape that they come out of the oven, perfect for holiday cookies.

If you like your cookies on the sweeter side, double the recipe for the Maple Vanilla Icing and give those cookies a good coating of icing. So good…

P1080137


Gingerbread Cookies

Makes 10 – 12 cookies


Ingredients


2 tbsp water

½ level tsp psyllium husk powder *


1 tsp vanilla

3 tbsp + 1 tsp maple syrup

1 tbsp + ½ tsp organic unsulfered blackstrap molasses


1/8 level tsp ground black pepper (optional)

¾ level tsp ground ginger

1 ¼ level tsp + 1/8 level tsp ground cinnamon

1 ¼ cup oat flour + 3 tbsp oat flour **

tiny pinch of sea salt


3 tbsp + 1 tsp melted refined coconut oil ***


Notes – *Psyllium husk powder gels like nothing else, and there’s no great substitute for it. I found mine in the bulk spice section of the local Fred Meyer, but Whole Foods, Trader Joes have been known to carry it as well. If it’s not in the natural foods, or bulk spice section, check the dietary supplement/ digestive health (where the Metamucil is) section of the store or pharmacy as it’s sometimes sold there as well.

** I grind oats into oat flour using a blender. Don’t grind the oats in a food processor because the flour won’t be fine enough.

Any extra oat flour I don’t use in the recipe goes into an airtight container and I use it for another recipe.

If you’re making the cookies for someone who has celiac disease, use certified gluten free oats, as the oats from the bulk bins can sometimes be processed on the same equipment as wheat.

*** I used the refined coconut oil from Trader Joes, which is filtered and not bleached. It’s the fat of coconut oil, without the flavor which works great for these cookies. You can use regular coconut oil for this recipe, but it probably will give the cookies a mild coconut flavor. Because I used the refined coconut oil, these cookies didn’t taste of coconut at all.


Instructions

1. In a small bowl stir together the water and psyllium husk, try to stir out all the lumps. Set aside for a few minutes and let it gel.

2. In a medium size bowl, sift the oat flour, spices and salt together.

3. Add the maple syrup, molasses and vanilla to the oat flour mixture, and stir until well combined. Add in the gelled psylium husk and stir until you no longer see any bits of the gel.

4. Add the melted refined coconut oil to the mixture and stir until well combined. It will look very sticky, but don’t worry. There’s no need to add any additional flour, the coconut oil will firm up in the fridge and the dough will sort itself out.

5. Let the dough sit in the bowl for 2-3 minutes and it should be firm enough to scoop onto some plastic wrap. Wrap it up and refrigerate for at least 3 hours.

P1080096

6. Preheat your oven to 325 F. Cut the top and sides off of a gallon size Ziploc bag and open it and lay it flat to form a long rectangle.

Dip a paper towel in a little bit of neutral flavored oil (like avocado oil or vegetable oil) and oil the inside of the plastic. Don’t use the coconut oil for this, it solidifies too quickly and the dough ends up sticking to it.

7. Take the dough out of the fridge and cut it in half. Wrap the half you’re not working with in plastic wrap and set to the side.

If the dough breaks when you try to roll it out, you can knead it with your hands for a little bit so that the coconut oil in the dough melts a little from the heat in your hands. It should soften up and become easier to work with after this.

If the dough is too sticky to work with, you can add about 1 tbsp of oat flour, and knead it into the dough to combine, or put it back into the fridge to firm up for a few minutes.

P1080124

Roll out your dough between the layers of oiled plastic to 1/4 of an inch thick, re-oiling the plastic each time your re-roll out the dough.

Cut out the shapes with the cookie cutters. Use something like the flat edge of the back of a butter knife (an offset spatula would be perfect for this) and run it under the cookies to get them to release from the plastic.

If there are any little bits of the dough stuck to the plastic after you peel your cookies off, make a little ball out of your scrap dough, and drag it over the plastic and it should clean it right off.

If your finding it difficult to remove the cookies from the plastic (especially for more complex shapes like snowflakes), cut the cookie shapes out using the cookie cutters, and remove the excess cookie dough from around your cookies. Then lay the cookies that are stuck on the plastic onto a plate and stick them in the freezer for 10-15 minutes. After that, the cookies should be firm enough to peel off the plastic and set them onto the baking sheet.

I usually use my finger to press the sides of the cookies smooth, just to clean up the edges.

Place the cookies onto a silpat or parchment lined baking sheet and bake at 325 for 34- 38 minutes (I baked them for 36 minutes) until just slightly darkened about the edges and firm to the touch.

For small cookies (about 1-1.5 inches in size) bake for 22-24 minutes, until slightly darker around the edges.

Allow the cookies to cool before icing.

P1080131

Enjoy!

Happy Holidays!


Mini Chocolate Peppermint Pies – Vegan, Gluten Free, Dairy Free Tarts

P1070527

Before I cut out gluten, dairy, and refined sugar out of my diet, one of the things that I looked forward to every Christmas was the arrival of the Ghirardelli Chocolate Peppermint Bark Squares at the local grocery stores.

How I loved those little squares… so creamy, and rich, and wonderful. I loved opening each of those little brightly colored red and white wrappers.

I loved the little crunchy bits of that swirled in amongst the smooth bright flavor of the peppermint white chocolate. They were so festive, and eating each one felt like such a treat.


P1070601

This year, I decided that I would come up with a recipe to get that same sort of feeling of eating a chocolate peppermint treat at Christmastime, (but one that I could eat with my dietary restrictions) so that I wouldn’t feel like I was missing out on anything.

These little tarts are vegan, and nut (without the cashew cream) / soy / and gluten free, so they will work with a variety of food sensitivities and food allergies, and would be a good dessert to bring for any holiday party.

You can make this mixture ahead of time and spoon it into the tart shells right before serving. You can eat them as is, or top them with some cashew whipped cream, or a little star made from the scraps of your pie crust for a more festive look.

Any way that you eat them, I hope that you really enjoy them this holiday season!


P1070523


Makes 6 tarts

(Ingredient amounts for 12 tarts listed at the end of the post)


Ingredients

1/2 cup roasted sweet potato puree

5 tbsp maple syrup

4 tbsp unsweetened cocoa powder (I used the Ghirardelli’s brand one)

1 tsp strong coffee or espresso*

6 tbsp melted coconut oil **

1/8 tsp peppermint extract (I used the McCormick brand one) ***

tiny pinch of sea salt to taste


Instructions

1. Melt the coconut oil, and add it along with all the other ingredients into a food processor and process until smooth.

2. Taste the mixture, and if the peppermint flavor isn’t strong enough, add another drop of peppermint extract at a time to the mixture until you’re happy with the flavor.

Peppermint extract can be very strong, and there’s a very fine line between it being perfectly minty in flavor, and way too strong.

If you accidentally add too much extract, you can add in a little more of the other ingredients to balance the flavor out again. This recipe is pretty forgiving and can take a little tweaking if need be.

If your sweet potato puree was cold from the fridge before you blended the mixture together, the coconut oil may have set before it had a chance to incorporate with the rest of the ingredients. What you can do in this case is gently heat and stir the mixture over a double boiler until it’s glossy and smooth.

For serving, if you want the mixture to be sort of soft and pudding-like, you can gently heat the mixture up again using a double boiler, just until the coconut oil melts and the mixture turns glossy, and then spoon it into the tart shells. Coconut oil melts at 76 °F, so it won’t take long to heat up. For the pictures in this post, I heated the filling using this method before dolloping the filling into the shells, which gives the tarts a beautiful finish.

I prefer the texture when the filling has been refrigerated. It’s like a cross between a fudgy peppermint chocolate frosting and a chocolate mousse. Once you spoon it into the tart shells, you can give the filling a glossy finish (it won’t have the same “dollop” look, but will still look really nice) by dipping a teaspoon into hot water, and smoothing out the tops of the tarts before topping them with cashew whipped cream, a little pie crust star, or leaving them as they are.

3. Spoon the filling into the tart shells and serve immediately.


I used this recipe for the tart shells. For the stars, I used the scrap dough, cut them out using a small star shaped cookie cutter and baked them on a silpat at 375 for 10-15 minutes until golden brown around the edges.


* I add 1 tsp ground Italian Roast Coffee to a mug with 1/4 cup of hot water, allow it to cool, cover with plastic wrap and then refrigerate this overnight. This strong coffee is good to have on hand for this recipe, but also for adding a depth of flavor to other chocolate things like hot chocolate, brownies, and even chocolate frosting.

**I used regular coconut oil, and there is the faintest hint of coconut flavor in these tarts. If you that’s not really your thing, you can used refined coconut oil instead so that you don’t get that hint of coconut flavor in the tarts.

*** I would prefer to use an organic peppermint extract, but this is just the one that I had on hand, and the flavor is good.


P.S. I’ll let you in on a little secret – this recipe makes enough filling for about 7 1/2 tarts, but what that means is that you can fill the 6 tart shells, and save the extra filling as a treat to eat later after all the holiday parties. When you get home, you can look forward to having a quiet moment to yourself to sit in your jammies, and eat this and fall asleep watching Christmas specials on TV. No one will ever know…


For 12 tarts

1 cup roasted sweet potato puree

10 tbsp maple syrup

8 tbsp unsweetened cocoa powder (I used the Ghirardelli’s brand one)

2 tsp strong coffee or espresso

12 tbsp melted coconut oil

1/4 tsp peppermint extract (I used the McCormick brand one)

tiny pinch of sea salt to taste


stainless steel pan

How to Make a Stainless Steel Pan Non-stick (non-toxic)

stainless steel pan 1

(This is what the pan looks like before the coating of oil).

When I decided to stop using non-stick cookware, one of the hardest thing to get my head around was how I was going to be able to cook things like pancakes and sunny-side up eggs.

I googled “how to make a stainless steel pan non-stick” and wasn’t able to find an answer.

So after much trial and error, I finally figured it out. And it’s actually super simple to do.

By heating the oil in a pan this way, the oil binds to the surface of the steel (forming a polymer – whatever that means…), creating a temporary non-stick coating. I’ve used this method with olive oil, coconut oil, and avocado various times and all have worked great.

Instructions

1. Start with a cool stainless steel pan. Rub the bottom of the inside of the pan with probably about ½ tsp (maybe less) of olive oil with either your fingertips or a paper towel. You only need a thin layer, but want to coat the entire bottom of the pan so that there are no gaps in where you put the oil.

2. This can get a little smelly so, I’d turn on the cooking fan for this.

Put the pan onto a cold burner and turn the heat up to medium. Hover your hand a few inches above the pan. When the air over the pan feels about as warm as a warm bath you’d give a baby (so not too hot) then turn the burner off, and leave the pan to cool on the burner while you prep your veggies for your stir-fry, or your pancake batter.

3. Then just cook as usual.

The non-stick coating is temporary, but you should be able to get through cooking a batch of pancakes, or fry a few eggs on this surface just fine before you need to add a little more oil.

When you’re done cooking, you can scrub this non-stick surface off with some baking soda mixed into a paste with a little dish soap and a scrubby sponge. When I need a non-stick surface next time, I just repeat the process.

stainless steel pan 2

(This is what the pan looks like after it’s been heated with the oil).

For me, I cook on an electric stove, and I’ve done this enough times now that I know that if I start with a cold pan, it takes 5 minutes to heat to the baby bath level of warmth. Now I can just rub the pan’s surface in oil, put it onto the burner, turn on the stove, turn on the fan, and set a timer for 5 minutes.

You may have to adjust the timer for your stove, as you may find that your stove heats up more quickly or more slowly than mine does.

I always stay in the kitchen as I do this, just in case the pan starts to smoke.

If you see the pan start to smoke, pull the pan off the hot burner right away (also turn off the burner) and put the pan on one of the cold burners to cool. Once cool, it should still have created a non-stick surface and you can just cook on this pan as usual.

If you fry an egg sunny side upon this surface, I’d cover the pan with a plate or a lid while the egg is cooking. The egg white cooks through more evenly with a lid on the pan.

What would you cook using this trick? Let me know in the comments below.

Happy Cooking!


baby spinach

How to Keep Baby Spinach Fresh for Longer

baby spinach

These days, most baby greens come prepackaged and washed in those plastic clam shells at the supermarket. They are super convenient, but the greens seem to always spoil quickly. As it turns out there is a very easy fix for this.

When you open the package, take 2-3 paper towels, fold them in half, and lay them on top of your greens before you close the lid and put them into the fridge. The paper towels absorb the excess moisture that can cause your greens to wilt more quickly. Every few days, check to see of the paper towels are damp. If they are, just replace them with new paper towels, and compost the used ones.

These baby spinach leaves really have been in my fridge for 2 weeks (that’s why the box is so empty, I’ve eaten most of it). This trick works great!

Different greens will have different shelf lives, even if you use this trick. Spring mix doesn’t last as long as the baby spinach does, but this will still work for that as well. This works very well for romaine lettuce, as it’s a sturdier lettuce.

I think that I’m going to post a new recipe every Saturday from now on. Occasionally I may write additional posts other days of the week. I have a number of tips for how to keep food fresh, and how to freeze foods that can spoil quickly, and I’m really excited to share those with you as well.

Please feel free to comment below, and let me know if this trick works for your lettuce too! I think that this must have saved me a small fortune (in baby greens) by now, and it feels great when you can make the most of the ingredients that you have.


pumpkin muffins

Pumpkin Bread Muffins – Gluten Free, Dairy Free

pumpkin muffin final

These little muffins are wonderfully spiced and perfect for when you’re craving pumpkin bread. They have a better texture the next day, so I usually bake them the night before, set them out on a plate on the counter and cover them with a paper towel. The next morning they have dried out a little, and the texture and flavor are even better than they are fresh out of the oven.

When you take them out of the oven, they will be nice and puffy, but the will flatten as they cool. Don’t worry about this, as they will still be delicious. They are wonderfully creamy in the middle and taste just like your favorite pumpkin bread.

You can either bake them as 6 full sized muffins, or as 9 snack sized (flatter) muffins. I normally prefer to bake them as 9 instead of 6 muffins, as it’s harder to wolf down 9 muffins in one sitting than 6 muffins, (trust me on this, I know). Either way, they taste amazing! I hope that you like them.

I’ve included the measurements for 12 muffins below, just in case you need them.

Pumpkin Bread Muffins
Makes 6 full sized muffins – or 9 snack sized ones.

Ingredients

¾ level tsp ground cinnamon

¼ level tsp + 1/8 level tsp ground ginger

1/8 level tsp ground cloves

1 cup oat flour (I just grind the oats in a blender until they become a fine flour)

¼ level tsp + 1/8 level tsp baking soda

1 small pinch of salt


¾ cup + 2 tbsp pumpkin puree (or sweet potato puree)

1 tbsp water

1 tbsp apple cider vinegar

4 ½ tbsp. melted coconut oil (or a neutral flavored oil)

¼ cup + 2 tbsp maple syrup

1 egg


Instructions

1. Preheat the oven to 350 degrees

2. Grease and flour the muffin pan using coconut oil (or neutral oil) and oat flour. Here’s my trick to doing this.

3. In a large bowl, sift the cinnamon, ginger, cloves, oat flour, baking soda and salt together. In a separate bowl mix the pumpkin puree, water, apple cider vinegar, oil, eggs and maple syrup.

4. Pour the wet ingredients into the dry, and stir until well combined.

For 6 muffins – divide the batter evenly between 6 muffin cups, and use the back of a spoon to smooth down the batter in each muffin cup so that the tops of the scoops of batter are flat.

Bake for 30 min at 350, then turn the oven down to 300 for another 10 minutes.

Let them cool in the pan. To remove them, run a butter knife around the edge of each muffin and pop them out and set them onto a plate.

For 9 flatter muffins – divide the batter equally between 9 muffin cups. Use the back of a spoon to smooth down the batter in each muffin cup so that the tops of the scoops of batter are flat.

Bake for 30 min at 350. Let them cool in the pan. To remove them, run a butter knife around the edge of each muffin and pop them out and set them onto a plate.


Note
– I made the little decorative leaves from the extra scrap dough from making the tart shells. I used a small paring knife to cut the shape of the leaves and the tines of a fork to make the little indentations. Bake the leaves at 375 for 10-15 minutes until golden brown around the edges.


For 12 muffins

1 ½ level tsp ground cinnamon

¾ level tsp ground ginger

¼ level tsp ground cloves

2 cups oat flour

¾ level tsp baking soda

2 small pinches of salt

1 ¾ cup pumpkin puree (or sweet potato puree)

2 tbsp water

2 tbsp apple cider vinegar

9 tbsp melted coconut oil (or a neutral flavored oil)

¾ cup maple syrup

2 eggs